Our company logo

State

Identifying Damaged Garage Door Opener Chain Components


Published: Apr 22, 2026

You’ve done everything right. You noticed your garage door opener chain was sagging, you looked up a guide, and you tightened it. For a few days, everything was perfect—the door ran smoothly and quietly. But now, that annoying sag is back, and maybe it’s brought some new grinding or popping sounds with it.

It’s a frustratingly common scenario. While many guides show you how to tighten a chain, they often miss a crucial point: sometimes, a loose chain isn’t the core problem, but a symptom of a much bigger issue. Repeatedly tightening a chain without addressing the root cause is like pumping air into a tire with a slow leak—it’s a temporary fix for a permanent problem.

Before you grab that wrench again, let's take a closer look. This guide is designed to help you become a chain drive detective. We’ll walk you through a visual inspection to determine if your opener components are healthy or if they’re too worn for a simple adjustment and need to be replaced.

Foundation: Understanding Your Chain Drive System


To diagnose a problem, you first need to know the players involved. Your chain drive opener is a straightforward system, but each part has a critical job. Think of it like a bicycle chain—if one component fails, the whole system struggles.
Annotated diagram of a garage door opener system showing the sprocket, chain, trolley, rail, and pulley.
Here are the key parts you’ll be looking at:

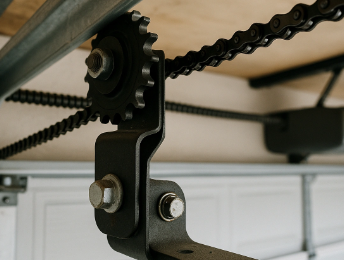
  • Motor Sprocket: The gear on top of the motor unit that pulls the chain.
  • Chain: The length of linked metal that connects the motor to the trolley.
  • Trolley: The carriage that moves along the rail, attached to both the chain and the garage door arm.
  • Master Link: A special two-piece link that connects the two ends of the chain into a loop.
  • Rail: The long metal track that the trolley and chain travel along.
  • Idler Pulley: The gear or pulley at the far end of the rail (opposite the motor) that the chain loops around.
Now that you know what you're looking at, let's start the inspection.
Annotated diagram of a garage door opener system showing the sprocket, chain, trolley, rail, and pulley.

The Visual Inspection Guide: What to Look For


For this part, you’ll want a step ladder and a good flashlight. Make sure to unplug your garage door opener for safety before you begin.

The Sprockets: The Hidden Cause of Chronic Sagging

The sprockets are the most overlooked but often most critical components in the system. When their teeth wear down, they can no longer grip the chain effectively. This is the primary reason a chain will repeatedly loosen or even skip, creating a loud popping or banging noise.
What to Look For:
  • Healthy Teeth: The teeth on a new sprocket are relatively flat or squared-off at the top.
  • Worn Teeth: Over time, the chain will wear the teeth into sharp, hooked points that look like shark fins. This is a definitive sign that the sprocket is failing and needs replacement. Chipped or broken teeth are also red flags.
Comparison of healthy vs. worn opener sprockets, showing flat teeth versus thin, hooked teeth.
Remember to check both the sprocket on the motor unit and the idler pulley at the end of the rail. If you see this "shark fin" wear on either one, the components must be replaced. Simply tightening the chain will not solve the problem.

The Chain Itself: More Than Just Tension

Next, inspect the chain. While proper tension is important, physical damage to the links themselves can cause operational issues and indicate that the chain has reached the end of its life. A common reason for a chain to fail is when it's forced to work against a door with other issues; for example, you might need to repair a sagging garage door to reduce strain on the opener itself.
What to Look For:

  • Healthy Links: Uniform, oval-shaped links that move freely.
  • Damaged Links: Look for signs of stretching, where some links appear longer or more open than others. Check for stiff, rusted, or kinked sections that don't move smoothly. If your garage door chain came off the sprocket, inspect it closely for twisted or bent links that may have occurred during the incident.

The Master Link and Trolley: The Connection Points

Finally, examine the hardware connecting everything. The master link joins the chain into a loop, and the trolley connects that loop to the door.
  • Master Link: Check the clip or pins holding the link together. Ensure they are secure and not cracked or bent.
  • Trolley: Look at where the chain connects to the trolley. Check for cracks in the metal or plastic, or any signs that the connection point has become oval-shaped from wear.
Comparison of healthy vs. worn opener sprockets, showing flat teeth versus thin, hooked teeth.

Mastery: The 'Adjust vs. Replace' Decision Tree


Flowchart guiding chain maintenance decisions from symptoms to adjust or replace actions.
Now that you’ve completed your inspection, you can make an informed decision. Instead of guessing, use this simple flowchart to determine your next move. This will help you confidently choose between a quick adjustment and a necessary parts replacement.

Flowchart guiding chain maintenance decisions from symptoms to adjust or replace actions.

Need more information?

What's Next? Your Action Plan


Based on your findings, here are your next steps:

  • If You Only Have a Loose Chain: If your sprockets and chain links look healthy, your problem is likely just a simple tension issue. You can proceed with a standard adjustment. For a detailed walkthrough, see our guide on achieving the proper garage door chain tension.
  • If You Found Worn or Damaged Parts: If you identified "shark fin" sprockets, stretched links, or other damage, a replacement is necessary. Important: It is highly recommended to replace the chain and both sprockets as a set. Putting a new chain on old, worn sprockets will cause the new chain to wear out extremely quickly.
  • When to Call a Professional: Replacing a chain and sprocket assembly is a more complex and potentially dangerous task than a simple adjustment. It involves disconnecting the door, managing spring tension, and ensuring correct alignment. For these kinds of extensive garage door repairs, calling a certified technician is the safest and most effective option.

Frequently Asked Questions (FAQ)


What are the first signs of a damaged garage door opener chain?

The most common initial signs are a sagging chain that doesn't stay tight and new noises. Listen for grinding, popping, or skipping sounds during operation, as these often point to worn sprocket teeth.

What kind of noise does a worn sprocket make?

A worn sprocket typically causes a loud "popping" or "skipping" sound as the chain fails to engage properly with the worn-out teeth and jumps from one tooth to the next.

Can I replace just the chain and not the sprockets?

While technically possible, it's not recommended. Worn sprockets will rapidly damage a new chain, and you'll likely be dealing with the same problem again in a few months. Always replace them as a set for a lasting repair.

How do I put the chain back on if it fell off?

If the chain has come off completely, it's often a sign of a major failure, like a broken master link or severely worn sprocket. While some guides explain how to get a garage door back on the chain, it's critical to first perform the visual inspection above to find out why it came off. Without fixing the root cause, it will just happen again.
By taking a few minutes to look beyond the sag, you can diagnose the real issue with your garage door opener. This empowers you to make the right call—saving you the headache of repeated, temporary fixes and ensuring your garage door operates safely and reliably for years to come.

You may also like


blog photo

Garage Door Opener Power Usage: Belt vs. Chain vs. Screw Drive

It’s a sound most of us hear every day: the familiar hum and clank of the garage door opener, a simple convenience we take for granted. But have you ever paused to think about what that convenience costs on your electricity bill? While it may not be the biggest energy user in your home, the choice you make when selecting an opener can have a surprising impact. We often focus on noise levels or price, but the mechanism whirring away above your car—whether it’s a chain, belt, or screw drive—has its own unique energy footprint. Understanding this difference is the key to making a smarter, more energy-conscious decision. Let’s pull back the curtain and explore how these everyday machines work and which one truly wins the power-consumption showdown.