Our company logo

State

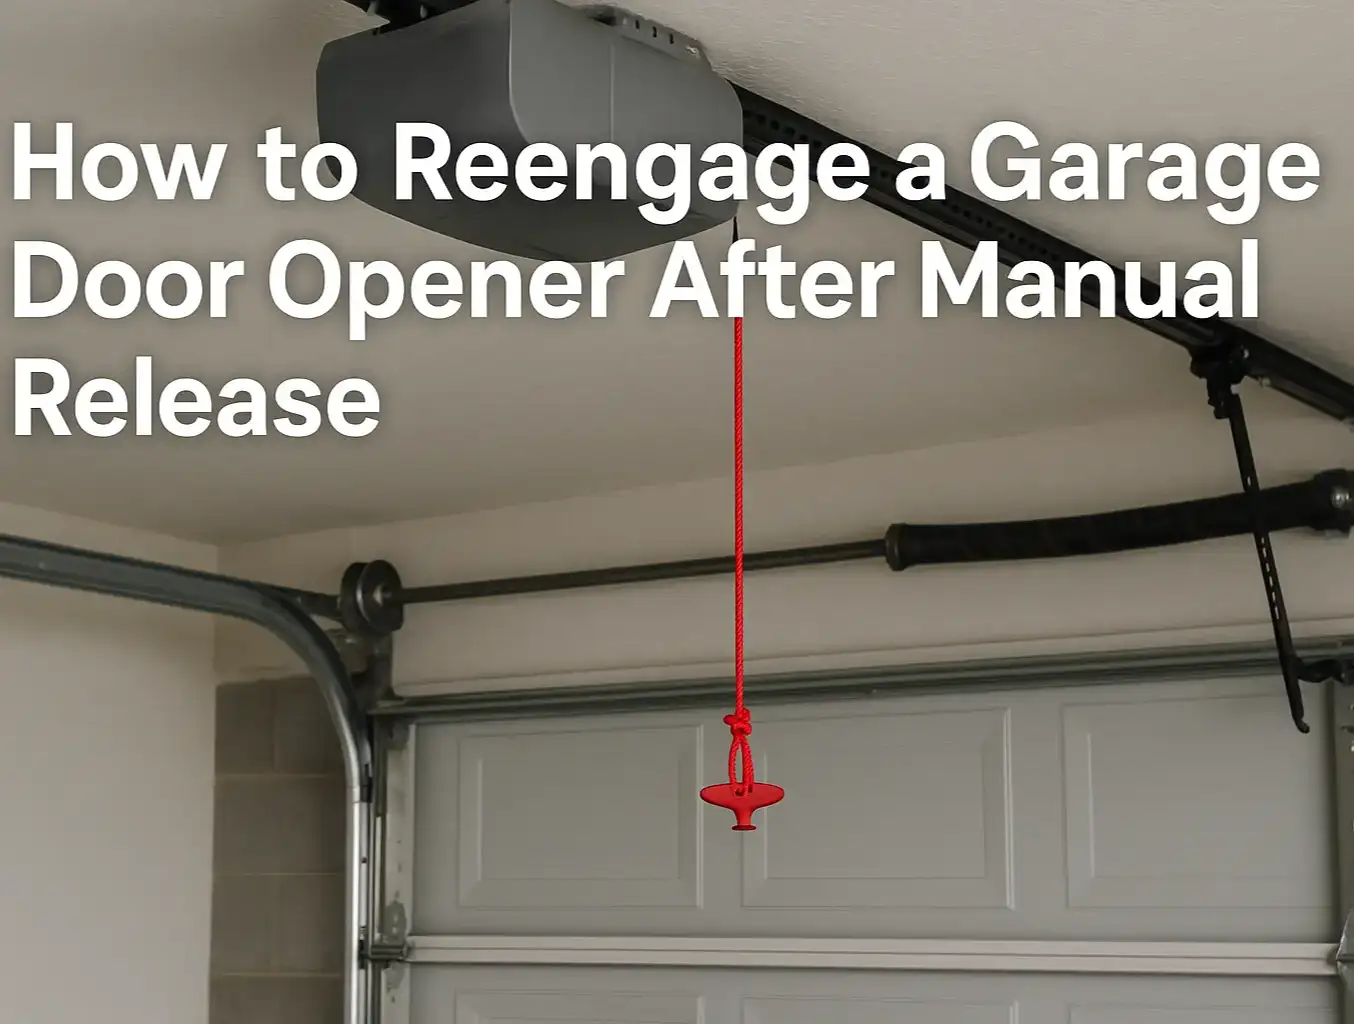
Reengaging Chain, Belt, and Screw Drive Openers


Published: Apr 8, 2026

You followed the online guide perfectly. You pulled the red emergency cord, handled the power outage, and now you’re ready to reconnect your garage door. You press the button on the remote, the motor hums to life, and… nothing. The chain, belt, or screw just moves back and forth in the rail, but the door stays put.

It’s a frustratingly common scenario, and it happens because over 90% of re-engagement guides miss one critical detail: the type of opener you have dramatically changes the steps you need to take.

Welcome to the guide the others should have been. We’re not just going to show you how to re-engage your opener; we’re going to help you understand the why behind the process. This is your first step from being a frustrated homeowner to an empowered one.

Identify Your Opener: The Critical First Step That Most Guides Skip


Before you can follow the right instructions, you need to know what kind of machine you’re working with. Most residential openers fall into one of three categories, distinguished by what they use to pull the trolley and move the door. Take a quick look at the rail extending from the motor unit to the wall above your garage door.
Visual comparison of chain, belt, and screw drives to identify your opener type and re-engagement method.

  • Chain Drive: This is the workhorse. You’ll see a metal chain, much like a bicycle chain, running along the rail. They are known for their durability and affordability.
  • Belt Drive: This type uses a sturdy, steel-reinforced rubber belt instead of a chain. If you were looking for a quiet garage door opener, this is likely the one you chose.
  • Screw Drive: This design features a long, threaded steel rod (the "screw") that rotates to move the door. It has fewer moving parts, making for a simple, powerful mechanism.
Knowing which one you have is the key. The re-engagement process for chain and belt drives is nearly identical, but the process for a screw drive is fundamentally different.
Visual comparison of chain, belt, and screw drives to identify your opener type and re-engagement method.

Building: The How-To for Each Type


Now that you’ve identified your opener, let’s get it reconnected. Safety first: Always perform these steps with the garage door closed. Re-engaging the opener with the door open can cause it to slam shut unexpectedly.

Re-engaging Chain & Belt Drives: The "Automatic Latch" Method

For chain and belt drive models, the trolley (the small carriage that moves along the rail) contains a spring-loaded mechanism. Your goal is to set this mechanism so it automatically latches back onto the moving chain or belt.
  1. Close the Garage Door: If it's not already, manually close the door completely.
  2. Position the Trolley: Manually slide the garage door so the inner trolley is about an inch away from the outer trolley (the part connected to the chain or belt).
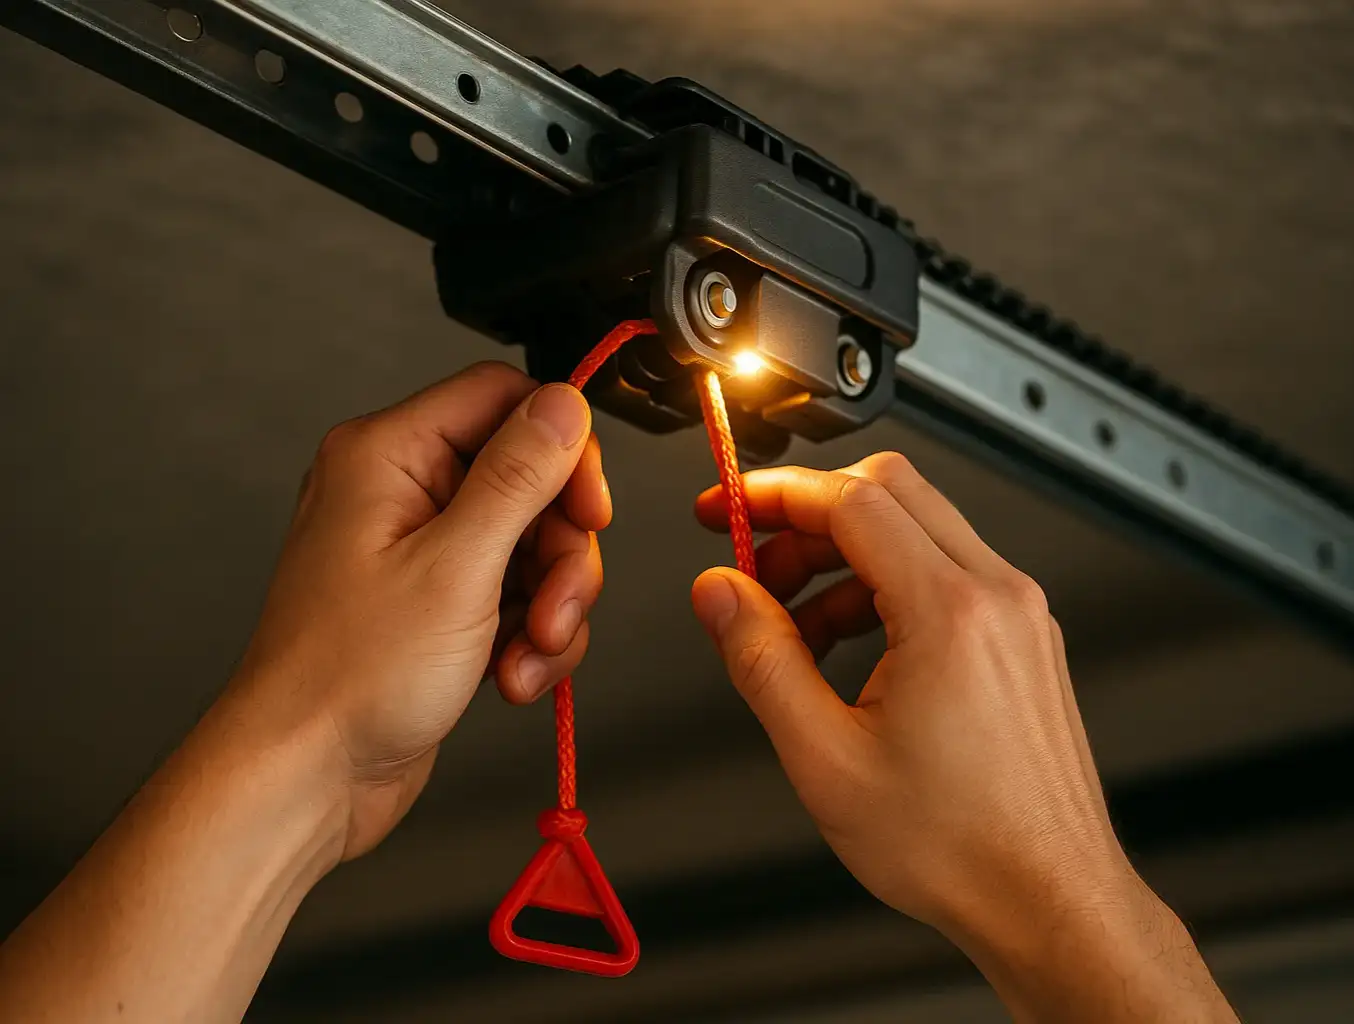
  3. Set the Release Lever: Pull the garage door emergency release cord down and toward the motor. You should see a spring-loaded lever click into a horizontal or "ready" position. This primes the trolley to reconnect.
  4. Run the Opener: Press the button on your wall control or remote. The motor will start, and the chain or belt will move the outer trolley toward the inner one.
  5. Listen for the Click: As the two parts meet, they will automatically lock together with an audible click. Your door is now re-engaged and should operate normally.
Guide to safely realign a screw drive carriage for smooth, correct re-engagement.
If this process doesn't work, there may be a simple reason why. Our detailed guide on how to reconnect a garage door opener can walk you through additional checks.

Re-engaging Screw Drives: The "Manual Alignment" Method

This is where most people get stuck. Unlike chain and belt drives, a screw drive carriage doesn't have a spring-loaded lever. It connects directly to the threaded rod. You can’t just run the motor and hope it connects; you have to manually line it up first. This is the "aha" moment for screw drive owners.

  1. Close the Garage Door: Ensure the door is fully closed for safety.
  2. Pull the Cord: Pull the emergency release cord to disconnect the door from the carriage.
  3. Align the Carriage: Manually move the door up or down the track until the metal "fins" on the door's arm line up directly under the slot on the screw drive carriage. This alignment is the most important step.
  4. Run the Opener: Press the button on your wall control or remote. The motor will turn the screw, causing the carriage to travel along the rail.
  5. Watch for the Connection: As the carriage moves over the door arm, it will automatically scoop it up and lock it in place. Your door is now re-engaged.
⚠️ Critical Tip for Screw Drives: Do NOT just run the motor hoping it will connect. You must manually align the door arm with the carriage before activating the motor. Skipping this step is the #1 reason for re-engagement failure on these models.
Guide to safely realign a screw drive carriage for smooth, correct re-engagement.

Mastery: Troubleshooting & Common Problems


Sometimes, things still don't go as planned. If your opener won't re-engage, don't panic. The cause is often simple, and knowing your drive type helps you diagnose it faster.
Drive-specific troubleshooting shows common re-engagement issues and safe solutions.

Universal Problem: The Motor Runs, But Nothing Moves.

Cause: The trolley is not properly re-engaged. Go back and carefully repeat the steps for your specific drive type. Make sure you hear the "click" for chain/belt drives or see the successful alignment for screw drives.

Chain/Belt Drive Problem: The Release Lever Won't "Set".

Cause: The spring inside the trolley might be worn, or debris could be jamming the mechanism. Try pulling the cord firmly a few times to dislodge any blockage. If the lever still feels loose, the trolley may need to be serviced or replaced.

Screw Drive Problem: The Carriage Moves Past the Door Arm.

Cause: This is almost always an alignment issue. The door arm is not positioned directly under the carriage. Close the door, release it again, and be more precise with your manual alignment before running the motor.

Universal Problem: The Door Feels Extremely Heavy or Won't Stay Put.

Cause: This indicates a much more serious issue, likely a broken spring. The opener is designed to lift a balanced door, not dead weight. Do not attempt to operate the door. This is a job for a professional. A garage door stuck in this state can be very dangerous.

Drive-specific troubleshooting shows common re-engagement issues and safe solutions.

Need more information?

Action: Maintenance & Prevention


The best way to deal with re-engagement issues is to prevent them. A few simple checks can ensure your emergency release system works when you need it and that your opener stays in top shape.
Maintenance roadmap with simple, drive-specific checks for proactive opener care.

  • Twice a Year: With the door closed, pull the release cord. Manually lift the door halfway up. It should stay in place. If it slams down or shoots up, the springs are unbalanced and need professional adjustment.
  • Annually: Check the release cord itself for fraying or damage. Ensure the handle is easy to reach.
  • After Re-engaging: Always run the opener through a full open-and-close cycle to confirm everything is working smoothly.
Maintenance roadmap with simple, drive-specific checks for proactive opener care.

Frequently Asked Questions (FAQ)


What’s the difference between "re-engaging" and "resetting" my opener?

Re-engaging is the physical process of reconnecting the door to the opener's trolley. Resetting usually refers to clearing the electronics, like when you need to reset a garage door after pulling the red cord because the travel limits are off. They are two distinct procedures.

Why would my garage door disconnect in the first place?

The most common reasons are a power outage that required you to open the door manually, or someone pulling the emergency cord by mistake.

Is it safe to pull the emergency cord when the door is open?

No, never. If the door's springs are weak or broken, pulling the cord with the door open will cause it to crash down with dangerous force. Only ever use the emergency release with the door fully closed.

I followed the steps, but my opener still won't reconnect. What's next?

First, double-check that you're using the correct method for your drive type. If you are, and it's still not working, it could mean the internal parts of the trolley are worn or broken. If you find the garage door emergency release is stuck, it's best to stop and call for professional help.
Understanding your specific opener type transforms a frustrating task into a manageable one. By knowing whether you have a chain, belt, or screw drive, you can use the right technique every time. If you’ve followed these steps and are still facing issues, or simply want the peace of mind that comes with professional service, our team at Up & Down Garage Doors is here to help 24/7.

You may also like


blog photo

How to Reengage Your Garage Door Opener After a Power Outage

The power flickers back on. The clocks are blinking, and you’re resetting the coffee maker when you hit the button for your garage door. Nothing happens. Or maybe you hear a hum, but the door doesn’t move. It's a frustratingly common scenario, but don't panic. You haven't broken anything. Your garage door opener has a simple, manual override system designed for exactly this situation. In a few minutes, you can safely get your door working again. This guide will walk you through not just the how, but the why, so you feel confident and in control. Think of your opener’s emergency release as putting a car in neutral. It disconnects the door from the motor's chain or belt, allowing you to move it by hand. Re-engaging it is just like shifting the car back into drive.

blog photo

When NOT to Reengage Your Garage Door Opener: Identifying Safety Risks

You’re heading out, you press the button on your garage door remote, and… nothing. Or worse, a horrible grinding sound fills the air, and the door stops halfway, hanging at a crooked angle. Your first instinct is probably to press the button again. Maybe it was just a fluke. We get it. It’s the simplest solution, and we’re all programmed to try the easy fix first. But in this situation, that instinct could turn a manageable repair into a catastrophic failure. Hitting that button again when your garage door is under mechanical stress is like telling a sprinter with a torn hamstring to "just run it off." You’re not fixing the problem; you’re risking severe, expensive damage to the door, the opener, and even your property. Before you touch that remote again, take five minutes to read this. This quick diagnostic guide will help you understand what might be happening, identify critical safety risks, and decide on the safest next step. It could save you a thousand-dollar headache.