Our company logo

State

Decoding Rolling Codes: Your Guide to Car-to-Garage Programming


Published: Mar 31, 2026

You’ve tried it once. You’ve tried it a dozen times. You’re sitting in your car, pressing the built-in button, pointing it at your garage, and… nothing. The blinking light on your visor taunts you, and the garage door remains stubbornly shut. If you’ve ever felt the frustration of trying to sync your car to your garage door opener, you’re not alone. The problem isn’t you—it’s the sophisticated security technology working inside your opener.

That technology is called a “rolling code,” and while it’s fantastic for keeping your home secure, it can make the programming process feel like you’re trying to solve a puzzle without all the pieces. But here’s the good news: there's a clear logic behind it, and you can master it. This guide will be your single source of truth, transforming you from a frustrated button-pusher into someone who understands the why behind the process, especially for the tricky scenario of programming without a handheld remote.

The 'Aha!' Moment: Understanding Rolling Code Technology


Before we dive into the steps, let's have that "aha moment." In the old days, garage remotes used a fixed code. It was like having one simple password that never changed. The problem? Someone could potentially grab that code out of the air and get access to your garage.
Visualize rolling code technology with this diagram showing the secure two-way handshake that enables reliable car-to-opener programming.
Rolling code technology, pioneered by companies like Chamberlain and Genie, changed the game. Instead of one static password, your opener and remote share a complex algorithm that generates a brand-new, unpredictable code every single time you press the button.
Think of it as a secret, two-way handshake:

  1. Handshake Part 1 (Training the Car): Your car’s system (like HomeLink or Car2U) first needs to learn the language your remote speaks—its frequency and encryption type.
  2. Handshake Part 2 (Training the Opener): The garage door opener’s main unit then needs to be introduced to your car, officially adding its unique signal to its list of trusted “friends.”
This two-part process is the number one reason people get stuck. They successfully complete the first part and think they're done, but the opener has no idea it's supposed to listen to the car yet.

Do You Have a Rolling Code System?

Not sure if this applies to you? Here’s a quick check. Your garage door opener likely uses rolling codes if it was manufactured after 1995 and has a "Learn" or "Program" button on the motor unit (the part that's attached to your ceiling). If you see that button, you're in the right place.
Visualize rolling code technology with this diagram showing the secure two-way handshake that enables reliable car-to-opener programming.

The Pro Move: Programming Your Car Without a Handheld Remote


Lost your remote? Or just want to program a new car without digging the old one out of a junk drawer? You’re in luck. Knowing how to program your garage door to your car without a remote is a game-changer.
This process works because you skip the first part of the handshake (training the car with a remote) and go straight to introducing the car to the opener motor itself.
Before You Start:
  • Park your car in the driveway, facing the garage door.
  • Make sure the garage door is clear of any obstructions.
  • You will need a sturdy ladder to safely reach the motor unit on your ceiling.
Follow this clear flowchart to program your car without a remote, overcome common issues, and complete synchronization with confidence.

Step-by-Step Guide

1. Clear Your Car’s System: First, erase any old codes from your car's built-in remote system. For most HomeLink systems, you do this by pressing and holding the two outer buttons simultaneously for about 20 seconds, until the indicator light begins to flash rapidly. (Consult your car’s manual for specific instructions).
2. Prepare the Car for Learning: Choose the button you want to program in your car. Press and hold it. The indicator light will likely start blinking slowly. Keep holding this button down through the next steps.
3. Activate the Opener’s “Learn” Mode: This is the crucial step. Climb your ladder and locate the learn button on your garage door opener. It’s usually a small, square button on the back or side of the motor unit, often near the antenna wire.

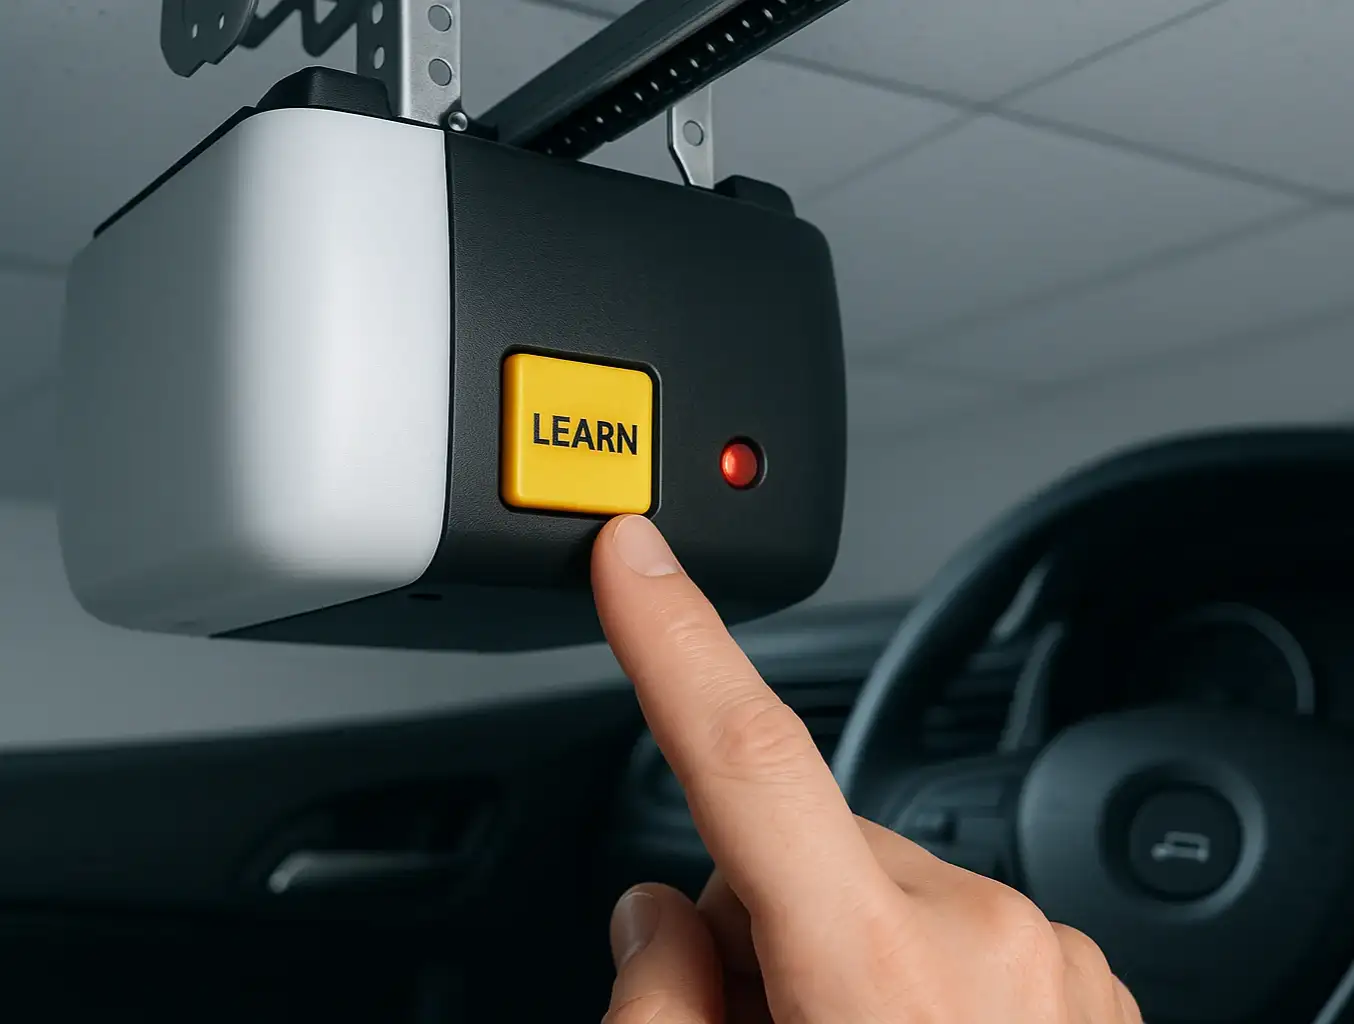
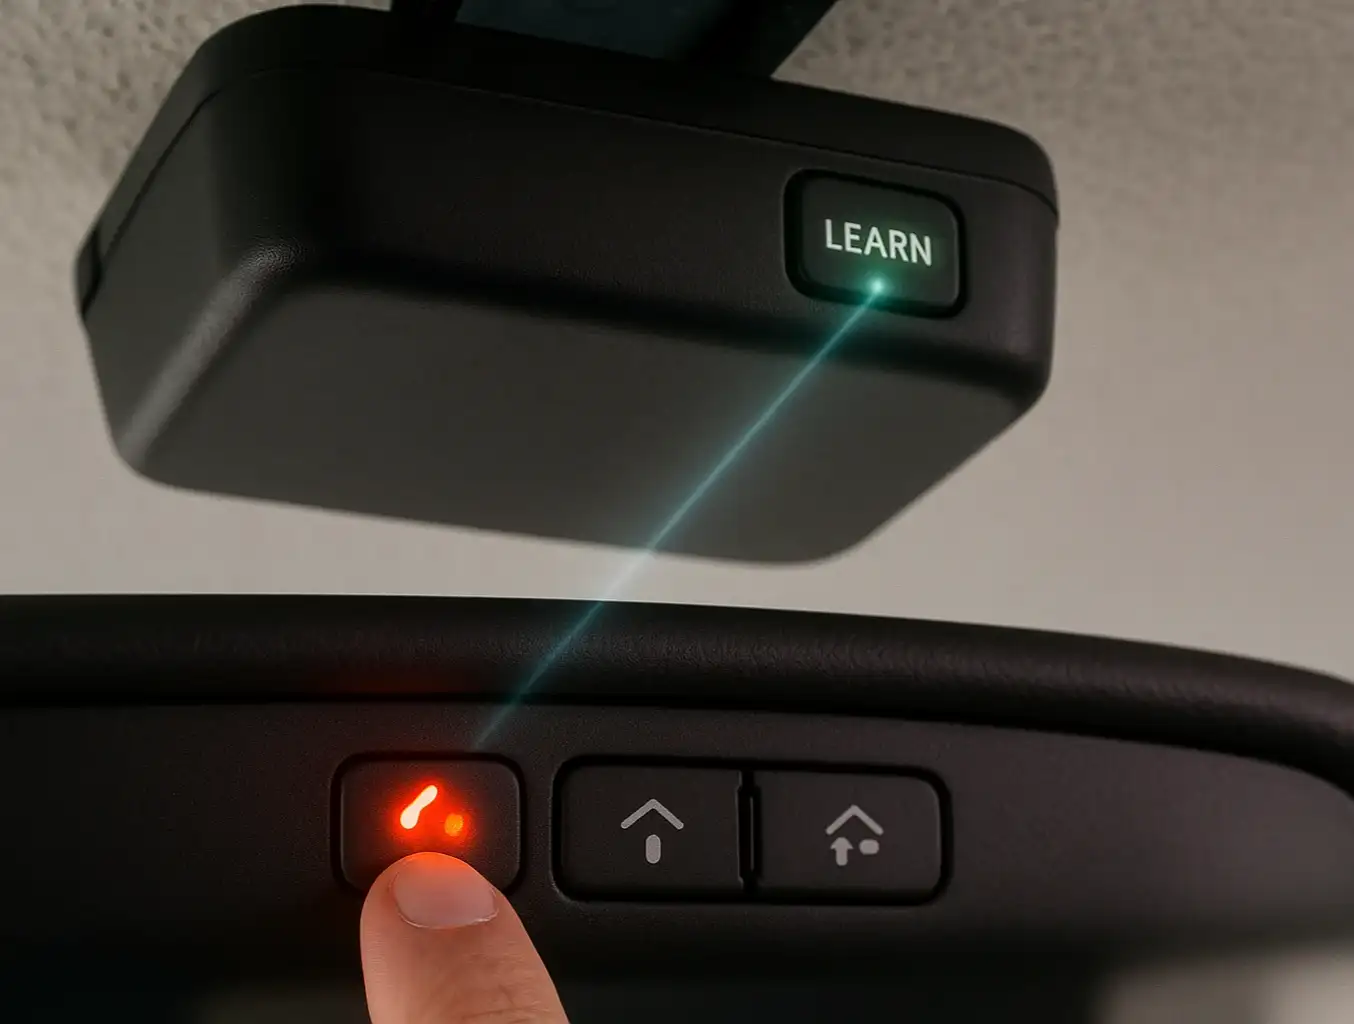
  • Press and release this button one time. Do NOT hold it down. Holding it for too long can erase the memory of all your other remotes.
  • After you press it, a small LED light next to the button will turn on and stay lit. This means the opener is in "pairing mode" and you have about 30 seconds to complete the next step.
4. Complete the Handshake: Quickly and safely return to your car. The car button you chose should still be held down and blinking slowly. Now, watch the main lights on the garage door opener unit itself (not the little LED). Within a few seconds, you should see the main lights flash or hear an audible click. This is the signal that the handshake is complete.
5. Test It Out: Release the button in your car. Now, press it again. Your garage door should move. Congratulations, you’ve just mastered the remote-less programming process.
Follow this clear flowchart to program your car without a remote, overcome common issues, and complete synchronization with confidence.

When Things Go Wrong: Your Troubleshooting Playbook


Sometimes, even when you follow the steps perfectly, technology has other plans. If your door isn't responding, don't panic. Here are the most common roadblocks and how to clear them.

Problem: The car's light flashes rapidly, but the opener doesn't respond.

This is the classic "Handshake Part 1 complete, Part 2 failed" scenario. It means your car tried to talk to the opener, but the opener wasn't in "Learn" mode to listen.
Solution: You missed the 30-second window. Simply press the "Learn" button on the motor unit again and repeat Step 4 within the time limit.
Quickly identify and fix common programming issues with this troubleshooting matrix, helping you resolve problems with confidence.

Problem: The signal only works when my car is right under the opener.

A weak signal is almost always caused by interference. The number one culprit today is surprising: LED light bulbs.
Solution: The radio frequency emitted by some low-quality LED bulbs can disrupt the signal from your car. Try removing the LED bulbs from your garage door opener and see if the range improves. If so, replace them with garage door opener-specific, low-interference LED bulbs. A weak battery in the car's remote system (less common) or a damaged antenna on the motor unit could also be to blame.

Problem: I programmed one car successfully, but now my other remotes don't work.

This is a sign that you held the "Learn" button down too long. A long press (6+ seconds) on most models initiates a full memory wipe.
Solution: Unfortunately, you'll need to reprogram your garage door opener and all of your other devices, including any handheld remotes and keypads. Be mindful to only press and release the learn button quickly next time. If you're having trouble with a specific remote, our guide on how to fix a garage door remote can help.

Quickly identify and fix common programming issues with this troubleshooting matrix, helping you resolve problems with confidence.

Need more information?

Advanced Knowledge: Compatibility, Learn Buttons


Compare your car and garage door opener compatibility at a glance to choose the best programming method and avoid costly compatibility issues.
As you become more comfortable with the process, a few extra details can make all the difference.

The Mystery of the Colorful "Learn" Buttons

Ever notice the "Learn" button on your opener is a specific color? It's not for decoration! The color indicates the type of technology your opener uses, which can be critical for programming.

  • Green: Used on older (1993-1997) Billion Code systems.
  • Orange/Red: The first generation of rolling code systems (1997-2005), often using Security+ technology.
  • Purple: A common color for Security+ systems made between 2005 and 2014.
  • Yellow: The newest systems, using Security+ 2.0 and MyQ technology. These sometimes require a compatibility bridge for older cars.

What is a Compatibility Bridge?

If you have a brand new garage door opener but an older car, they might not speak the same "language." A HomeLink Compatibility Bridge is a device that acts as a translator, allowing your older car’s HomeLink system to communicate with a modern opener (usually those with a yellow "Learn" button). Exploring smart garage door opener compatibility can shed more light on which systems work together seamlessly.
Compare your car and garage door opener compatibility at a glance to choose the best programming method and avoid costly compatibility issues.

Frequently Asked Questions


How many devices can my garage door opener remember?

Most modern openers can remember between 8 to 12 devices. If you've programmed many remotes and keypads over the years, the opener's memory might be full. Wiping the memory (by holding the learn button) and reprogramming only the devices you currently use can solve this.

Why do I have to press the button in my car multiple times to make the door work?

This can happen if the programming wasn't perfectly "clean." The best fix is to clear the codes from your car's system and from the opener's memory, then start the programming process from scratch for a fresh connection.

Will this process work for any car and any opener?

This guide covers the vast majority of rolling code systems from major brands like LiftMaster, Chamberlain, and Genie, and in-car systems like HomeLink. However, some vehicle or opener models may have unique quirks. Always keep your car’s and opener’s manuals handy as the ultimate reference.
By understanding the simple "two-way handshake" behind rolling codes, you can approach what was once a frustrating task with confidence. You now have the knowledge not just to follow steps, but to diagnose problems and find solutions—putting you in complete control of one of your home's most important access points.

You may also like


blog photo

Garage Door Learn Button Not Working for Your Car

You’re sitting in your new car, that new-car smell still fresh, ready for the final touch: programming the built-in garage door opener. You follow the car manual’s instructions, press the button on your ceiling-mounted opener, and… nothing. You try again. The little light next to the "Learn" button refuses to blink, staying stubbornly off or solidly lit. It’s a frustrating moment, and your first thought is probably, “Great, the button is broken.” Here’s the good news: the Learn button itself is rarely the problem. Think of it less as a button and more as a "go" signal. If it’s not responding, it usually means something else is preventing your opener from getting that signal. The issue isn't a broken part; it's a communication breakdown. This guide is your friendly troubleshooter. We’ll walk through the most common reasons your opener is giving you the silent treatment and how to fix them, starting with the simple 5-minute checks before moving on to more advanced steps.

blog photo

Troubleshooting HomeLink & Car2U Programming Failures Without a Remote

It should be simple, right? Press a button on your garage door opener, hold a button in your car, and voilà—the two are paired. But if you’re reading this, you probably know it’s rarely that easy, especially when you don't have the original remote. You’ve followed the manual, watched a few videos, and now you're stuck in a loop of blinking lights that don’t actually open the door. It’s a common frustration, and most guides don't cover the real-world glitches that stop you in your tracks. This isn’t just another set of instructions. This is a diagnostic guide. We’re going to walk through why these systems fail and provide the troubleshooting steps that are usually buried in the comments section of enthusiast forums. Think of this as the conversation you’d have with a knowledgeable friend who’s seen—and solved—this problem a dozen times.