Our company logo

State

Understanding Track Radius and Its Impact on Garage Door Performance


Published: May 5, 2026

When you’re planning a new garage door, you think about the big things: the color, the style, the windows. But there's a crucial component, hidden in plain sight, that will dictate how smoothly and quietly your door operates for the next 15 years. It’s the gentle curve in the track where the door transitions from vertical to horizontal.

This curve is called the track radius, and choosing the right one is the single most important decision most homeowners don’t even know they’re making. Getting it right means a quiet, reliable door. Getting it wrong can lead to a noisy, clunky system that wears out years ahead of its time.

Let's take a friendly coffee-break dive into this unsung hero and make sure you have the knowledge to get it right.

Foundation: What is Track Radius? (The 60-Second Explanation)


Diagram comparing 12″ vs 15″ garage door track radius curves
In the simplest terms, the garage door track radius is a measurement of how sharply the track curves. Imagine you’re driving a car. A 12-inch radius is like a tight turn in a compact city, while a 15-inch radius is a wider, more gradual curve on a country road.
Just like the car on the country road has a smoother ride, a garage door on a larger radius track operates more smoothly.
For most residential garage doors, you’ll encounter two standard sizes:

  • 12-Inch Radius: The industry standard for many years, designed to fit in garages with limited overhead space.
  • 15-Inch Radius: A newer standard that is often preferred when space allows, because its gentler curve offers a significant performance advantage.
The visual difference is subtle but the operational difference is huge. The larger the radius, the less stress is placed on your door panels, rollers, and opener as it makes the turn.
Diagram comparing 12″ vs 15″ garage door track radius curves

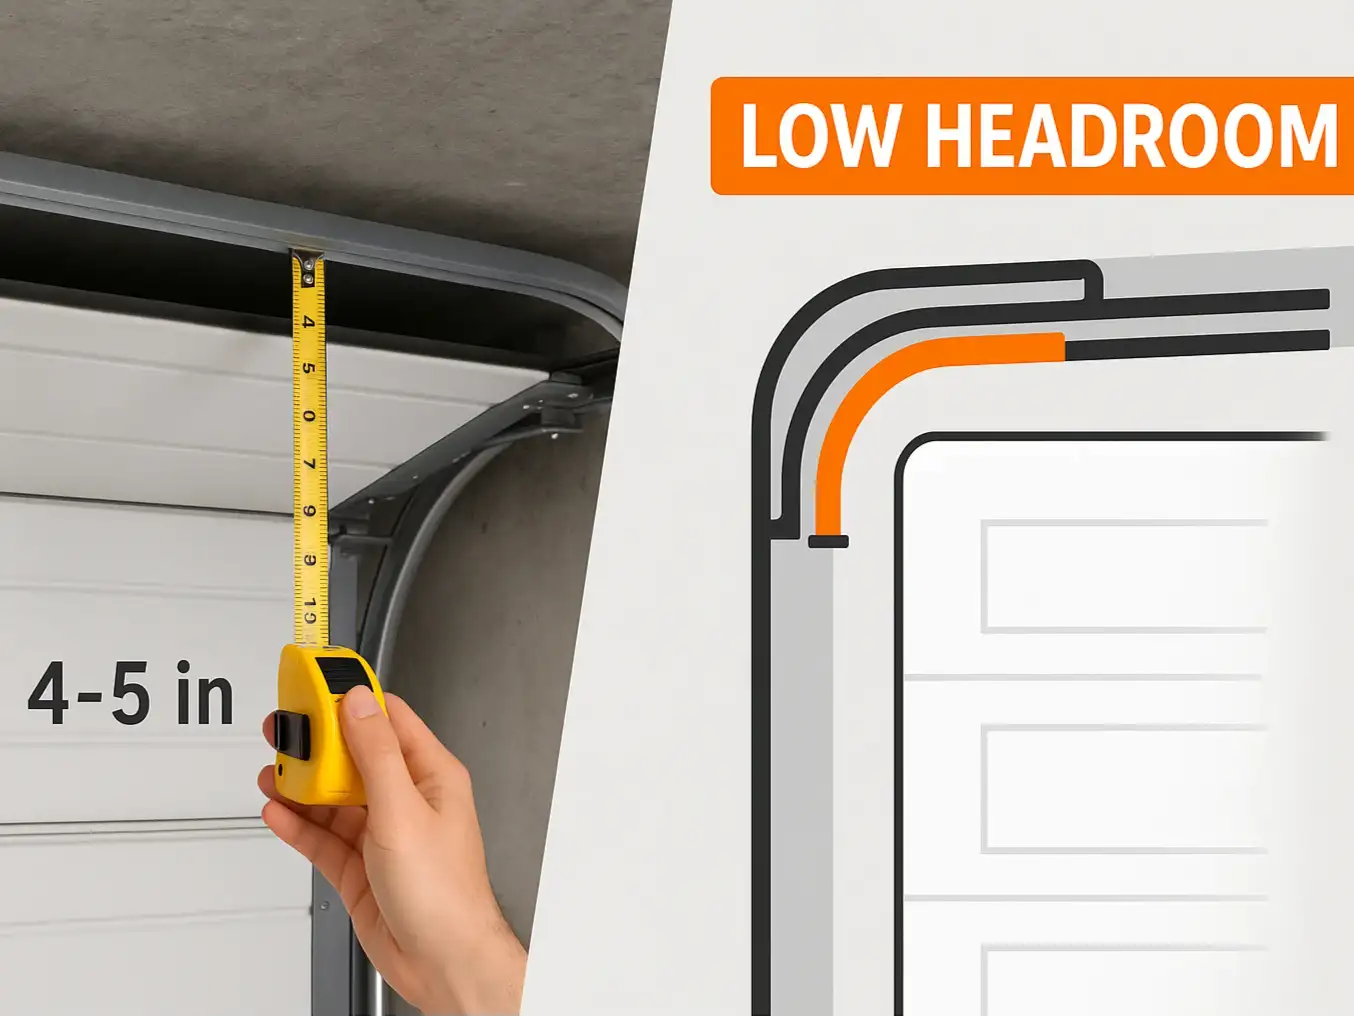
Building: Measuring Your Headroom - The Only Measurement That Matters


So, how do you choose between a 12-inch and 15-inch radius? The answer isn't a matter of preference; it's dictated by one critical measurement: headroom.
Headroom (or rough opening) is the amount of clear space between the top of your garage door opening and the ceiling (or the lowest obstruction, like a beam or pipe). This space determines which track radius you can safely install. Accurately learning how to measure a garage door is the first step to a successful installation.
How to Measure Your Headroom:
  1. Use a tape measure.
  2. Measure the distance from the top of the finished door opening to the ceiling.
  3. If you have a ceiling joist, light fixture, or pipe that hangs lower than the ceiling, measure to that obstruction instead.
Guide to measure garage headroom from door top to ceiling
Once you have your measurement, you can determine your ideal track radius with this simple chart:

  • Less than 12 inches of headroom? You'll need a special Low Headroom track system, which often uses a double track. In some cases, a specific low headroom garage door opener might also be required.
  • 12 to 14 inches of headroom? A 12-inch radius track is your required choice.
  • 15 inches of headroom or more? You should use a 15-inch radius track.
Common Mistake: Automatically choosing a 12-inch track because it's "standard." Always use the largest radius that your headroom allows for. If you have 16 inches of space, you gain a significant performance boost by opting for the 15-inch radius track.
Guide to measure garage headroom from door top to ceiling

Mastery: The Performance Trade-Off: 12" vs. 15" Radius


This is where you get your "aha moment." Why do we push for a 15-inch radius whenever possible? Because it directly impacts the health and longevity of your entire garage door system.
Let's break down the consequences of that "sharp turn" versus the "gentle curve."

Operation: Sharp vs. Gentle

12-Inch Radius: The door has to make an abrupt transition. This can cause a "jerking" or "bumping" motion as the top section navigates the tight curve.
15-Inch Radius: The transition is much more gradual. The door flows smoothly from vertical to horizontal, resulting in a seamless and stable operation.
Chart comparing 12″ vs 15″ track radius performance

Noise Level: Louder vs. Quieter

12-Inch Radius: That abrupt turn causes more vibration. The rollers can bind slightly in the track, and the panels can flex, creating pops, scrapes, and rumbles. If you're looking for a noisy garage door fix, an improper track radius can be a root cause.
15-Inch Radius: Less vibration and smoother roller movement mean significantly quieter operation. It’s one of the keys to a door that doesn't wake up the whole house.

Wear & Tear: Higher Stress vs. Less Stress

12-Inch Radius: The sharp angle puts immense stress on the rollers, hinges, and the top panel of your door. This leads to premature wear, causing rollers to crack and hinges to loosen over time.
15-Inch Radius: By distributing the force over a wider arc, it reduces stress on all components. This simple change can extend the life of your rollers and hardware, saving you money on future repairs.

Opener Strain: More Force vs. Easier on the Motor

12-Inch Radius: Your garage door opener has to work harder to pull the door through the tight turn. This increased strain can shorten the lifespan of the motor's gears and internal components.
15-Inch Radius: The door requires less force to move through the curve, putting less strain on your opener. A happier opener is a longer-lasting opener, delaying the need for a new garage door motor installation.

Chart comparing 12″ vs 15″ track radius performance

Action: Making the Right Choice & Spotting Problems


Infographic for choosing the right garage door track radius
The takeaway is simple: Measure your headroom and choose the largest track radius that fits. This single decision, made during the initial garage door installation, will pay dividends in performance and longevity for years.
If you already have a door installed, listen to it. Is it excessively loud right at the point where it starts to level out? Do you see signs of stress or cracking on the top door panel? These can be indicators that the track radius is too tight for the door system, contributing to poor garage door track alignment.

Infographic for choosing the right garage door track radius

Need more information?

Frequently Asked Questions about Garage Door Track Radius


What happens if I use a 12-inch radius track when I have room for a 15-inch?

You'll miss out on a much smoother and quieter operation. Your door will function, but it will put more stress on the rollers, hinges, and opener motor, potentially leading to a shorter lifespan for those components and a generally louder door.

Can the wrong track radius make my garage door louder?

Absolutely. A radius that is too tight is one of the leading causes of the garage door making noise. The shuddering, bumping, and straining as the door navigates the sharp curve creates vibrations that echo through the entire system.

How does track radius affect my garage door opener?

Think of it like pushing a heavy cart. A 15-inch radius is a smooth, flat path. A 12-inch radius is like trying to push that same cart up and over a curb. The opener has to exert a spike of force to get the door through the tight turn, causing extra wear on its motor and gears.

What if I have very little headroom?

If you have less than 12 inches, don't worry—you still have options. A professional installer can use a low headroom track kit (often called a dual-track system) that allows the door to turn in a much smaller space. It’s a specialized solution for a common problem.

Your Path to a Smoother, Quieter Garage Door


Understanding track radius moves you from a passive homeowner to an informed decision-maker. By simply measuring your headroom and insisting on the largest radius that will fit, you are actively investing in the long-term health of your garage door. It’s a small detail that makes a world of difference.
While the concepts are straightforward, installing garage door tracks requires precision and expertise. Proper alignment and balance are critical for safety and performance. If you're planning a new installation or suspect an issue with your current setup, consulting with professional garage door maintenance services can ensure your system runs smoothly and safely for its entire lifespan.

You may also like


blog photo

Mounting Garage Door Tracks to Different Wall Materials

You’ve just unboxed a brand-new garage door. The panels are pristine, the hardware gleams, and you’re envisioning a smooth, quiet operation. You grab the vertical tracks, hold them up to the wall, and suddenly, the project hits a snag. The instructions show a simple bolt going into a wood stud, but you’re staring at a solid concrete wall. Or maybe it’s a modern garage framed with metal studs. This is the moment many ambitious DIYers and even new technicians realize that a successful garage door installation isn’t just about the door—it’s about the wall it’s attached to. The wall material is the unsung hero, the foundation that determines whether your door operates flawlessly for decades or becomes a wobbly, misaligned headache in a matter of months. Getting this single detail right is the difference between a secure, long-lasting installation and a costly, dangerous failure. Let’s break down how to master the mount, no matter what your garage walls are made of.