





How to Upgrade an Older Garage Door Opener to a Smart System Safely
Published: Jul 8, 2026
You pull up to your house in the pouring rain, fumble for your garage remote, and… nothing. The battery is dead. As you get soaked dashing to the front door, you think, “Why can’t I just open my garage with my phone?”
It’s a common thought, and here’s the good news: you probably can. For less than $50 and about 30 minutes of your time, you can bring your trusty old garage door opener into the smart home era. But before you add that shiny smart controller to your online cart, there’s a crucial first step most guides gloss over: figuring out if your older opener is even compatible.
This is the definitive guide to navigating that challenge. We’ll skip the jargon and give you a simple framework to determine if a DIY smart upgrade is right for you, what hurdles to expect, and when it’s smarter to call in a professional.
The 2-Minute Compatibility Check: Your First Step
Here’s the big secret: upgrading isn’t really about your garage door opener’s motor. It’s about whether a small, add-on smart hub can communicate with it. Think of the smart controller as a universal remote your phone can talk to. But for it to work, it needs to speak your opener’s language.
Let’s figure out what language your opener speaks. This simple pre-flight checklist will prevent 90% of the headaches homeowners face.
Your Universal Compatibility Litmus Test: The “Learn Button”
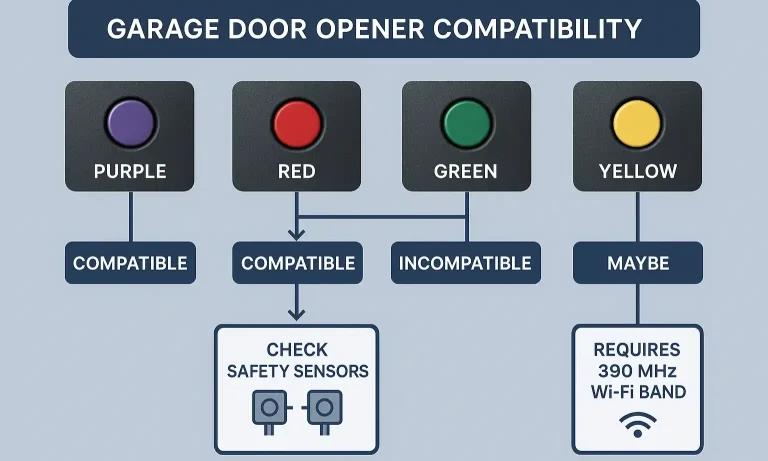
The single most important component for determining compatibility is the “Learn Button” on your garage door opener’s motor unit (the big box hanging from the ceiling). This button is used to program remotes and keypads. Its color tells you almost everything you need to know about the technology inside.
Find your Learn Button and identify its color. It will likely be Green, Red/Orange, Purple, or Yellow.
The Safety Sensor Question
Next, look at the bottom of your garage door tracks, near the floor. Do you see two small electronic “eyes” facing each other? These are safety sensors, mandated on all openers manufactured after 1993. If you do not have these sensors, stop here. Your system is too old for a safe smart upgrade, and you should consider a full opener replacement.
If you have a Learn Button and safety sensors, you’re likely in a great position for a DIY upgrade.
Why Isn't My Old Opener Compatible? Understanding the "Why"
So, what if your opener is from the early 90s or even the 80s? Why won’t a smart controller work with it? It comes down to how the opener and remote communicate.
- Pre-1993 “Dip Switch” Systems: These ancient openers used a set of physical switches inside the remote and the opener. You had to match the pattern for them to work. There’s no “code” for a smart hub to learn, making them fundamentally incompatible.
- Early “Rolling Code” Systems (1995-2005): This was a huge leap in security. Represented by Green or Red/Orange Learn Buttons, these systems changed the code every time you used the remote. Most modern smart controllers can easily “learn” and replicate these codes.
- Security+ and Security+ 2.0 (2005-Present): Represented by Purple and Yellow Learn Buttons, this is the current standard. These technologies use more complex encryption. While most smart controllers are designed for these, it’s crucial to check. For example, setting up a HomeKit garage door opener requires ensuring the controller you buy is specifically compatible with your opener’s Security+ version.
Understanding this “why” empowers you. You’re no longer just following a list; you’re diagnosing your own system’s technology.
Building: Choosing Your Smart Controller
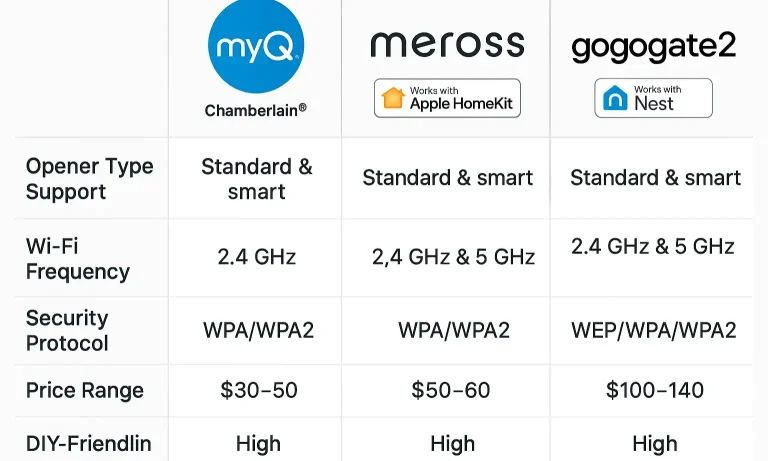
With your Learn Button color in hand, you can now shop for a smart controller with confidence. The market is dominated by a few key players, and most work in a similar way: a central hub wires into your opener’s wall control terminals, and a small sensor tells the app if the door is open or closed.
- Chamberlain/LiftMaster myQ: As the industry leader, myQ has excellent compatibility with most openers made after 1993, especially those with Purple and Yellow Learn Buttons. If you have a LiftMaster garage door opener, this is often the most seamless choice.
- Meross, Tailwind, and others: These brands often offer broader compatibility and integrate well with different smart home ecosystems like Apple HomeKit, Google Assistant, and Amazon Alexa. Always double-check their compatibility lists against your opener’s model and Learn Button color.
The golden rule is to always trust the manufacturer’s compatibility list before you buy. A quick search for “[Your Opener Brand] [Controller Brand] compatibility” will save you a lot of trouble.
Mastery: The DIY Installation & Common Hurdles
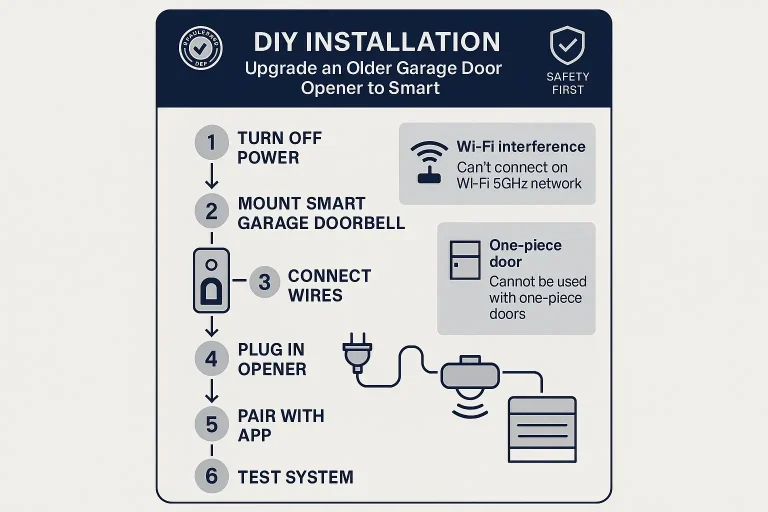
Once you have your compatible controller, the installation is usually straightforward. While you should always follow the manufacturer’s specific instructions, the process generally looks like this.
However, even the most straightforward smart garage door opener installation can hit a snag. Here are the most common mistakes and how to avoid them:
STOP: Is Your Wi-Fi Ready?
Nearly all smart garage controllers require a 2.4 GHz Wi-Fi network. Most modern routers broadcast both 5 GHz and 2.4 GHz bands, but your phone might automatically connect to the 5 GHz one. During setup, you may need to manually switch your phone to the 2.4 GHz network for the controller to connect properly. A weak signal in the garage is another common culprit for connectivity problems. If you’re struggling, our guide to fixing Wi-Fi issues with your smart garage opener can help.
CAUTION: One-Piece Doors
Most smart controllers are designed for modern sectional garage doors (the kind made of multiple horizontal panels that roll up). If you have an older, single-panel “one-piece” door that swings out and up, many controllers are not recommended due to safety concerns. Check the controller’s manual before installing on this type of door.
Action: When to Call a Pro
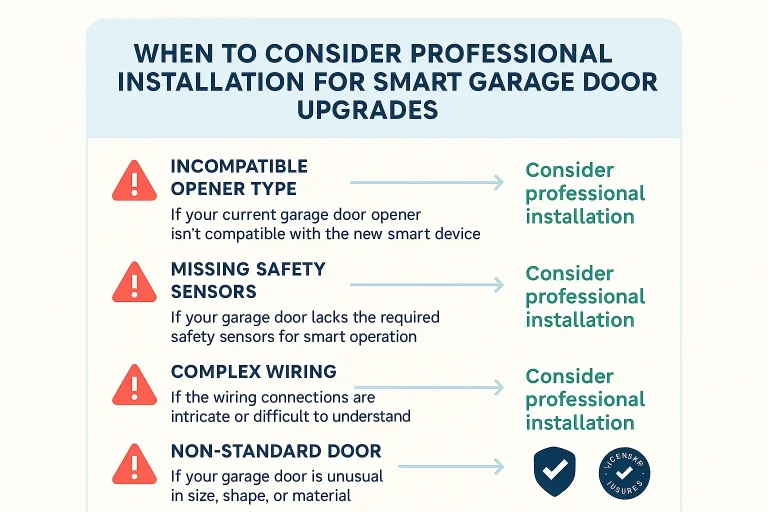
A DIY project is rewarding, but it’s not always the right answer. Your garage door is the largest moving object in your home, and safety should always be the top priority.
It’s time to call a professional if:
- Your opener has no safety sensors.
- Your opener is so old it has no Learn Button or identifiable brand.
- You’ve tried all the troubleshooting steps and still can’t get it to work.
- You notice any signs of physical damage, like frayed cables or a struggling motor. These are issues beyond a smart controller and require professional garage door opener troubleshooting.
A professional can quickly diagnose compatibility, ensure a safe and secure installation, or recommend a modern, reliable opener that comes with smart technology built right in.
Frequently Asked Questions (FAQ)
Can I make any garage door opener smart?
No. As a rule, openers made before 1993 that lack safety sensors are not compatible or safe to upgrade. Always start by checking for safety sensors and your Learn Button color.
What if my opener brand isn’t on any compatibility list?
If you have a Learn Button and safety sensors, there’s still a good chance a universal controller will work. Look for controllers that mention compatibility with specific Learn Button colors rather than just brands.
Do I need special tools for this?
Typically, no. The only tools you’ll likely need are a stepladder, a screwdriver, and possibly some wire strippers. The installation is low-voltage and generally very safe for a DIYer.
How do I program my old remotes after installing a smart controller?
Your existing remotes will continue to work exactly as they did before! The smart controller simply acts as another remote. If you need to add a new one, you can still follow our guide on how to program a garage door remote from another remote.
Will my smart garage opener work if the Wi-Fi goes out?
Your smart features, like app control and notifications, will not work without Wi-Fi. However, your traditional remotes and the wall-mounted button will still function perfectly, so you’ll never be locked out.
Upgrading your garage door opener is one of the most cost-effective smart home projects you can tackle. By starting with a simple compatibility check, you can confidently decide if it’s a project you can handle this weekend or if it’s time to bring in an expert. Either way, the convenience of a truly smart garage is well within your reach.
You May Also Like
How To Upgrade Garage Door Bottom Seal for Better Protection
You pull into the garage after a long day, and there it is—a small puddle of water near the door after a rainstorm. Or maybe you’ve noticed unsettling signs of tiny, unwelcome visitors: chewed-up cardboard or…
Published Date: Jul 1, 2026
Why a Vertical Lift Garage Door Is a Smart Modern Upgrade
A vertical lift garage door is a space-saving solution for garages with high ceilings, overhead storage, or commercial equipment needs. Instead of curving along the ceiling, the door lifts straight up, keeping the…
Published Date: Jan 5, 2026
Top Garage Door Upgrades: Increase the Appeal of Your Home
Garage door upgrades help homeowners and property managers improve appearance, comfort, and day‑to‑day function. Many people explore upgrades when their door becomes noisy, outdated, or no longer matches the style of…
Published Date: Dec 9, 2025