Our company logo

State

How To Upgrade Garage Door Bottom Seal for Better Protection


Published: Jul 1, 2026

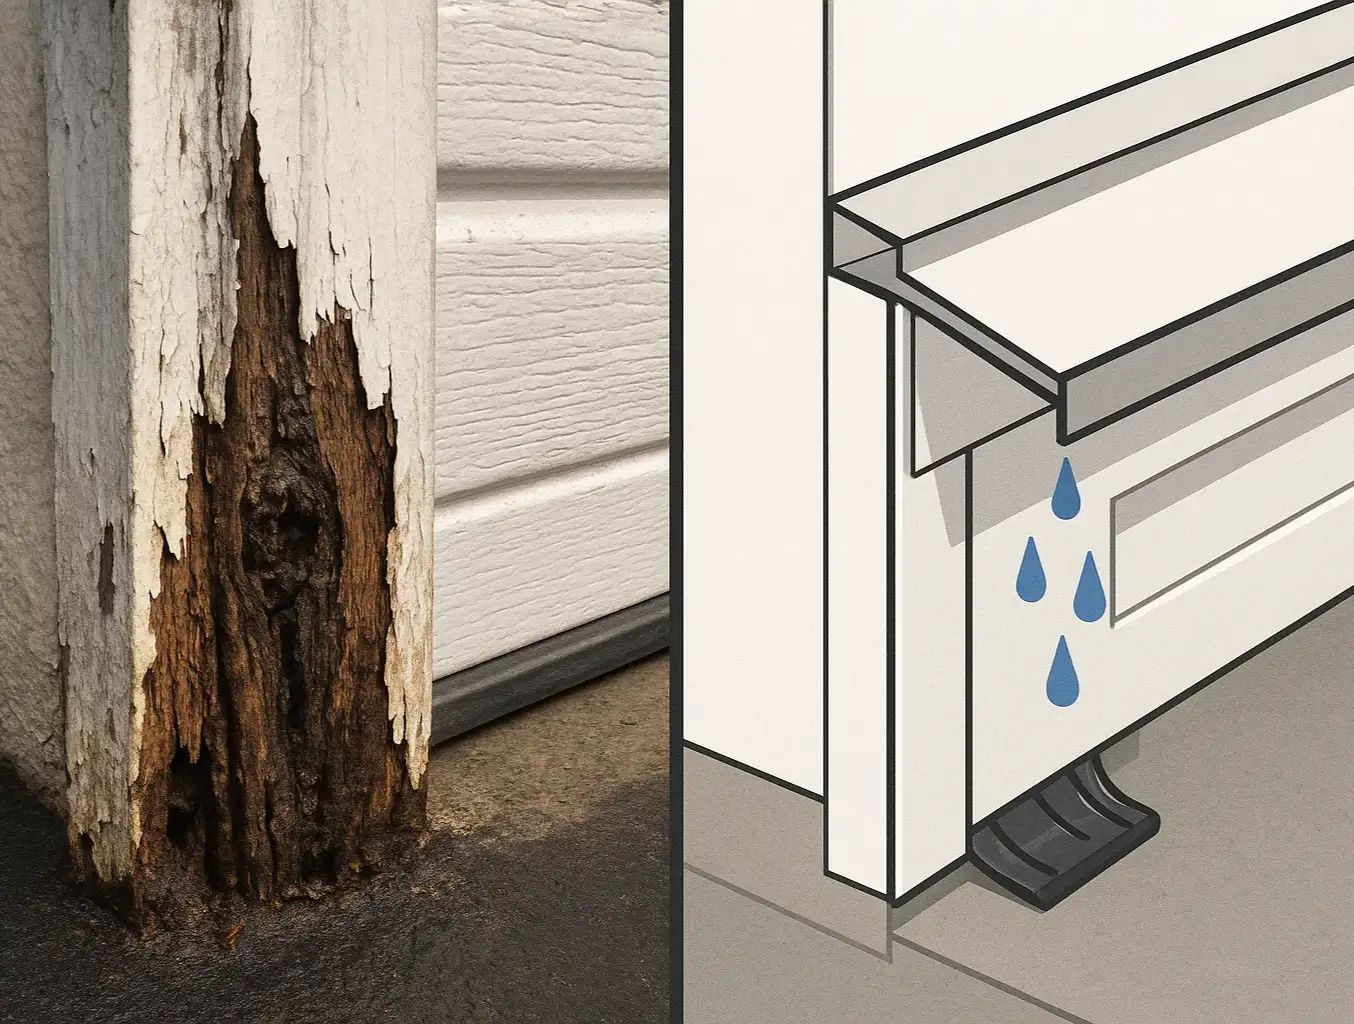
You pull into the garage after a long day, and there it is—a small puddle of water near the door after a rainstorm. Or maybe you’ve noticed unsettling signs of tiny, unwelcome visitors: chewed-up cardboard or droppings in the corner. You thought your garage door was secure, but these clues tell a different story.

Many homeowners focus solely on the rubber strip at the bottom of their garage door, assuming it’s the only line of defense. But here’s the "aha moment": a truly pest-proof and watertight garage is a complete system. Pests and water are incredibly resourceful; they don’t just test the bottom seal. They probe for weaknesses along the sides, in the corners, and across the threshold.

Think of your garage door not as a single barrier, but as a structure with four vulnerable zones: the bottom, the sides, the top corners, and the threshold where the door meets the concrete. Sealing just one of these is like locking your front door but leaving a window wide open. This guide will walk you through a professional diagnostic process to create a complete seal, turning your garage into a fortress against the elements and unwanted critters.

Foundation: Your First Step - The Light Test


Before you buy anything, you need to become a detective. The single most important diagnostic you can perform is the "light test." It’s simple, costs nothing, and will reveal every single gap and vulnerability in your garage's defenses.
A person shining a flashlight under a closed garage door to check for light gaps, demonstrating the Light Test.
Here’s how to do it:
1. Wait for Dark: Perform the test at night or on a very overcast day for the best results.

2. Close the Garage Door: Ensure the door is fully closed.

3. Turn Off the Lights: Make the inside of your garage as dark as possible.

4. Look for Light: From inside, carefully inspect the entire perimeter of the garage door. Pay close attention to the bottom, the sides, and the top corners.

Every sliver of light you see is a potential entry point for water, drafts, insects, and even rodents. A mouse can squeeze through a gap the size of a dime. Seeing light is your clear signal that an upgrade is needed.

Perform the essential Light Test to diagnose garage door sealing vulnerabilities before choosing your bottom seal solution.


If your garage door has a gap at the bottom that’s letting in significant light, it's a clear invitation for trouble. The next step is understanding what’s defending that space right now—and why it might be failing.

A person shining a flashlight under a closed garage door to check for light gaps, demonstrating the Light Test.

The Bottom Seal - Your Primary Defense


The rubber or vinyl strip on the bottom of your door is called the bottom seal or astragal. It’s the workhorse of your garage’s sealing system, but not all seals are created equal. The material it's made from and the way it attaches to your door are critical for effective protection.
A collage showing different garage door bottom seal materials (EPDM, vinyl, steel-infused) and various retainer profiles (T-style, bead-style).

Why Standard Seals Fail: A Material Showdown

Standard garage door seals are often made from basic vinyl, which can become brittle, crack in cold weather, and get chewed through by determined rodents. Upgrading your material is the single biggest improvement you can make.

Vinyl: The most common and affordable option. It provides a basic seal but offers poor durability against extreme temperatures and virtually no resistance to pests. Rodents can chew through it with ease.

EPDM (Ethylene Propylene Diene Monomer) Rubber: This is a significant step up. EPDM is a synthetic rubber that remains flexible in freezing temperatures and won’t crack or warp in the summer heat. It provides a much better and more durable seal against water and drafts. While tougher than vinyl, it can still be compromised by rodents.

Rodent-Proof Seals: The gold standard for pest exclusion. These are typically made of a durable EPDM or PVC material with a patented steel fabric or stainless steel mesh co-extruded into the seal. Rodents can’t chew through the metal, stopping them in their tracks.

When considering an upgrade, comparing EPDM and vinyl garage door seals makes it clear that investing in a more durable material pays off in the long run.

Decoding Your Door: A Guide to Retainer Types

Before you can buy a new seal, you need to know how it attaches to your door. The seal slides into a channel on the bottom of the door called a retainer. Identifying your retainer profile is crucial for getting a perfect fit.

The most common types are:

Single-T (or T-Style): The seal has a single T-shaped end that slides into a matching single channel.

Double-T (or L-Style): The seal has two T-shaped ends that look like an "L" on each side. This is a very common style.

Bead-End: The seal has small, circular bead-shaped ends that slide into two C-shaped channels.

A collage showing different garage door bottom seal materials (EPDM, vinyl, steel-infused) and various retainer profiles (T-style, bead-style).

Mastery: Sealing the Gaps - Advanced Solutions


Sometimes, even the best bottom seal isn't enough. If your Light Test revealed major gaps, especially from an uneven floor, or light bleeding in from the sides, it’s time to look at advanced solutions that complete the system.
An infographic showing two solutions for an uneven garage floor: an oversized bottom seal compressing to fill a gap, and a threshold seal on the floor creating a new, level surface for the door to close on.

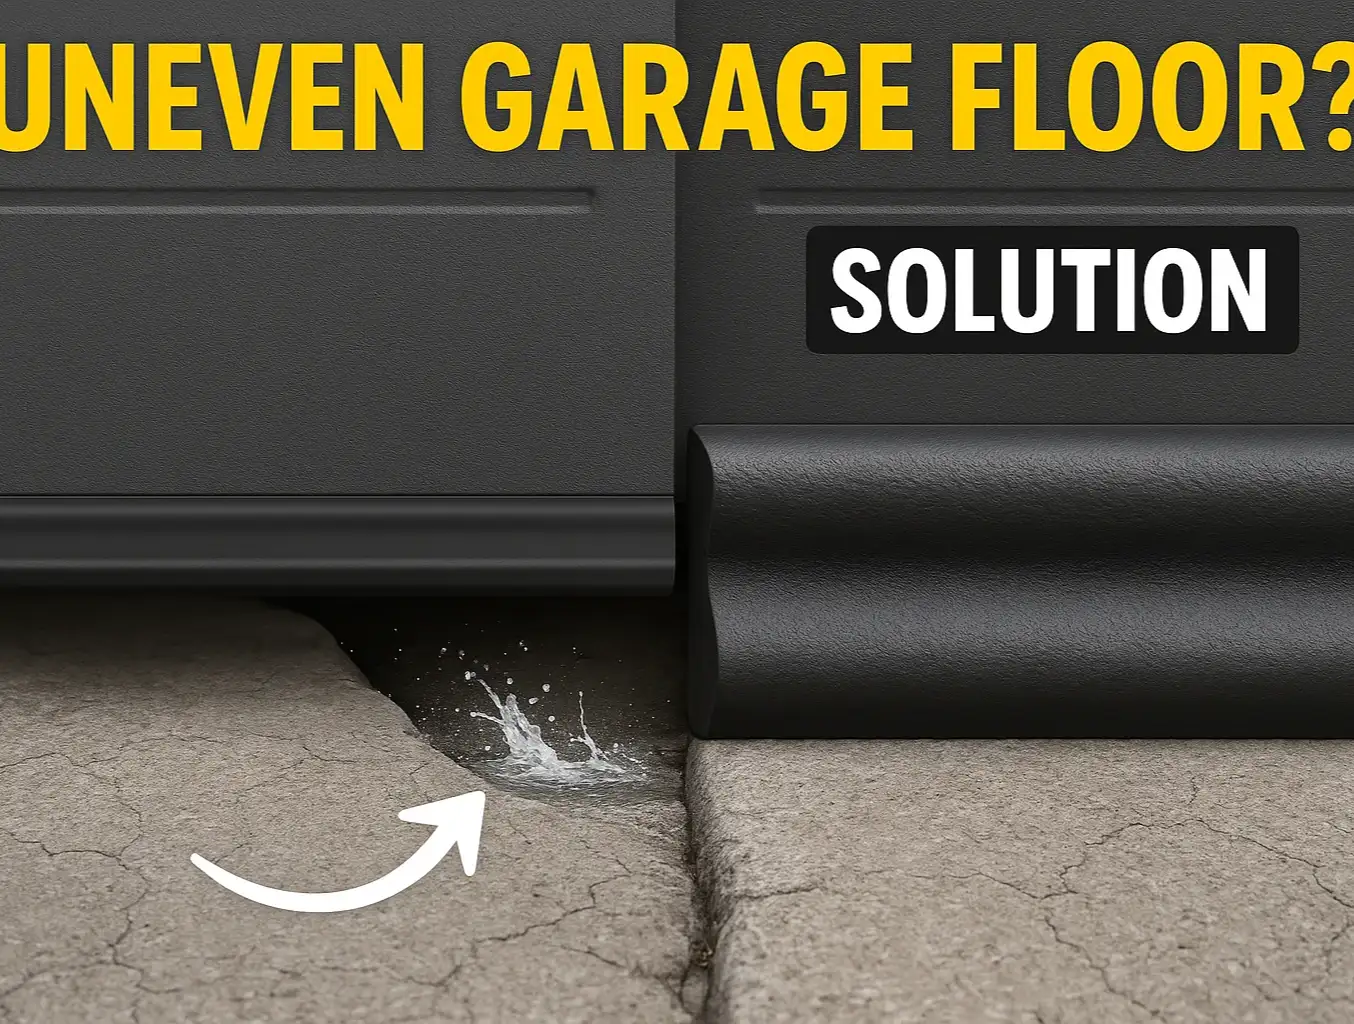
The Uneven Floor Problem: Thresholds vs. Oversized Seals

This is one of the most common and frustrating challenges homeowners face. Over time, concrete garage floors can settle, crack, or heave, creating gaps that a standard bottom seal can’t close.

You have two primary solutions:

1. Oversized Bottom Seal: You can purchase a bottom seal that is much taller (e.g., 6-inch instead of the standard 3-inch). This extra material can compress and conform to dips in the floor, effectively closing the gap. This is a good solution for moderate, gentle slopes.

2. Garage Door Threshold Seal: This is the most robust solution. A threshold is a strip of durable rubber that you adhere directly to the garage floor. The garage door’s bottom seal closes down on top of the threshold, creating a virtually impenetrable barrier against water, drafts, and pests. This is the best garage door bottom seal for an uneven floor with significant gaps or a steep slope.

Follow this clear roadmap to effectively seal your garage door gaps caused by uneven floors, ensuring pest and water exclusion success.

Securing the Perimeter: A Guide to Side and Top Seals

Don't forget the other three sides! The vinyl or wood trim around your garage door opening is called the stop molding. Attached to it is weatherstripping that should press snugly against the face of the garage door. Over time, this weatherstripping can shrink, crack, or get damaged, creating entry points along the sides. Knowing how to seal garage door gaps along the perimeter is a key part of the total solution.

Check for damage and ensure it’s making firm contact with the door when closed. Replacing it is a straightforward DIY project that completes your garage’s defensive system.

An infographic showing two solutions for an uneven garage floor: an oversized bottom seal compressing to fill a gap, and a threshold seal on the floor creating a new, level surface for the door to close on.

Action: Your Pest-Proofing Checklist & Next Steps


Feeling empowered? Here’s a simple checklist to guide you from diagnosis to a fully sealed garage.
A checklist graphic with icons for each step: a lightbulb for the light test, a ruler for measuring, a mouse icon for choosing material, and a checkmark for completion.
1. Diagnose with the Light Test: Identify all your vulnerabilities first. Where is the light coming from?
2. Inspect Your Current Seal: Check for cracks, brittleness, or pest damage. These are clear signs that indicate it's time to replace a garage door bottom seal.
3. Identify Your Retainer: Determine if you have a Single-T, Double-T, or Bead-style retainer.
4. Measure for a New Seal: Measure the width of your garage door and the width of your current seal when laid flat.
5. Choose Your Material: Upgrade to EPDM for durability or a rodent-proof seal for total pest exclusion.
6. Address Uneven Floors: Decide if an oversized seal or a threshold is the right solution for your specific floor.
7. Inspect Perimeter Seals: Check the weatherstripping on the side and top stop molding and plan to replace it if it's damaged.
8. Install with Confidence: Once you have your materials, a proper garage door seal installation can typically be done in under an hour.

Use this step-by-step checklist to confidently complete your garage door sealing project and ensure comprehensive pest and water protection.

A checklist graphic with icons for each step: a lightbulb for the light test, a ruler for measuring, a mouse icon for choosing material, and a checkmark for completion.

Frequently Asked Questions (FAQ)


How do I know for sure which retainer type I have before buying a new seal?

The best way is to slide a few inches of the old seal out of the track. This allows you to see a cross-section and definitively identify the "T" or "Bead" shape. If it’s stuck, using a flathead screwdriver to gently pry open the track at one end can help.

Can I just use a bigger bottom seal to fix my uneven floor?

An oversized seal works well for gradual dips and minor unevenness. However, for more significant gaps (over an inch) or an abrupt slope, a garage door threshold seal is a much more effective and permanent solution. It creates a new, perfectly level surface for your bottom seal to rest on.

What’s the easiest way to slide the new seal into the track?

Don't try to slide it in dry! The secret is lubrication. Spray the entire length of the retainer track with a silicone-based lubricant or even just some soapy water. This will make the process of learning how to replace the garage door weather seal much smoother and prevent the new seal from snagging or tearing.

By taking a systematic approach, you can move beyond simple fixes and build a comprehensive defense for your garage. Starting with the Light Test empowers you to buy the right products the first time and finally solve the problem of water and pest intrusion for good. And if you run into any trouble, the professionals at Up & Down Garage Doors are always here to help.

You may also like


blog photo

Best Garage Door Bottom Seal for Uneven Concrete Floors

That stubborn gap under your garage door is more than just an eyesore. It’s an open invitation for rainwater, chilly drafts, dust, and unwelcome pests. If your garage floor is sloped, cracked, or uneven, you know the frustration of a standard bottom seal that just can't make complete contact. You end up with a seal that’s compressed on one side and leaves a crescent-shaped gap on the other. You're not alone in this challenge. Many homeowners find that a perfectly good garage door still leaves a gap at the bottom simply because the concrete it's supposed to meet is imperfect. The good news is that you don't have to live with it. The solution isn't a new garage door; it's a smarter seal. This guide will walk you through everything you need to know to diagnose your specific gap, choose the right type of seal, and create a perfect barrier, turning your garage into a cleaner, more energy-efficient space.

blog photo

The Role of Proper Flashing and Sealant in Extending Garage Door Frame

You’ve seen it before. The paint on your garage door frame is bubbling. The wood near the bottom feels a little soft after it rains. You figure it’s time to replace the rubber weatherstripping—the black seal running along the sides and top of the door. So you spend a Saturday afternoon pulling off the old, cracked seal and carefully nailing on a new one. A few months later, the problem is back. And it’s worse. This is the frustrating cycle many homeowners find themselves in. They treat the symptom—a worn-out seal—without understanding the root cause. Your garage door’s weatherstripping is only its last line of defense against water. The real failure is happening silently, behind the trim, where an incomplete or improperly installed water management system is letting moisture in.

blog photo

Garage Door Weather Seal & Bottom Seal Degradation

That thin strip of rubber at the bottom of your garage door might seem insignificant, but it’s one of the hardest-working parts of your home’s exterior. Think of it as the silent defender of your garage, constantly battling rain, wind, dust, and pests. But this defender doesn't last forever. Over time, it wears down, creating subtle problems that can lead to bigger headaches—from shockingly high energy bills to unwelcome critters making a home in your garage. Most homeowners don't notice their seal is failing until there's a puddle on the floor or a draft they can't ignore. But what if you could spot the problem before it starts? There’s a simple trick you can use tonight to see just how well your seal is performing. The "Light Test": Your First Clue This is the easiest diagnostic you can do. Wait until it’s dark outside, then go into your garage and turn off all the lights. Close the garage door completely. Now, look around the perimeter of the door—the bottom and the sides. Do you see any slivers of daylight or streetlights peeking through? Every point of light is a breach in your garage's defense. It’s a clear sign that your seal is no longer creating a tight barrier, letting in everything you want to keep out.