





Garage Door Weather Seal & Bottom Seal Degradation
Published: Jan 27, 2026
That thin strip of rubber at the bottom of your garage door might seem insignificant, but it’s one of the hardest-working parts of your home’s exterior. Think of it as the silent defender of your garage, constantly battling rain, wind, dust, and pests. But this defender doesn’t last forever. Over time, it wears down, creating subtle problems that can lead to bigger headaches—from shockingly high energy bills to unwelcome critters making a home in your garage.
Most homeowners don’t notice their seal is failing until there’s a puddle on the floor or a draft they can’t ignore. But what if you could spot the problem before it starts? There’s a simple trick you can use tonight to see just how well your seal is performing.
The “Light Test”: Your First Clue
This is the easiest diagnostic you can do. Wait until it’s dark outside, then go into your garage and turn off all the lights. Close the garage door completely. Now, look around the perimeter of the door—the bottom and the sides. Do you see any slivers of daylight or streetlights peeking through? Every point of light is a breach in your garage’s defense. It’s a clear sign that your seal is no longer creating a tight barrier, letting in everything you want to keep out.
A Quick Intro to Garage Door Seals
Before we dive into what failure looks like, let’s get our terms straight. Your garage door typically has a few types of seals working together:
- Bottom Seal: This is the flexible rubber or vinyl strip attached to the bottom edge of the door. It’s the primary barrier against water, drafts, and pests on the floor.
- Weather Stripping (Stop Molding): This lines the top and sides of the garage door frame. It presses against the face of the door when closed, sealing the side and top gaps.
- Threshold Seal: This is an optional seal that gets affixed to the garage floor itself, creating a raised barrier that the bottom seal presses against. It’s especially useful for uneven concrete floors.
Together, these components create a complete seal. The many benefits of adding weather stripping to your garage door include improved energy efficiency, better protection from the elements, and a cleaner garage environment.
The Visual Failure Gallery: What a Bad Seal Really Looks Like
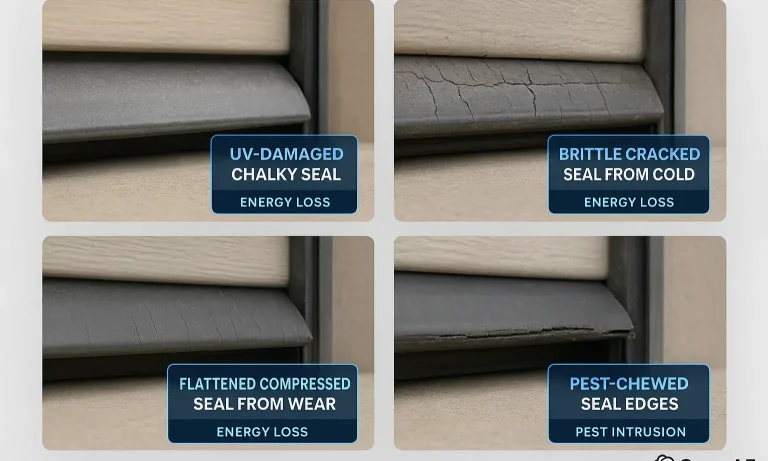
Seals don’t just fail overnight. They degrade in predictable ways. By learning to recognize these visual cues, you can diagnose a problem long before it leads to damage. Grab a flashlight and let’s inspect your seal.
Sign #1: Hardening and Cracking
- What it Looks Like: The seal feels stiff and brittle instead of soft and pliable. You’ll see a network of fine lines or deep, obvious cracks, especially in areas that get a lot of direct sunlight. The material may have a chalky, faded appearance.
- The Cause: This is classic UV damage. Just like the dashboard of a car, constant sun exposure breaks down the chemical compounds in the rubber or vinyl, making it lose its flexibility. Cold weather can accelerate this process, causing the hardened material to snap.
- The Impact: A cracked seal can no longer compress properly to fill gaps. Water easily seeps through the cracks, and cold drafts find a direct path into your garage.
Sign #2: Flattening and Compression
- What it Looks Like: The seal has lost its original shape. A rounded “bulb” seal might look squashed, or a “U” shaped seal may appear completely flat. It has no “memory” or bounce-back when you press on it.
- The Cause: Simple wear and tear. Thousands of open-and-close cycles and the constant weight of the garage door compress the seal until it can no longer rebound.
- The Impact: A flattened seal is the primary cause of gaps. It can’t conform to minor imperfections in your garage floor, leaving spaces for air, water, and debris to enter. If you’re trying to figure out how to fix a gap at the bottom of a door, checking for a compressed seal should be your first step.
- What it Looks Like: This is the most obvious sign—visible rips, holes, or sections that are completely missing. You might also notice frayed or chewed-looking edges.
- The Cause: This can be from the door catching on something, dragging over a rough patch of concrete, or—more commonly—damage from pests. Rodents often chew through seals to gain entry to a garage.
- The Impact: A torn seal is an open invitation. It provides an easy entry point for insects, mice, and water. Even a small tear can compromise the entire barrier.
Sign #3: Tearing and Physical Damage
The Most Important Step: Identifying Your Bottom Seal Profile
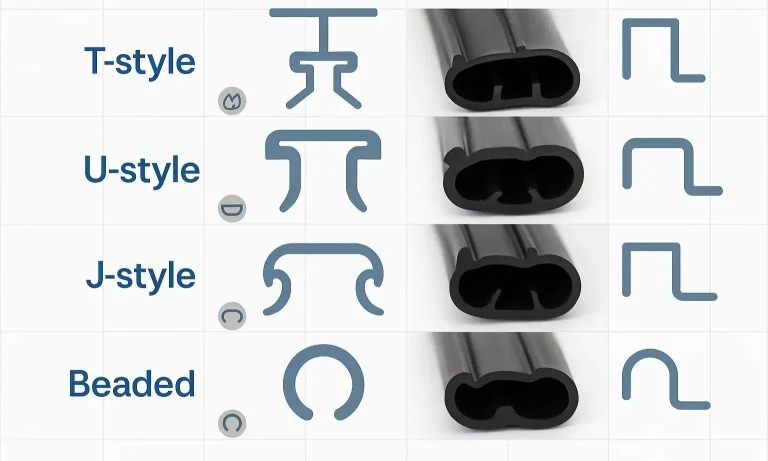
So, you’ve identified that your seal is bad. The next step is figuring out what kind to buy. Here’s the crucial point that trips up most DIYers: garage door bottom seals are not universal.
The seal itself is designed to slide into a channel on the bottom of the door called a retainer. These retainers come in different shapes, and you must buy a seal with a profile that matches your specific retainer. Trying to force the wrong seal type into the track will result in a poor fit and an ineffective seal.
This is where you need to become a detective. Look at the very end of your current bottom seal, or carefully pull a small section out of the retainer to see its shape in cross-section. It will likely match one of these common profiles.
- T-Style: The most common type. The top of the seal has two “T” shaped edges that slide into two parallel tracks on the retainer.
- Bead-Style: This seal has a small, round bead on each edge that slides into a C-shaped channel on the retainer.
- Bulb, U-Shaped, or J-Style: These seals are often a single piece of vinyl that wraps around the bottom of the door and is secured by screws into the side of the door. Learning how to install a garage door bottom seal of this type is often straightforward for a handy homeowner.
Once you know your profile, measure the width of your garage door to determine the length of the seal you need.
Choosing Your Replacement & When to Call a Pro
With your seal profile identified and measurements in hand, you’re ready to choose a replacement. You’ll generally find two material options:
- Vinyl: A great, affordable all-around choice. It holds up well in most climates but can become stiff in extreme cold.
- Rubber: More flexible and durable, especially in very cold temperatures where vinyl might crack. It often provides a better, more conforming seal on slightly uneven floors.
- The retainer track itself is bent, damaged, or rusted.
- The garage door is old, and the bottom panel is warped or damaged.
- You have trouble removing the old seal or can’t get the new one to slide in evenly.
For many homeowners, this is a manageable DIY project. However, you should consider calling a professional if:
A professional can ensure the new seal is installed correctly for a perfect fit and can also diagnose any other underlying issues with your door that might be contributing to gaps or poor operation.
Frequently Asked Questions
Are garage door seals universal?
No, they are not. The most critical factor is matching the new seal’s profile (T-style, Bead, etc.) to the retainer track on the bottom of your door. Always confirm your track type before purchasing a replacement.
How can a garage door bottom seal help with energy efficiency?
Gaps under your garage door allow unconditioned outside air to flow into your garage. If your garage is attached to your home, this can significantly impact your heating and cooling costs as your HVAC system works harder to compensate. A new seal can make a surprising difference, and understanding the importance of garage door seals for energy efficiency is key to a more comfortable home.
What if there are gaps on the sides of my garage door?
If the “Light Test” reveals light coming from the sides, your perimeter weather stripping may be worn out or improperly installed. Knowing how to fix garage door gaps on sides often involves adjusting or replacing this stop molding.
My garage floor is uneven. Will a standard bottom seal work?
For slightly uneven floors, a high-quality, flexible rubber seal with a larger bulb can often provide enough compression to fill the gaps. For more significant dips or slopes, a threshold seal installed on the floor can create a much more effective barrier.
Your Next Step to a Perfectly Sealed Garage
Inspecting your garage door seal is a simple task that can save you from future headaches and expenses. By learning to spot the visual signs of wear—cracking, flattening, and tearing—you can take control of your home’s efficiency and security.
Now that you can identify the problem and know which type of seal you have, you’re empowered to make the right choice. For those ready to tackle the project, a well-planned DIY guide for replacing garage door weather stripping can be an excellent next step. By investing a little time in this small but mighty component, you ensure your garage remains a protected, comfortable, and efficient part of your home.
You May Also Like
How Extreme Weather Affects Garage Door Component Lifespan
Ever noticed how your garage door seems to have a personality of its own? It groans and complains on the coldest winter mornings and acts sluggish and stuck on the hottest summer days. It's not your imagination. The…
Published Date: Jan 22, 2026
Garage Door Weatherstripping: A Simple Upgrade with Big Benefits
Sealing your garage may not seem urgent — until cold air, rainwater, or pests make their way inside. Garage door weatherstripping is a small investment that makes a big difference in insulation, comfort, and…
Published Date: Dec 8, 2025
Weatherproof Your Garage Door: Maintenance Tips for Hot & Humid Climates
Is your garage door sticking, warping, or rusting due to persistent heat and humidity? Keeping your garage door in good condition year-round is essential to protect your home, maintain energy efficiency, and avoid…
Published Date: Jan 30, 2025