





Maximizing Garage Door Hinge Lifespan
Published: Jan 28, 2026
Is your garage door trying to tell you something? Those squeaks, groans, and stutters aren’t just annoying noises—they’re often cries for help from one of the hardest-working parts of the system: the hinges.
Think of your garage door hinges as the joints in your body. They are the critical connection points that allow the heavy door panels to bend and glide smoothly along the track. When they’re healthy, you barely notice them. But when they start to fail, the entire system can become noisy, unsafe, and prone to costly damage.
This guide is your go-to resource for decoding your door’s language. We’ll walk you through everything from basic hinge anatomy to a simple “symptom checker” that will help you decide when to maintain and when it’s time to replace.
Foundation: The Anatomy of a Garage Door Hinge
Before you can care for your hinges, it helps to know what you’re looking at. These small metal plates are more than just simple brackets; they are engineered for a specific, crucial job.
What Do Garage Door Hinges Actually Do?
As your garage door opens and closes, it doesn’t move as one solid piece. It articulates, with each panel pivoting as it navigates the curve in the track. The hinges are the pivot points that make this smooth articulation possible. Without them, the door panels would bind, jam, and eventually fail.
The Hinge Numbering System Explained: Your First “Aha” Moment
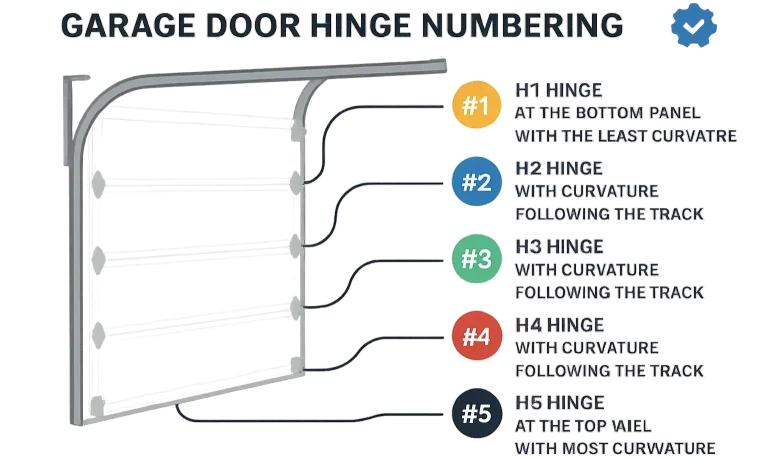
Have you ever noticed the small numbers stamped onto your hinges? They aren’t random. This numbering system is the secret to your door’s smooth travel.
Because the garage door track curves away from the wall, the rollers need to be positioned further from the door’s edge as they go up. Each numbered hinge is slightly different to accommodate this change.
- #1 Hinges: These are the most common and are used in the center of the door to connect all the panels. They hold the rollers closest to the door.
- #2, #3, #4 Hinges (and up): These are placed on the outer edges of the panels, starting from the bottom. A #2 hinge places the roller slightly further out than a #1, a #3 slightly further than a #2, and so on. This graduated spacing ensures the door follows the track’s curve without binding.
- 14-Gauge: This is the standard for most residential doors. It’s perfectly adequate for typical use.
- 11-Gauge: This is a thicker, heavy-duty option. If you have an oversized, heavy, or insulated door, 11-gauge hinges provide superior strength and a longer lifespan.
Understanding the garage door hinge numbers is the first step to choosing the right replacement part and ensuring the geometry of your door system remains correct.
Hinge Materials and Gauge: What Durability Looks Like
Most residential garage door hinges are made of galvanized steel to resist corrosion. The most important factor for durability is the gauge, or thickness, of the steel.
Building: The Maintain vs. Replace Decision Framework (The Symptom Checker)
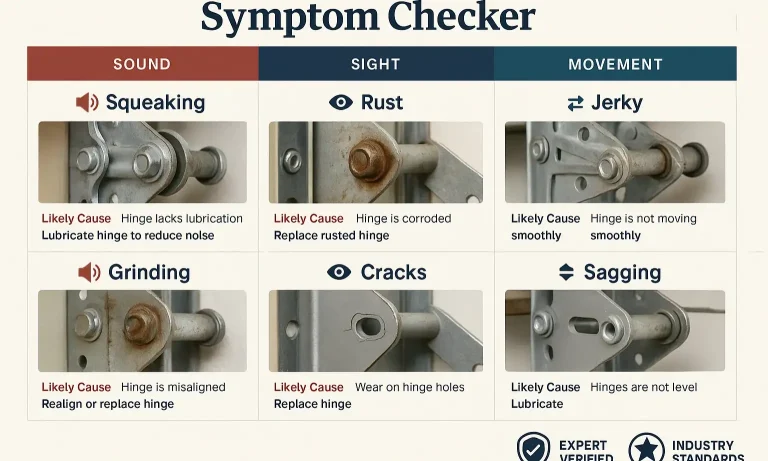
So, how do you know if your hinges need a little TLC or a complete replacement? Just use your senses. This simple framework will help you diagnose the health of your hinges.
Listen: Decoding Your Garage Door’s Language
Close your eyes and just listen as the door operates. What do you hear?
- Squeaking or Squealing: This is the sound of dry metal rubbing against metal. It’s the earliest sign that your hinges are thirsty for lubrication.
- Grinding: A harsher, grittier sound than a squeak. This often indicates that dirt and debris have mixed with old lubricant, or that rust is creating friction. This is a sign that replacement might be on the horizon.
- Popping or Snapping: This is an urgent sound. It can mean a hinge is so loose that it’s shifting under pressure, or worse, that the metal has cracked and is about to fail completely. If you hear this, a thorough visual inspection is critical. A loud door can have many causes, but finding a reliable noisy garage door fix starts with identifying the source.
Look: Visual Clues of Hinge Distress
Now, with the door closed and secure, take a close look at the hinges themselves.
- Visible Rust: Surface rust can often be cleaned, but deep, flaking rust is a sign that the metal’s integrity is compromised. If you’re figuring out how to repair a rusted garage door panel, don’t forget to check the hinges—they often rust first.
- Cracks or Stress Fractures: Look closely around the screw holes and the pivot point. Any visible crack, no matter how small, means the hinge is failing and must be replaced immediately.
- Elongated Screw Holes: If the holes where the screws attach the hinge to the door look oval instead of round, it means the hinge has been shifting under stress. This can cause the door to sag and should be addressed promptly.
- Jerky or Stuttering Motion: If the door seems to catch or hesitate as it moves, it’s often due to worn-out hinges binding instead of pivoting smoothly.
- Sagging or Uneven Gaps: Look at the gaps between the door panels. If they appear uneven or one side of the door hangs lower than the other, failing hinges could be the culprit, as they are no longer holding the panels in proper alignment.
Feel: When the Movement is Wrong
How the door moves is your final clue.
Mastery: Taking Action
Once you’ve diagnosed the issue, it’s time to take the right action.
How to Properly Lubricate Your Hinges (The Right Way)
Proper lubrication is the single most effective way to extend the life of your hinges. But doing it correctly is key.
- Wipe Down: Use a rag to wipe away any dirt, dust, and old, gunky lubricant from the hinge and its pivot point.
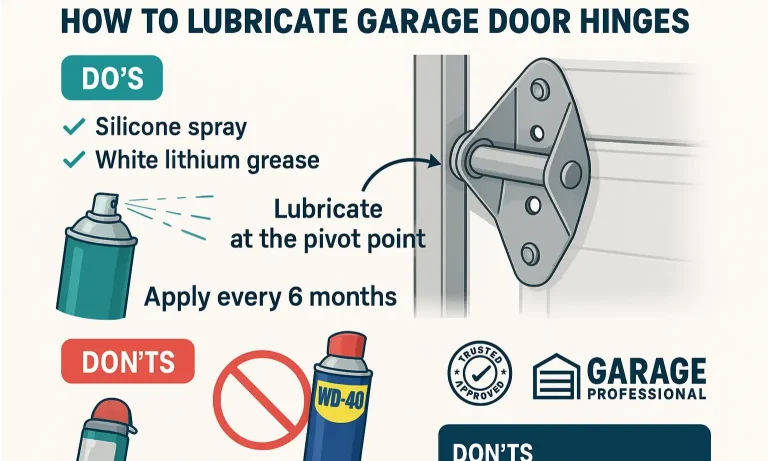
- Choose the Right Lubricant: This is critical. Use a garage door-specific lubricant, which is typically a silicone or white lithium grease spray.
- Apply Sparingly: Spray a small amount directly into the hinge’s pivot point. You don’t need to coat the entire hinge.
- Work it In: Operate the garage door a few times to allow the lubricant to penetrate deep into the joint.
- Wipe Excess: Use a clean rag to wipe away any excess lubricant, which can attract dust and dirt.
- Any cracks or fractures in the metal.
- Deep, structural rust that compromises the hinge’s strength.
- A hinge that is noticeably bent or warped.
- Severely elongated screw holes that prevent a secure fit.
Warning: Do NOT Use Standard WD-40!
This is the most common mistake homeowners make. Standard WD-40 is a solvent and degreaser, not a long-term lubricant. It can actually strip away existing grease and attract dust, making the problem worse over time. Stick to products specifically designed for garage doors.
Following a proper guide for how to lubricate garage door components is essential for system health.
When to Replace a Hinge: The Point of No Return
Lubrication can solve many problems, but it can’t fix a broken part. You should replace a hinge immediately if you see:
Action: Your Long-Term Hinge Health Plan
Consistency is key to preventing major issues. By integrating a simple check-up into your routine, you can catch problems early and keep your door running smoothly for years.
- Every 6 Months (Spring & Fall): Perform a full “Symptom Check.” Listen, look, and feel for any of the warning signs listed above.
- Lubricate: As part of your six-month check, apply the proper lubricant to all hinge pivot points.
- Tighten Hardware: Gently check if any hinge screws have become loose and tighten them as needed. Be careful not to overtighten.
This simple routine is a core part of any good garage door maintenance plan and can save you from unexpected and expensive repairs.
Frequently Asked Questions (FAQ)
Why are garage door hinges numbered?
Hinges are numbered (#1, #2, #3, etc.) to position the rollers at slightly different distances from the door. This allows the door to follow the curve of the track smoothly without binding. Higher numbers are placed higher up on the edges of the door.
What is the best lubricant for garage door hinges?
The best options are silicone spray or white lithium grease specifically designed for garage doors. Avoid standard WD-40, as it’s a solvent that can attract dust and grime, ultimately worsening the problem.
Can I replace just one broken hinge?
Yes, you can replace a single hinge. However, if one hinge has failed due to age or rust, it’s a good idea to thoroughly inspect all other hinges, as they are likely experiencing similar wear and may fail soon.
Is replacing a garage door hinge a DIY job?
For a handy homeowner, replacing a center (#1) hinge can be a straightforward DIY task. However, replacing the side hinges that hold the rollers can be more complex and potentially dangerous if not done correctly, as they are under tension. When in doubt, it’s always safest to call a professional. Your safety is paramount.
You May Also Like

How Extreme Weather Affects Garage Door Component Lifespan
Ever noticed how your garage door seems to have a personality of its own? It groans and complains on the coldest winter mornings and acts sluggish and stuck on the hottest summer days. It's not your imagination. The…
Published Date: Jan 22, 2026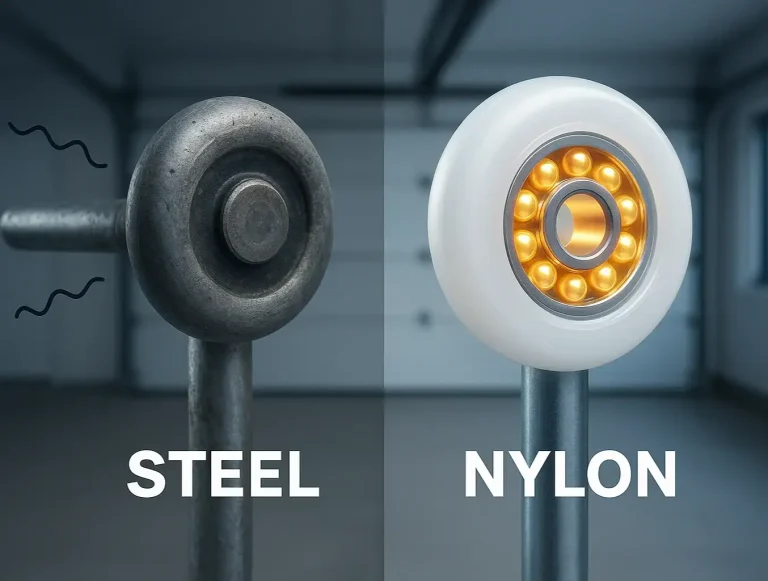
Steel vs. Nylon Garage Door Rollers: The Ultimate Guide to Lifespan
Ever stood in your driveway and winced as your garage door screeched its way open? That grating, metal-on-metal sound is a common complaint, and most people assume the solution is a simple choice: switch from steel…
Published Date: Jan 14, 2026
Garage Door Opener Lifespan: How Long Do Openers Last
Understanding the garage door opener lifespan helps homeowners and property professionals avoid sudden breakdowns and safety issues. Most openers work for years without trouble, yet wear, usage, and maintenance…
Published Date: Dec 17, 2025