





Installing an Exterior Emergency Release Kit for Stuck Garage Door
Published: May 29, 2026
It’s a scenario we all dread: the power goes out, and your car is trapped inside the garage. The remote is useless, the wall button is dead, and you have no other way in. That feeling of being stuck is frustrating, but what if a simple, 15-minute project could guarantee you’ll never face it again?
Installing an exterior emergency release kit is one of the most empowering and proactive upgrades you can make for your home. It’s a small lock on your garage door that provides a purely mechanical way to disengage the opener from the outside, allowing you to lift the door by hand. This guide will walk you through every step, transforming a task that seems intimidating into a straightforward project that delivers permanent peace of mind. Whether you’re worried about a power failure or a malfunctioning opener, this is your key to always having access.
The Simple Genius of a Garage Door Emergency Release
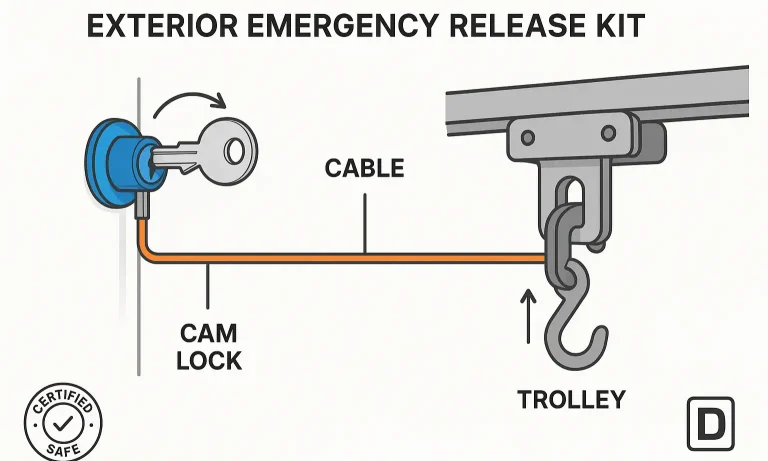
Before we start drilling, let’s have that “aha moment” and understand what this little device actually does. It’s not a complex electronic gadget; it’s a beautifully simple mechanical solution.
At its core, the kit consists of three main parts:
- A keyed lock cylinder that mounts on the exterior of your garage door.
- A steel cable that connects to the back of the lock.
- A connector that attaches the other end of the cable to your garage door opener’s release lever.
When you turn the key from the outside, it rotates a small cam on the back of the lock. This cam pulls the attached cable, which in turn pulls the same release lever you’d use inside the garage (the one with the red cord). This action disconnects the opener’s trolley from the door, allowing you to lift it manually. It’s the external equivalent of the familiar red cord, ensuring you have a reliable garage door manual release even when there’s no power.
Before You Start: The Most Important Safety Check You'll Make
Here’s something most guides skip, but it’s absolutely critical for your safety. Before you install a release that allows you to disconnect the opener, you must verify your garage door is properly balanced. An opener doesn’t lift the full weight of the door; the springs do. The opener just guides it.
If your springs are worn or broken, the door can be incredibly heavy and could slam shut once disconnected, causing serious injury or damage.
The 3-Step Door Balance Test:
- Close the garage door completely.
- Pull the red emergency release cord inside your garage to disconnect the opener.
- Carefully lift the door by hand to about waist height. It should stay there on its own. If it drifts down or slams shut, your springs are not balanced correctly and need professional service. Do not proceed with the installation until this is fixed.
Performing this check ensures that any time you need to operate your manual garage door, you can do so safely.
Installing Your Kit: A "Measure Twice, Drill Once" Guide
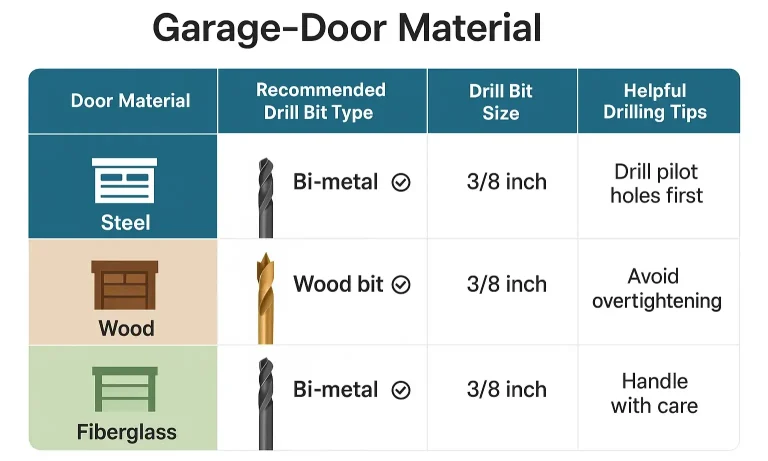
With your safety check complete, you’re ready for the main event. This process is all about precision, not power. Take your time, and you’ll get a clean, professional result.
Step 1: Gather Your Tools & Materials
You won’t need much. Most kits come with all the necessary hardware, so you’ll just need to supply the basic tools:
- Drill and drill bits
- Measuring tape
- Pencil or marker
- Wrench or socket set
- Screwdriver
- Safety glasses
The most common point of anxiety is drilling through the garage door. Using the right bit is key to a clean hole.
Step 2: Mark and Drill Your Hole
This is the point of no return, so let’s get it right. Your goal is to position the lock so the cable has a straight, clear path to the opener’s release lever.
1. Measure the Location: From inside the garage, measure from the top of the door down to the opener’s release lever. Then, measure from the side of the door to that same point.
2. Transfer the Measurement: Go outside and use those same measurements to mark a spot on the exterior of your door. This is where you’ll drill. Double-check that this spot is on a flat, solid section of a door panel, not on a seam or decorative groove.
3. Drill a Pilot Hole: Start with a small drill bit (e.g., 1/8″) to create a pilot hole. This prevents the larger bit from “walking.”
4. Drill the Main Hole: Switch to the bit size specified in your kit’s instructions (usually around 3/4″ to 1″). Drill slowly and steadily from the outside in.
Step 3: Install the Lock and Cable
With the hole drilled, the rest is simple assembly.
- Feed the armored cable through the hole from the outside.
- Slide the lock cylinder faceplate over the cable and fit it against the door.
- Insert the lock cylinder itself and secure it from the inside using the provided nut or clip.
- Attach the cable to the small cam on the back of the lock cylinder, tightening the set screw firmly.
- Route the cable up and over any support brackets, ensuring it won’t get pinched or snagged.
- Use the included hardware to attach the end of the cable to the metal lever on the opener trolley—the same one the red cord hangs from.
Step 4: Connect to the Opener Trolley
Now for the final connection.
⚠️ AVOID THIS MISTAKE: Do not attach the cable directly to the red plastic handle or the thin rope it’s on. These can break under pressure. Always connect it to the sturdy metal lever or ring that is part of the trolley assembly itself.
Trim any excess cable, but leave a little slack to prevent tension when the door is closed.
The Final Checks: Testing, Troubleshooting, and Upkeep
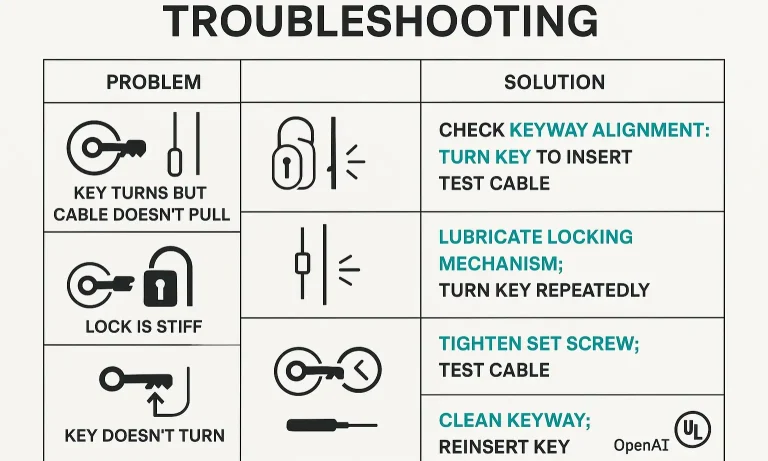
You’ve done the hard part. Now it’s time to ensure everything works perfectly and know what to do if it doesn’t.
How to Safely Test Your New Release
- Close the garage door.
- Go outside and insert the key into your newly installed lock.
- Turn the key and give it a firm pull. You should hear a “click” as the opener disengages.
- You can now lift the door manually from the bottom. Lift it a few feet to confirm it’s disconnected.
Re-Engaging Your Garage Door Opener
Once you’re done, you need to reconnect the door to the opener. Fortunately, most modern openers do this automatically. Simply press your remote or wall button. The opener will move the trolley along the track until it clicks back into place with the carriage on the door. For a detailed walkthrough of this process, see our guide on how to reconnect garage door opener systems.
Common Issues and Quick Fixes
Sometimes things don’t go perfectly. If you encounter an issue, don’t worry—it’s usually a simple fix. In any situation where the mechanism seems stuck, it’s helpful to understand how to open a stuck garage door from the outside to diagnose the problem. For more general issues, our guide on garage door opener troubleshooting can also be a valuable resource.
Your Garage Is Now Power-Outage-Proof
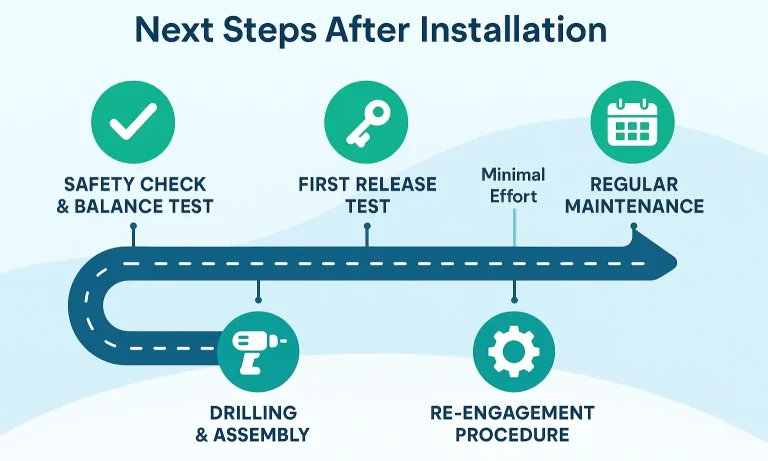
Congratulations! You’ve just installed a simple, robust system that ensures you’ll always have access to your garage. This small lock is a powerful symbol of preparedness, giving you confidence that you’re ready for any unexpected power outage or opener failure. You now know exactly how to open garage door without power from outside.
Frequently Asked Questions (FAQ)
What is the best drill bit for my garage door?
For standard insulated steel doors, a bi-metal hole saw is your best bet. For solid wood doors, a spade bit or Forstner bit works well. For fiberglass, a standard high-speed steel (HSS) bit is sufficient, but be sure to use painter’s tape over the drill site to prevent chipping.
What if the provided cable is too long or too short?
If it’s too long, you can simply trim it with a pair of wire cutters after installation. If it’s too short, you will likely need to find a better path for the cable or contact the manufacturer for a longer replacement. Do not try to splice or extend the cable, as this creates a weak point.
How do I know exactly where to drill the hole?
The “measure twice” rule is key. The goal is to align the lock cylinder with the opener’s release arm. Take careful measurements from inside the garage (top of the door down to the arm, side of the door across to the arm) and transfer them to the outside. A good rule of thumb is to place it centrally on one of the top door panels.
Can I install this on any garage door opener?
Yes, these kits are designed to be universal. They work with any opener that has a trolley-style release mechanism with a lever and a cord, which includes nearly all residential models from major brands like LiftMaster, Chamberlain, and Genie.
You May Also Like
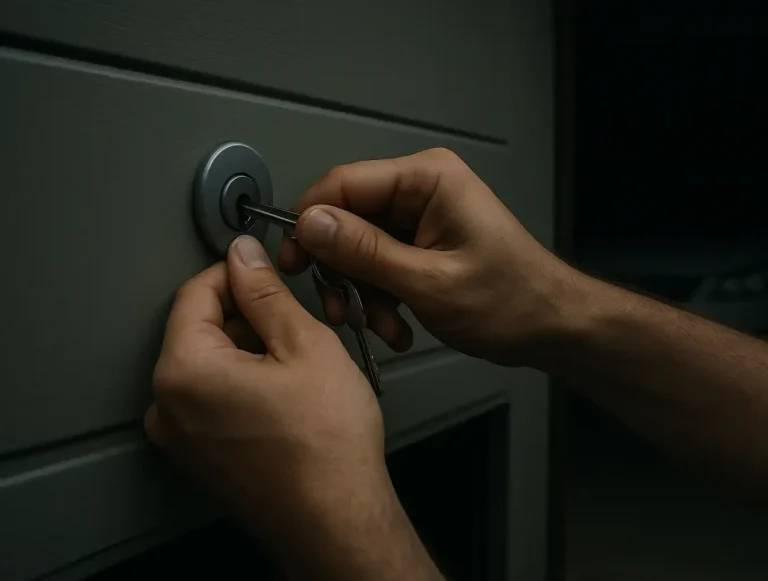
How To Open Open Garage Door Manually During Outage
The scenario is all too common: the power goes out, your car is inside the garage, and you're stuck on the outside. Your trusty remote is useless, and the keypad is dark. It’s a moment of pure frustration, but don't…
Published Date: May 26, 2026
How to Open a Stuck Garage Door from the Outside Safely
You pull into your driveway during a storm, the power is out, and your garage door is stuck. You’re locked out of your garage, and your tools — or even the main house entry — are inside. The quickest solution is…
Published Date: Nov 18, 2025
Emergency Exterior Access for Commercial or Rolling Steel Garage Doors
The power is out. Your delivery truck is loaded and needs to leave, but the massive rolling steel door to your warehouse is sealed shut. Or maybe the motor made a grinding noise and now refuses to budge. Panic starts…
Published Date: May 27, 2026