The Bottom Bracket Cable Guide: Why the Bike Industry’s Smallest Screw Causes the Biggest Failures
Published: Sep 28, 2026
When evaluating high-performance mechanical systems, we often focus on highly visible components like carbon layups, electronic shifting, or hydraulic braking systems. Yet, the most common point of catastrophic structural failure on modern frames is a humble, overlooked M5 fastener located at the absolute lowest point of your chassis.
The bottom bracket (BB) cable guide anchor bolt represents a critical single point of failure where geometry, chemistry, and environmental neglect converge. If you are currently staring at a seized, stripped, or spinning cable guide fastener, you are not alone. Understanding the engineering behind why this failure occurs is the first step toward a safe, permanent resolution that protects your high-end frame.
The Anatomy of a Low-Point Trap: Why Failure Occurs Here First
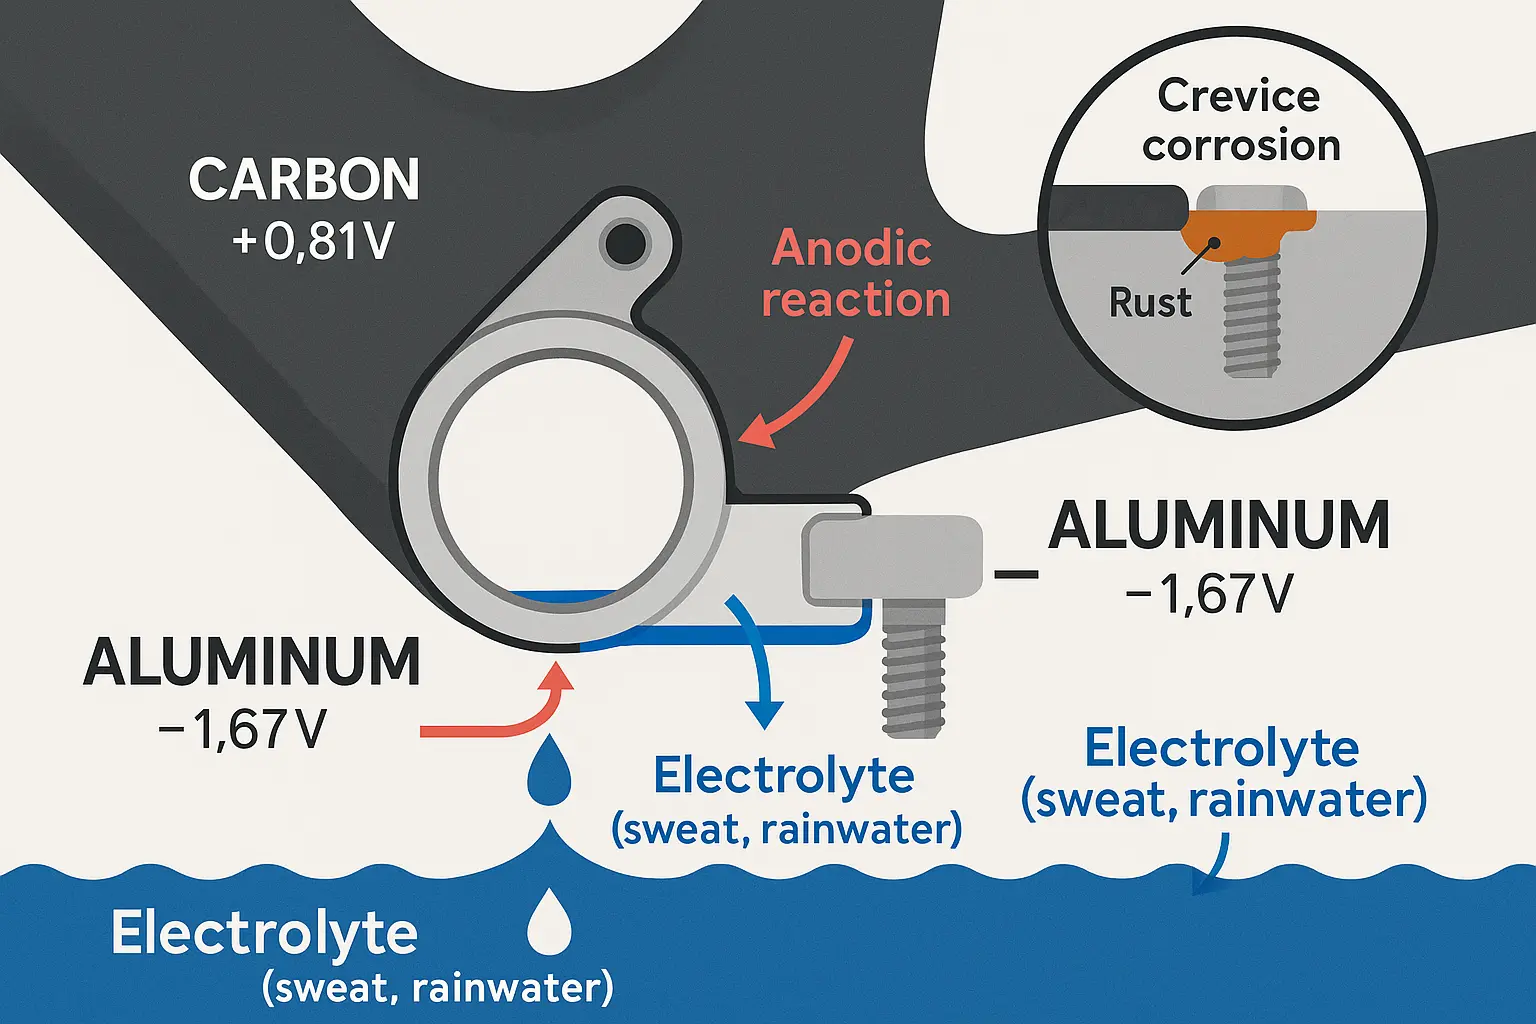
Your bicycle frame acts as a natural funnel. Rainwater, sports drinks, road spray, and highly corrosive, sodium-rich sweat enter the frame through structural openings like the seatpost split, internal routing ports, and headset gaps. Driven by gravity, these electrolyte-rich fluids migrate downward, pooling at the lowest possible point: the bottom bracket shell.
This is where design irony strikes. The M5 bolt holding the plastic bottom bracket cable guide is often positioned directly inside or adjacent to the frame’s natural drain hole. Instead of letting moisture escape, this fastener effectively acts as a drain plug.
As water pools around the thread interface, it remains trapped in a dark, oxygen-deprived environment. Over time, this stagnant moisture destroys bottom bracket bearings from the inside out, turning a simple cable routing anchor into a catalyst for total system degradation.
The Science of the Seizure: Galvanic & Crevice Corrosion
The Surgical Extraction Protocol (Interactive Troubleshooting Step-by-Step)
If you are dealing with a compromised bottom bracket anchor point, do not force it. Just as managing heavy residential hardware requires a calculated approach—like knowing how to remove rust from a garage door without compromising structural integrity—extracting a seized frame bolt requires patience and specialized techniques.
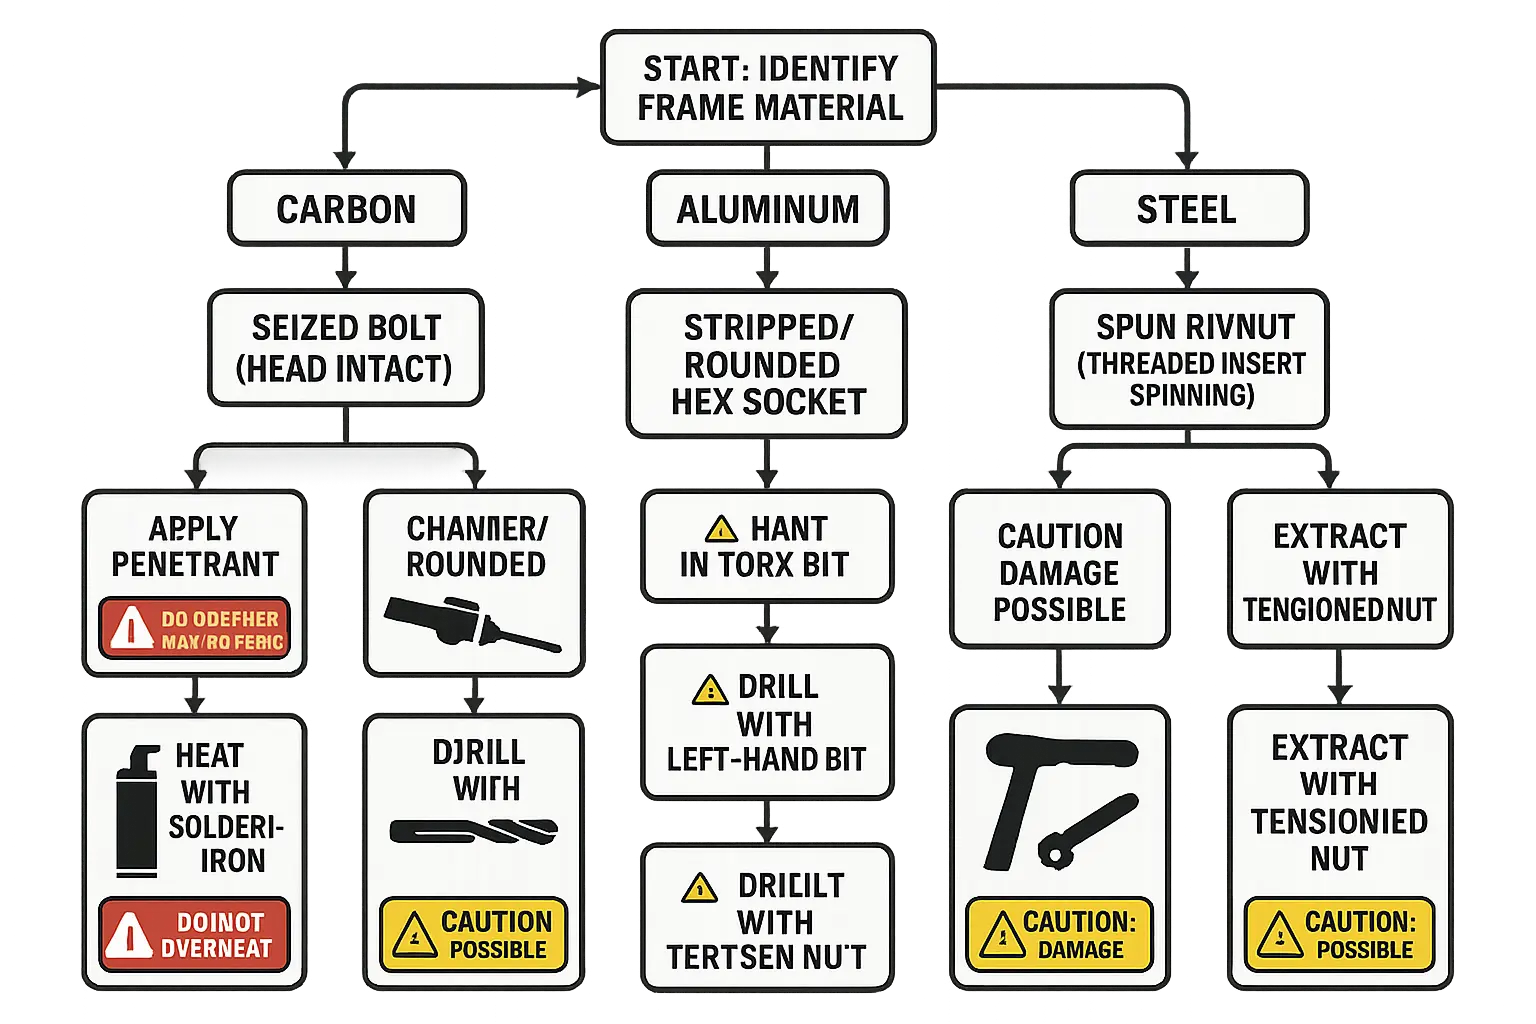
Level 1: The Seized Bolt (Head Intact)
Apply high-performance chemical penetrants (such as Kroil or PB Blaster) directly to the threads. Avoid generic lubricants like standard WD-40, which lack the surface tension properties required to penetrate dense oxide scaling.
Next, apply localized micro-heating. Press the hot tip of a soldering iron directly into the hex socket of the bolt. This concentrates heat solely on the steel fastener, causing it to expand and break the surrounding oxide bonds.
Level 2: The Rounded/Stripped Socket
When the hex pocket is completely stripped, drive a slightly oversized Torx bit (such as a T15 or T20) directly into the rounded hole with a series of light, sharp hammer taps. The sharp splines of the Torx drive will cut new channels into the metal, allowing you to back the bolt out.
Alternatively, employ a left-handed cobalt drill bit. Operating your drill in reverse delivers counter-clockwise torque that frequently catches and backs the bolt out during the drilling process itself.
Level 3: The Carbon Nightmare (The Spinning Rivnut)
On carbon frames, attempting to unscrew a seized bolt often breaks the glue bond holding the threaded metal insert (rivnut) inside the carbon shell. The insert will then spin infinitely.
To extract a spinning insert, thread an M5 bolt through a stack of washers and a wider nut, locking it down against the spinning flange to create tension. If this fails, you must surgically drill off the outer flange of the insert, push the remaining body into the bottom bracket shell, extract it through the BB opening, and set a new M5 rivnut using high-strength structural epoxy.
Preventative Solutions & Upgrades
The best way to handle bottom bracket corrosion is to prevent it entirely during your next build or overhaul. Much like securing structural garage door track brackets to handle massive dynamic loads without rusting out, protecting your frame’s anchor points requires the right chemical barriers.
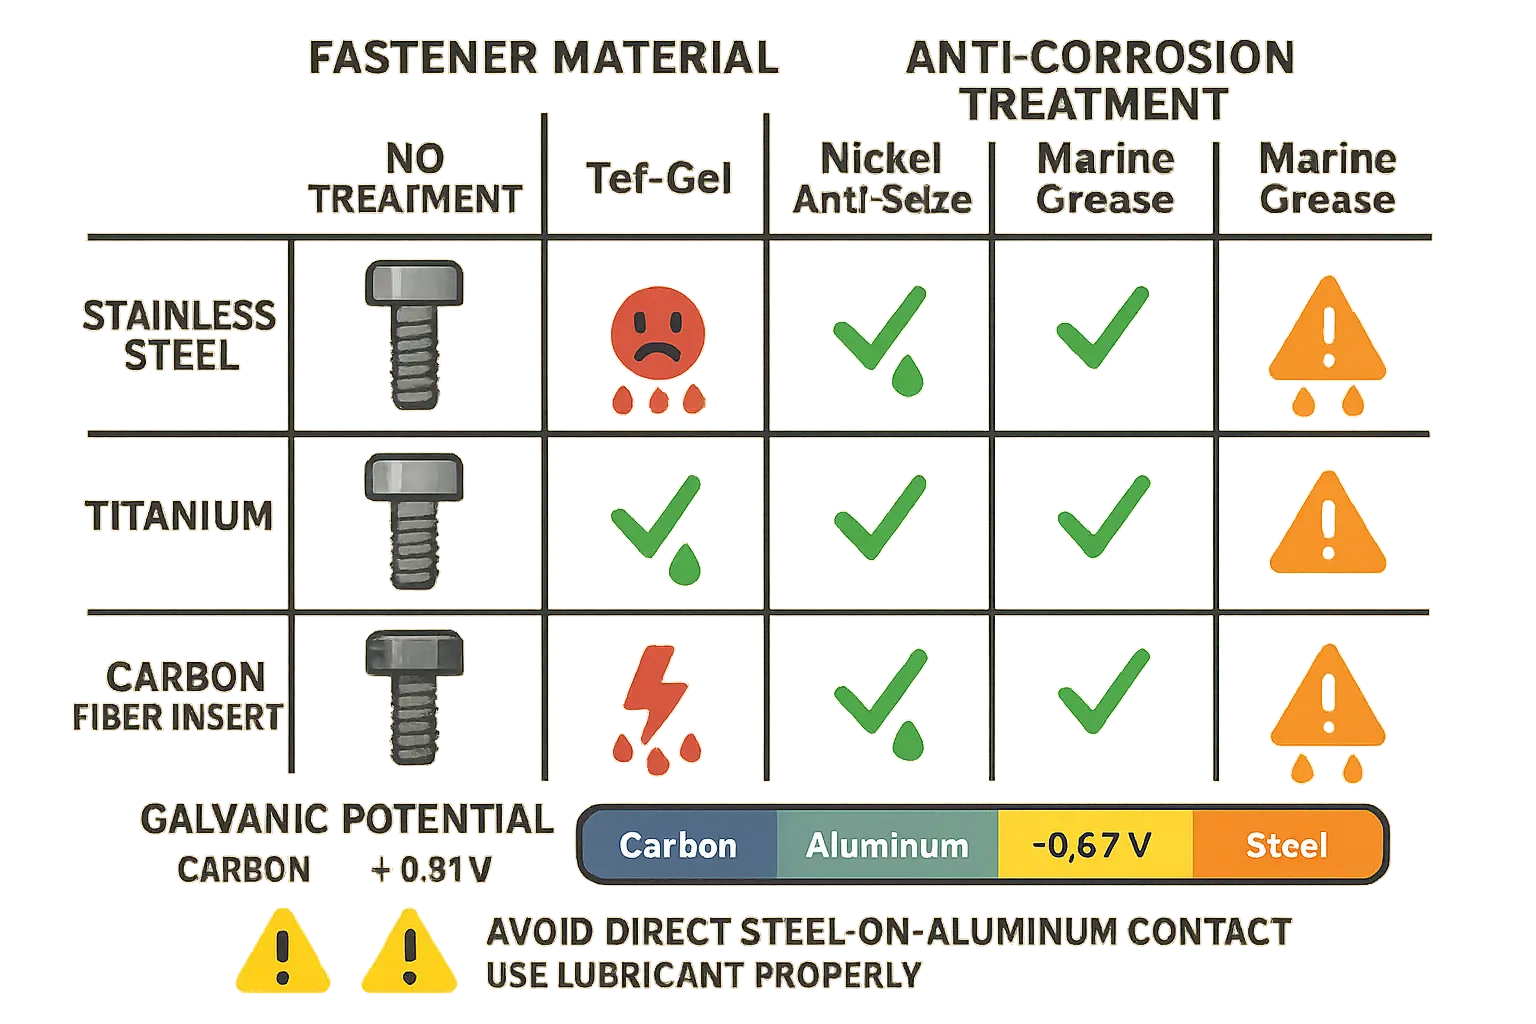
- Isolation Pastes (Tef-Gel): PTFE-based assembly pastes like Tef-Gel create a permanent physical barrier that prevents electrolytes from completing the circuit between dissimilar metals.
- Anti-Seize Compounds: Utilize nickel-based anti-seize for titanium fasteners and aluminum-carbon interfaces.
- Upgraded Fasteners: Swap soft steel or aluminum bolts for high-grade titanium fasteners, which offer far superior galvanic compatibility with carbon fiber.
- Alternative Routing: If your frame threads are permanently destroyed, bypass the problem entirely by using adhesive-backed plastic cable guides, routing full-length cable housing with heavy-duty zip ties, or upgrading to a wireless electronic drivetrain.
Neglecting these tiny details can lead to unexpected, expensive failures, much like a frayed garage door cable that snaps without warning due to hidden rust. A little chemical isolation goes a long way toward keeping your mechanical systems rolling smoothly.
Frequently Asked Questions
Can I use a propane torch to heat a stuck bolt on a carbon fiber frame?
What is the best grease to prevent bottom bracket galvanic corrosion?
A PTFE-based isolation paste like Tef-Gel is highly recommended because it does not wash away or break down when exposed to water and sweat. For standard metal-on-metal threads, a marine-grade grease or high-quality nickel anti-seize compound will also provide excellent long-term protection.
How do I know if my bottom bracket cable guide bolt is seized or if the insert is spinning?
If you turn the bolt counter-clockwise and it resists completely, the threads are seized. If the bolt turns continuously in both directions but never backs out or loosens, the adhesive bond holding the threaded frame insert (rivnut) has failed, and the insert is spinning inside the frame.
You May Also Like