Bottom Seal Retainer Replacement: When the Channel Is the Problem
Published: Oct 8, 2026
You purchased a brand-new rubber bottom seal, set aside an afternoon for a quick home improvement project, and got to work—only to hit a literal wall. No matter how hard you pull, tug, or lubricate, the new rubber track refuses to slide into the metal groove.
When a simple weatherstripping swap stalls, the culprit is almost always the bottom seal retainer channel. Over years of hard service, these metal or plastic tracks warp, pinch, and corrode. To restore a tight seal against drafts, pests, and water, you need to address the metal track itself.
Deciding Between a Seal Repair and a Channel Replacement
Before ripping off the bottom hardware, you must diagnose if your existing retainer can be saved or if a full channel replacement is necessary.
A quick diagnostic check will clarify your next step:
- Pinched or Crimped Tracks: If a heavy object hit the bottom of your door, the aluminum track channels may have pinched shut. You can often gently pry these open using a flathead screwdriver or needle-nose pliers.
- Oxidation and Buildup: If you notice a white, powdery residue (aluminum oxidation) or red rust, it will choke the track. You can clean this with a wire brush, but if the metal has begun flaking away, structural integrity is lost. Knowing how to resolve bottom of garage door rusting issues early can prevent this degradation.
- Severe Warping or Obsolete Profiles: If the channel is bent across a wide span or uses an obsolete proprietary shape that modern seals cannot fit, replacing the entire retainer is your only viable path.
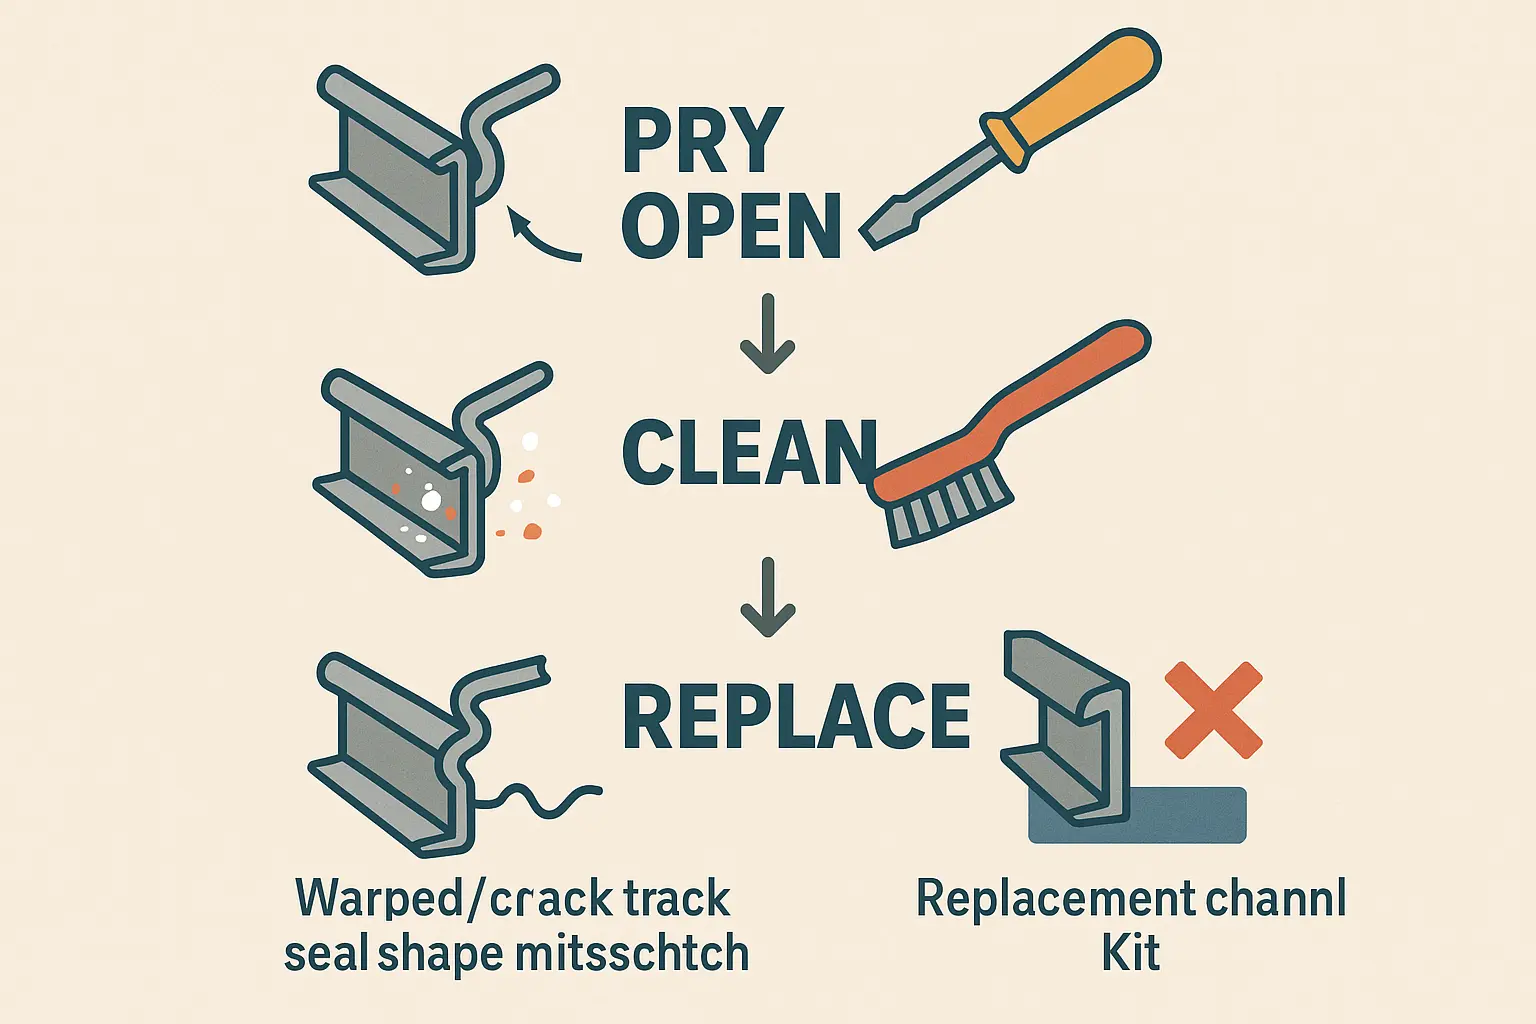 This checklist helps homeowners quickly diagnose if their garage door bottom seal issue is due to a bent track, rust buildup, or if the entire retainer channel needs replacing.
If cleaning the metal fails to resolve the friction, a complete retainer replacement is required to properly seal your garage.
Safe Handling of High-Tension Bottom Door Hardware
The single greatest barrier to starting this project is the fear of high-tension cables. Many homeowners worry that unscrewing the bottom track will release the door’s springs with violent force. This is a very real, valid safety concern.
The high-tension lift cables are attached exclusively to the bottom corner brackets. The bottom seal retainer track is installed independently of these brackets. You can safely remove the screws securing the center retainer track without touching the corner brackets. This is a crucial safety rule when evaluating how to fix a garage door yourself. Never loosen or remove the corner brackets; if you suspect cable issues, do not attempt to adjust them or learn how to adjust garage door cables without professional tools and training.
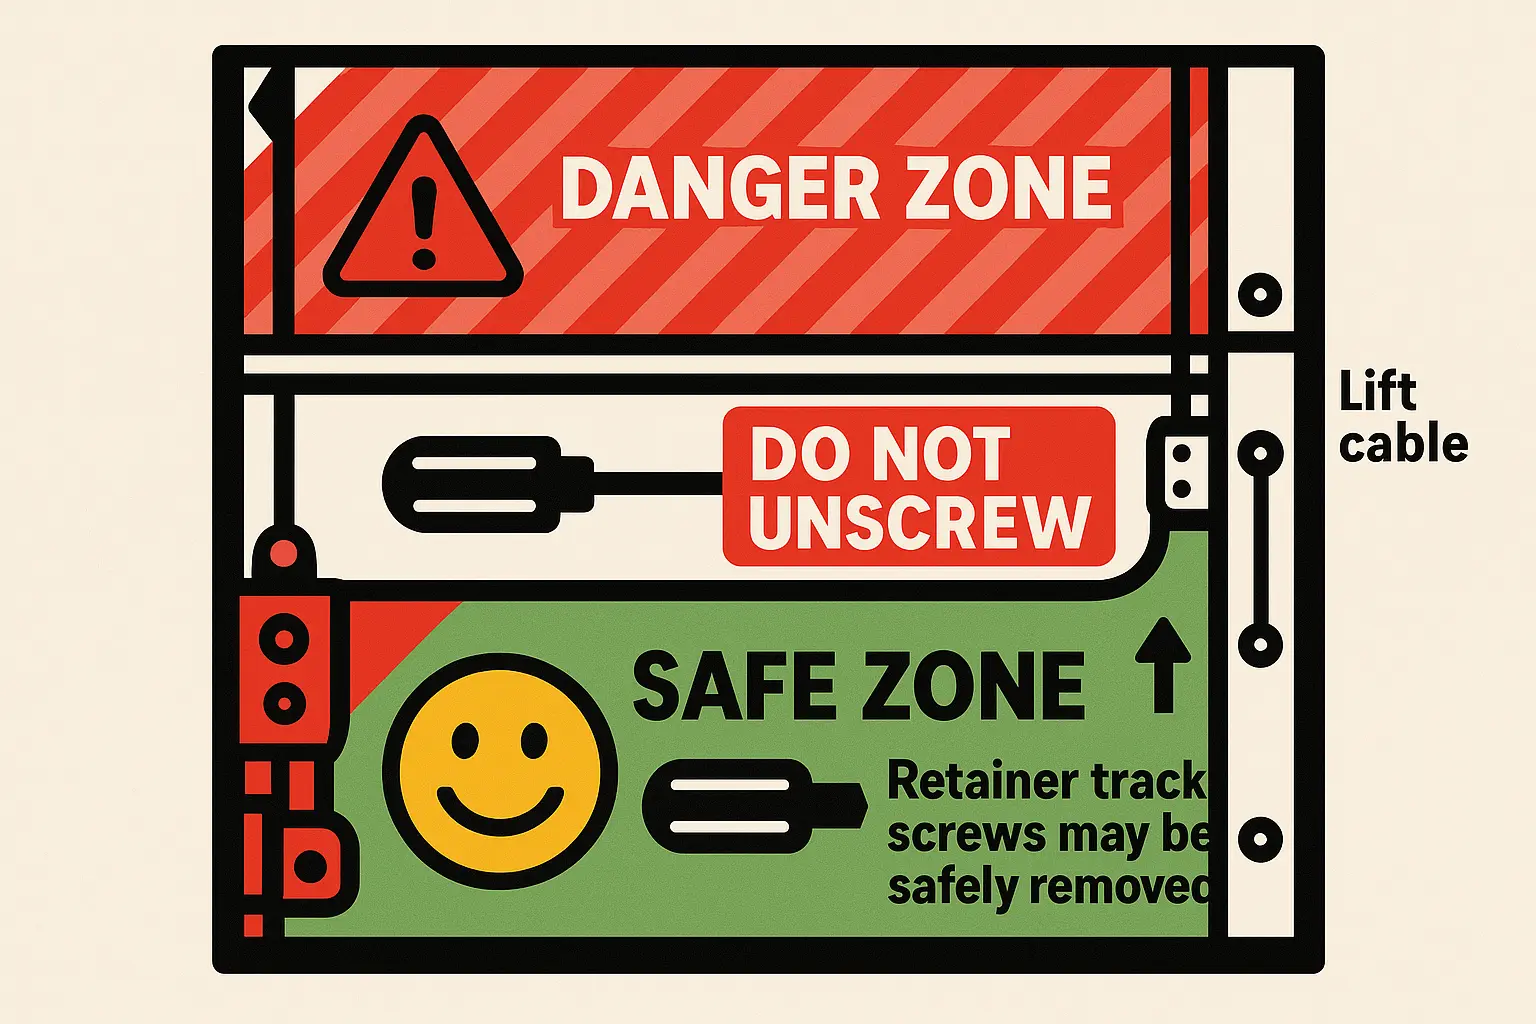 Understand the clear boundary between the dangerous high-tension corner brackets and the safe-to-remove retainer track screws, protecting you from injury during seal replacement.
Choosing a Replacement Channel: Materials and Sizes
When purchasing a replacement retainer, you need to match your door’s physical dimensions and material requirements. Retainers are sized by standard door thicknesses: 1-3/8 inches, 1-3/4 inches, and 2 inches.
Material Options
- Aluminum: Heavy-duty, rigid, and holds its shape for decades. However, it can bend on sudden impact and is susceptible to galvanic corrosion if paired with incompatible steel screws.
- PVC/Plastic: Rust-proof, highly flexible, and easy to trim to size. It flexes smoothly over uneven concrete, but can become brittle and crack in extreme winter temperatures.
Common Track Shapes
- U-Shape (Standard): Designed for flat-bottom steel and wood doors.
- L-Shape (Offset): Common on tongue-and-groove doors, creating an integrated exterior-facing drip edge. This shape is a vital component when you look at how to weatherproof your garage door against heavy rain.
The Wayne Dalton Workaround
If you own a Wayne Dalton garage door, you likely have a proprietary teardrop-style single-channel seal. These are notorious for tearing and are expensive to replace. The smartest industry workaround is to buy a universal aluminum U-channel retainer and screw it directly over the bottom of the Wayne Dalton panel. This permanently converts your door to a standard double-channel T-style system, giving you access to cheaper, more durable universal seals.
Step-by-Step Channel Replacement Guide
Replacing the bottom retainer channel is highly manageable when approached systematically.
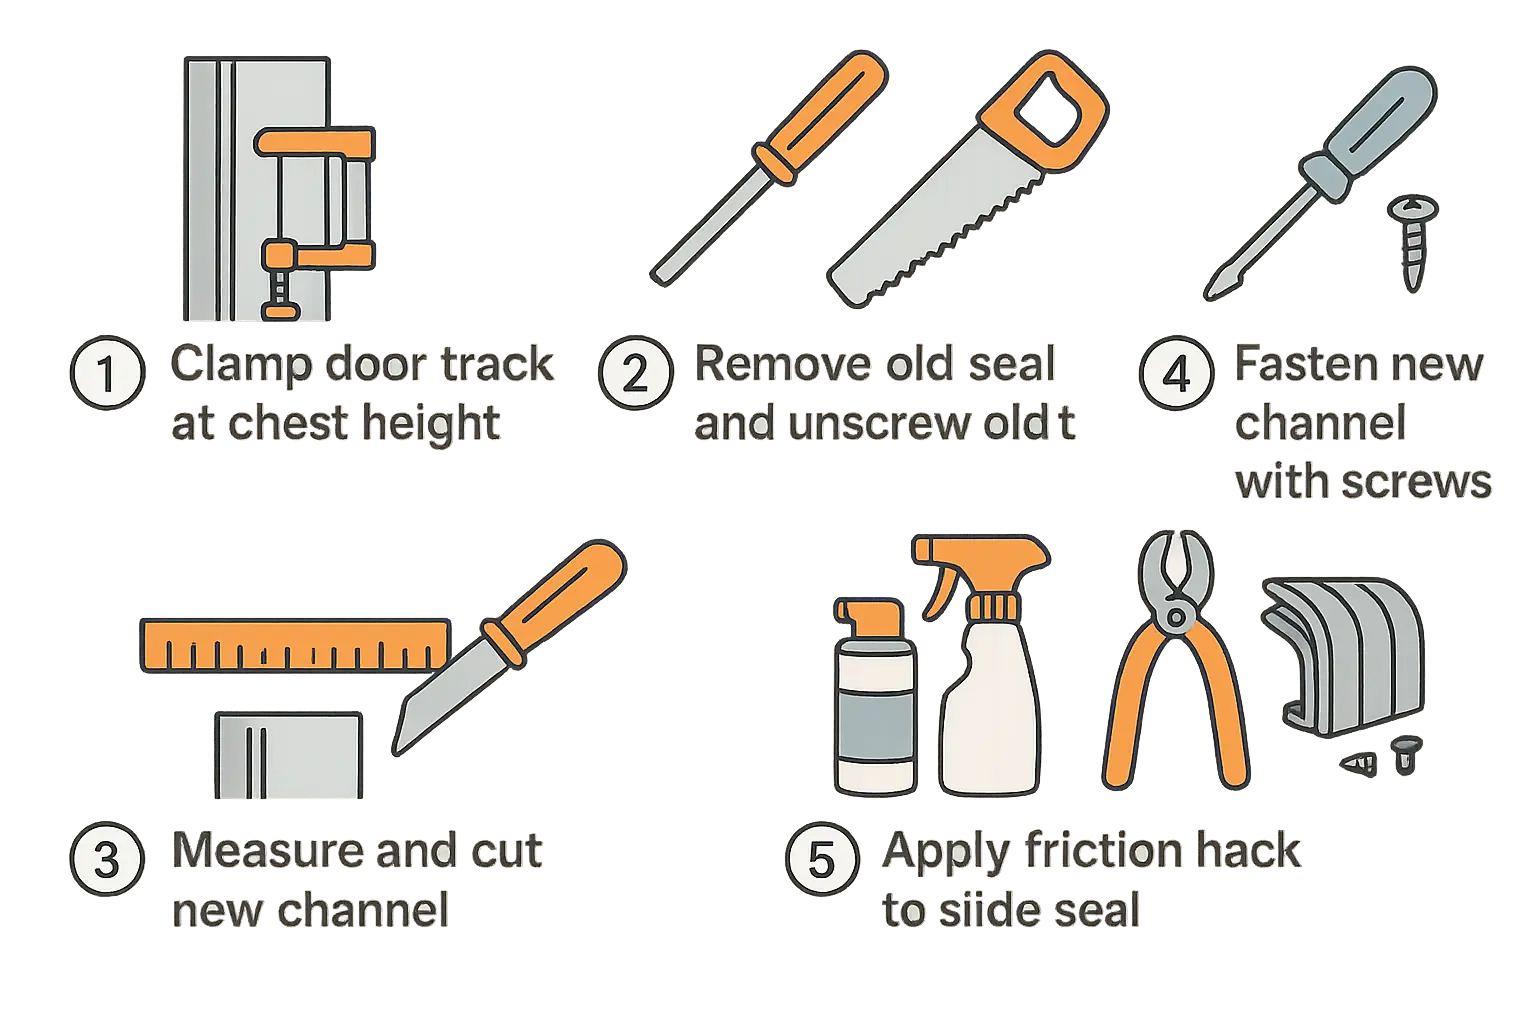 Follow these five easy steps for safe and effective garage door bottom seal retainer replacement, including pro tips to overcome friction challenges during installation.
1. Preparation
Raise the door to chest height. Lock locking pliers (vice grips) onto the vertical tracks directly beneath the rollers to mechanical block the door from moving while you work.
2. Strip and Clean
Slice the old rubber seal down the middle with a utility knife to pull it out in pieces. Unscrew the mounting fasteners holding the old retainer in place. Use a wire brush to remove dirt, debris, and corrosion from the bottom panel’s raw metal edge. If rust is present, take this opportunity to learn how to remove rust from a garage door to stop structural decay before installing new hardware.
3. Cut to Fit
Measure the exact width of your garage door. Cut your new aluminum or PVC retainer tracks using a hacksaw. If using multiple shorter pieces, ensure they line up perfectly straight across the door bottom.
4. Mount the New Retainer
Secure the new channel to the bottom of the door using self-tapping, rust-resistant sheet metal screws. Pre-drilling small pilot holes prevents the screws from walking and scratching your door’s outer skin.
5. Install the Rubber Seal Using Trade Hacks
- The Lubricant Hack: Never use WD-40, grease, or motor oil. Petroleum-based products degrade EPDM rubber and attract dirt. Use soapy water, silicone spray, or glass cleaner. Glass cleaner is the professional choice because it evaporates completely without leaving a sticky, dirt-attracting residue.
- The Flaring Hack: Before sliding the rubber in, use needle-nose pliers to slightly flare the outer edges of the metal track opening. This widens the entry point and prevents the sharp metal edge from cutting or tearing the rubber T-ends.
- The Shrinkage Hack: Pull the rubber through, leaving an extra two inches hanging off both ends. Fold the excess rubber back into the channel and secure it with a small screw. This prevents the rubber from shrinking and leaving gaps on the corners over time. Add checking this seal to your seasonal garage door maintenance checklist.
Frequently Asked Questions
Can I replace the retainer channel without replacing the rubber seal?
Yes, but it is rarely recommended. If your old retainer was warped or corroded enough to require replacement, the old rubber seal has likely degraded, hardened, or deformed to match the old channel’s defects. Installing a fresh, flexible rubber seal alongside the new track ensures a perfect, weatherproof seal.
Do I need to remove my garage door to replace the bottom track?
No, you do not need to remove the door. You only need to raise it to a comfortable working height (usually chest level) and lock it securely in place using track clamps or vice grips under the bottom rollers. This provides full access to the bottom edge.
How do I know if my door thickness is 1-3/8″ or 1-3/4″?
Open your garage door halfway and use a tape measure across the flat edge of the vertical side panel. Standard residential steel doors are typically 1-3/8 inches thick for non-insulated or entry-level models, and 1-3/4 inches thick for heavy-duty insulated sandwich-style panels.
Struggling with a stubborn bottom retainer, or unsure if it is more cost-effective to repair or replace components? Read our guide on whether is it cheaper to repair or replace a garage door? or contact Up & Down Garage Doors today. Our experienced local technicians provide professional, fair-priced repair and installation services across multiple states, ensuring your home stays safe and draft-free.
You May Also Like