Our company logo

State

How to Insulate Garage Door Panels on Old or Odd-Sized Models


Published: Jul 1, 2026

You’ve seen the videos. Someone grabs a neat, pre-packaged insulation kit from a big-box store, spends an afternoon snapping panels into place, and voilà—a perfectly insulated, standard-sized metal garage door. It looks so simple.

But then you look at your own garage door. Maybe it’s a gorgeous, solid wood door from the 1970s. Perhaps it’s a custom-built door with panels of all different sizes. Or it could just be an older model whose dimensions don't match anything on the shelf today.

Suddenly, that simple DIY project feels impossible. The guides don't apply, the kits don't fit, and you're left wondering if your garage is doomed to be an oven in the summer and an icebox in the winter.

Here’s the good news: you’re not alone, and your door is almost certainly not a lost cause. You’ve just stumbled into a common knowledge gap. Most resources cater to the simplest scenario, leaving everyone else to troubleshoot on their own. This guide is different. It’s for you—the owner of the non-standard, the vintage, the custom-fit door. Let's walk through how to solve this puzzle, one custom-cut panel at a time.

Hook: "Is Your Garage Door Standard?" - Door Type Diagnostic


Before you can find the right solution, you need to properly identify the problem. Most insulation challenges come down to the type of door you have. See if you recognize yours below.
A collage of different garage door types, including standard metal panel, wood, and custom designs.

  • Standard Steel Panel Doors: These are the most common. They have recessed rectangular panels, are typically made of steel, and are what most DIY kits are designed for.
  • Flat/Flush Panel Doors: These doors have a smooth, flat surface with no indentations. They offer a clean slate for custom insulation but require adhesives or pins.
  • Vintage Wooden Doors: Often heavy and built with solid wood frames or panels. They may have unique designs, cross-bracing, or no distinct panel structure at all.
  • Carriage House Style Doors: These often have decorative overlays (like cross-braces) that create irregularly shaped pockets for insulation.
  • Custom-Sized Doors: These doors don't conform to standard single or double-car widths or heights, meaning pre-cut kits will never fit properly.
A collage of different garage door types, including standard metal panel, wood, and custom designs.

Foundation: Core Concepts for Custom Insulation Jobs


When you're not using a kit, you have to become the designer. That means understanding a few core concepts that kit-users get to ignore.
A close-up of a garage door torsion spring, highlighting its importance in counterbalancing the door's weight.

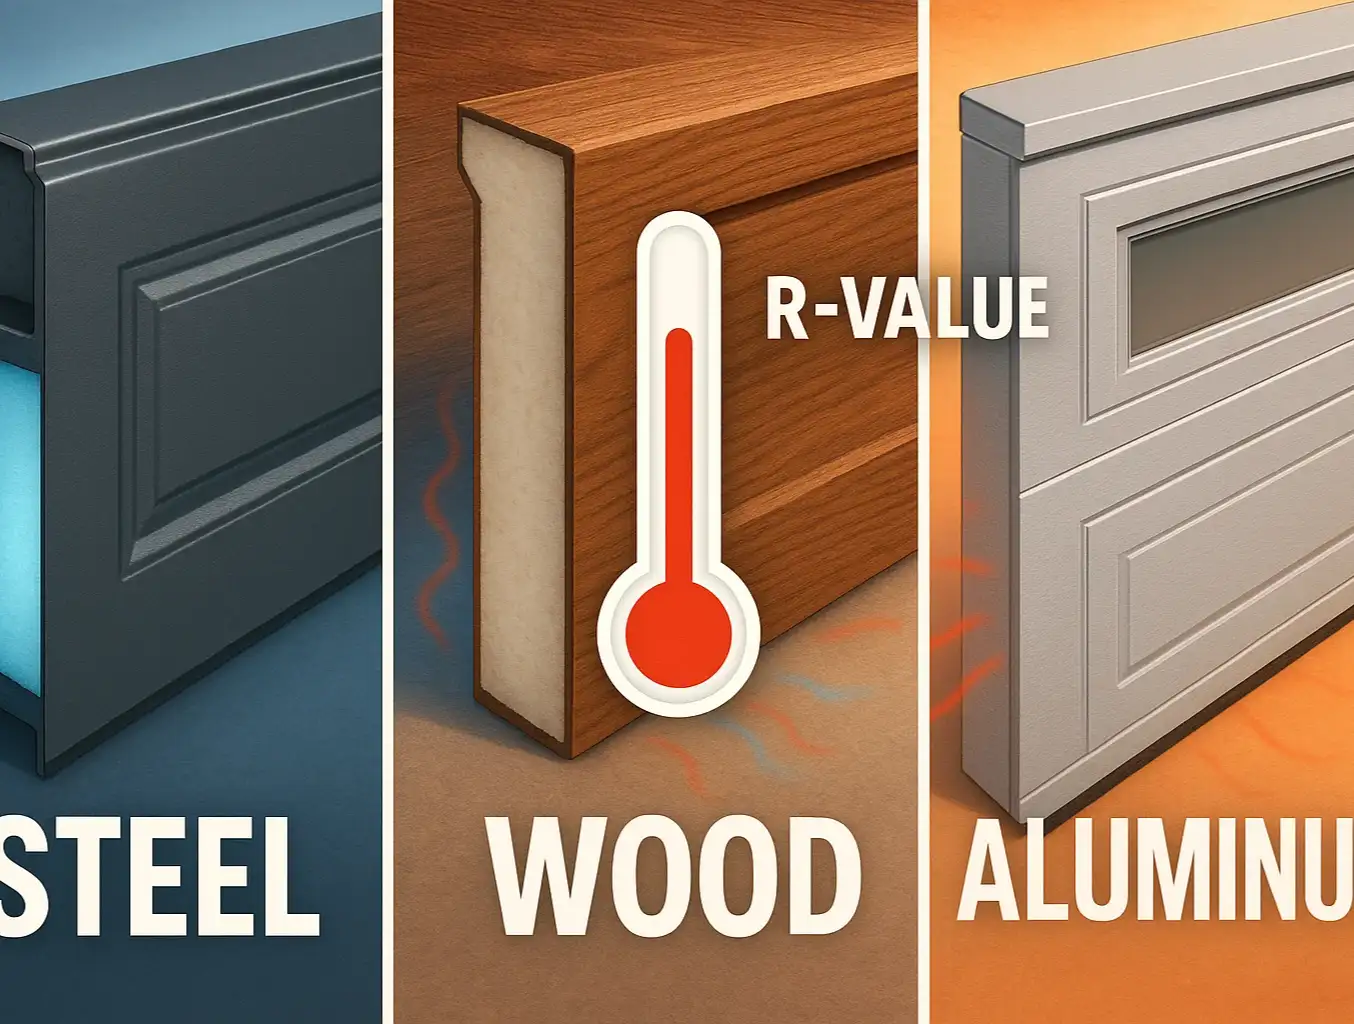
Understanding R-Value Beyond the Label

You've probably seen "R-value" on insulation packaging. It's a measure of thermal resistance—the higher the number, the better it insulates. But for a custom job, the type of material is just as important as its R-value. For example, rigid foam board is ideal for custom projects because it’s easy to cut precisely, while flimsy materials are much harder to work with. The overall benefits of garage door insulation go far beyond just R-value, affecting comfort, noise reduction, and even the longevity of items stored in your garage.

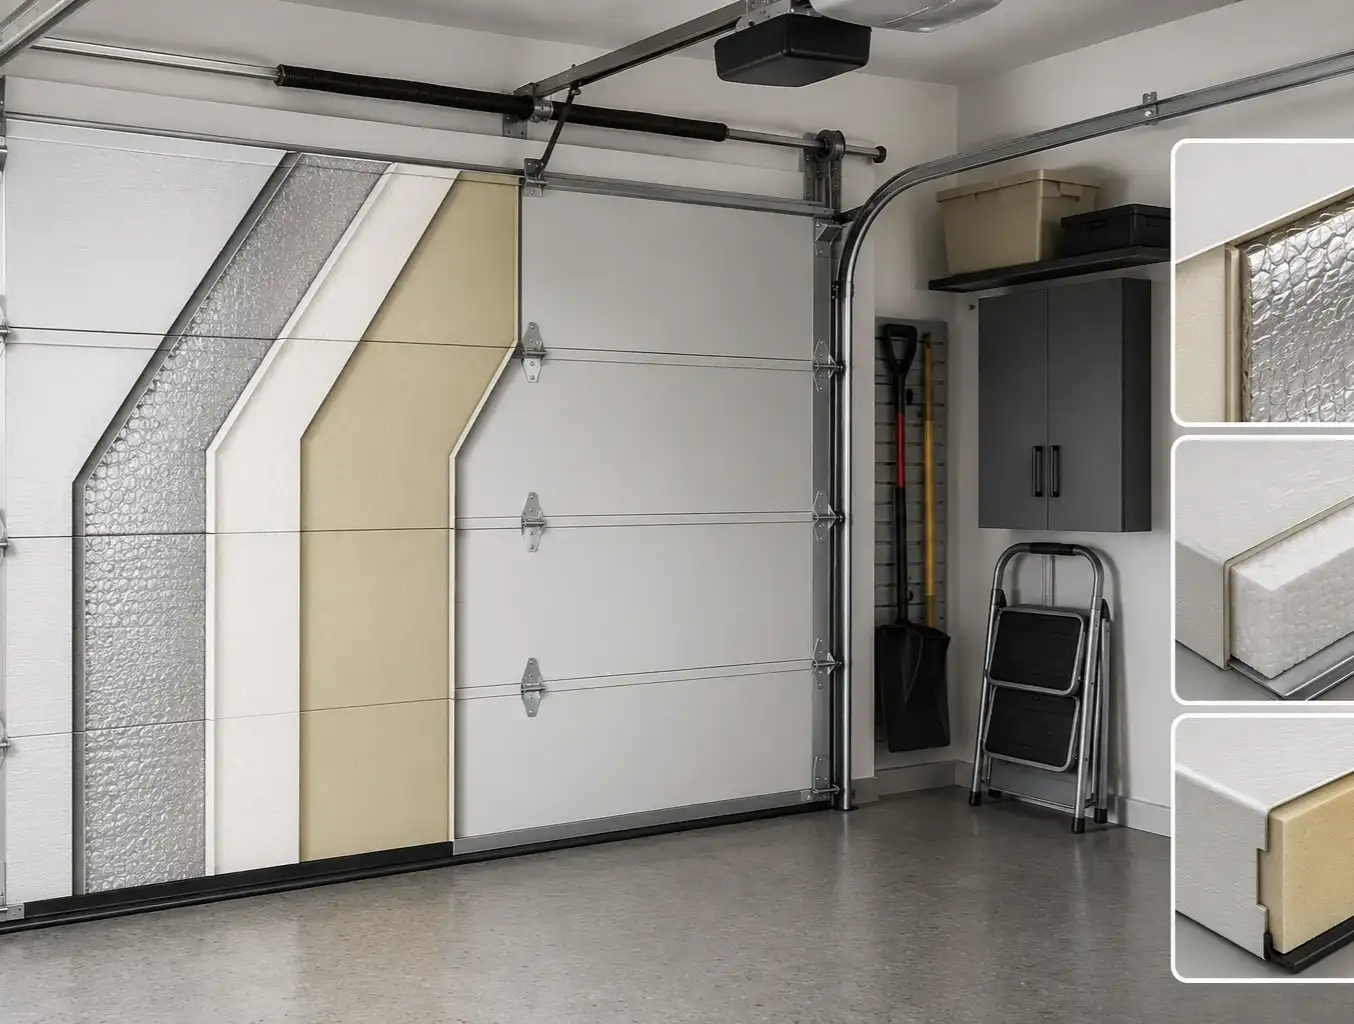
Choosing Your Material: Foam vs. Spray vs. Radiant Barrier

With a non-standard door, you have more choices, each with pros and cons for your specific situation.

Rigid Foam Board (EPS or XPS): The hero of most custom jobs. It's lightweight, easy to cut into any shape with a utility knife, and offers a great R-value for its thickness. If you're tackling a project with odd-shaped panels, this is likely your best bet. There are several types, with polystyrene garage door insulation being a popular and cost-effective choice.

Spray Foam: Excellent for filling irregular cavities, especially on older wooden doors with complex framing. However, it can be incredibly messy, is permanent once applied, and can even warp thin metal panels if it expands too much.

Radiant Barrier (Foil-Faced): This material reflects radiant heat. It’s incredibly effective in hot, sunny climates but provides less benefit in cold regions where convective heat loss is the primary concern. It’s very lightweight, which is a major plus.

The Critical Safety Briefing: Weight, Balance, and Your Springs

This is the most important section of this guide. It's the one thing that budget DIY articles often gloss over, and it's a huge safety risk.
Every ounce of insulation you add to your door is extra weight that your garage door springs must lift.: Older doors, especially wooden ones, are already heavy. Adding 20-50 pounds of foam board can throw the entire system out of balance. An unbalanced door puts immense strain on your garage door opener, causing it to wear out prematurely. More dangerously, it can cause the door to slam shut if a cable or spring fails. The different types of garage doors spring systems are under extreme tension and are responsible for safely counterbalancing hundreds of pounds. Adjusting them is not a DIY task. Before you even buy your materials, you need to understand that finishing this project correctly will likely involve calling a professional to rebalance your door.

A close-up of a garage door torsion spring, highlighting its importance in counterbalancing the door's weight.

Building: The Step-by-Step Custom Insulation Guide


Ready to tackle the project? Here’s how to think through it methodically.
A person carefully measuring and cutting a foam insulation board to fit a custom-sized garage door panel.

Part A: The Pre-Flight Check: Test Your Door’s Balance

Before you add any weight, test your door's current balance.

1. Close the garage door.

2. Pull the red emergency release cord to disconnect the opener.

3. Manually lift the door. It should be relatively easy to lift with one hand and should stay put when you let go at any point (fully open, halfway, or near the ground).

4. If the door flies up or slams down, it’s already out of balance and needs professional service before you add any more weight.

This simple test gives you a baseline for comparison later.

Part B: Measure Twice, Cut Once: A Guide for Awkward Spaces

For panels that aren't perfect rectangles, a tape measure alone won't cut it.

1. Create a Template: Get a large piece of cardboard (an old appliance box works great). Hold it up to a panel and trace the outline of the space you need to fill.

2. Cut the Template: Cut out the cardboard template and test its fit. Adjust it until it slides into the panel cavity perfectly.

3. Transfer to Insulation: Lay your perfected template on the rigid foam board and trace it with a marker.

4. Cut with Precision: Using a sharp utility knife and a straight edge, carefully cut the foam board. For best results, score the line first, then make several deeper passes rather than trying to cut through it all at once.
Pro Tip: Cut your first panel slightly larger than your trace line. You can always shave off small amounts for a snug, friction-fit, but you can't add material back.

Part C: Installation and Sealing the Gaps

For most metal doors, the panels can be friction-fit into the panel cavities. For flush doors or wooden doors, you may need a construction-grade adhesive designed for foam board.
The final, crucial step is sealing. Even the best-cut panels will have small gaps. Air infiltration will negate much of your hard work.
• Use foil tape to seal the seams between insulation panels.
• Inspect the perimeter of the door. A worn-out or damaged seal at the bottom or sides of the door is a major source of energy loss. A full garage door bottom seal replacement can be just as impactful as insulating the panels themselves.

A person carefully measuring and cutting a foam insulation board to fit a custom-sized garage door panel.

Mastery: Advanced Scenarios & Troubleshooting


Your door might have some unique quirks. Here’s how to handle them.

How do I insulate a solid wood garage door?

If your door is one solid piece with a wooden frame on the inside, you can cut foam board to fit between the frame's vertical stiles and horizontal rails. Use a strong adhesive to secure the panels.

My garage door has windows. What's the best approach?

Do not cover the windows with insulation. Simply treat each window as a fixed obstacle and cut your insulation panels to fit snugly around the window frame.

Is it worth insulating a very old (50+ years) door?

It depends on the door's condition. If the wood is solid and the door operates smoothly, absolutely. However, if the door is warped, rotting, or has significant structural issues, insulating it is like putting a band-aid on a bigger problem. A comprehensive garage door maintenance check can help you determine if the door is a good candidate for insulation or if replacement is a better long-term investment.

Action: Calibrating Your Door for Its New Weight


You’ve cut and installed every panel. The job looks fantastic. But you're not done yet.
A professional technician adjusting the torsion spring on a garage door to ensure it is properly balanced and safe.

Testing the Door Post-Installation

Repeat the balance test from Part A. Disconnect the opener and lift the door manually. You will almost certainly notice it feels much heavier. If it doesn't stay open on its own or is difficult to lift, the balance is off.

Why You Must Call a Professional for Spring Adjustments

It's tempting to watch a video and try to adjust the springs yourself. Please don't. Torsion springs are under immense tension, and a mistake can lead to serious injury or property damage. There's a reason professionals have specialized tools and training. Trying to rewind garage door spring systems is one of the most dangerous home repair tasks you can attempt.

A professional technician can adjust or replace your springs to perfectly counterbalance the new weight of your insulated door. This ensures your opener works efficiently and, most importantly, that your door operates safely for years to come.

A professional technician adjusting the torsion spring on a garage door to ensure it is properly balanced and safe.

Your Next Steps to a More Comfortable Garage


Insulating a non-standard or older garage door is more of a puzzle than a paint-by-numbers project, but it's a puzzle you can absolutely solve. By understanding your door type, choosing the right materials, and prioritizing safety—especially when it comes to the added weight—you can achieve the same comfort and energy efficiency as someone with a brand-new, standard-size door.

You've taken the first step by learning. Now, you’re equipped to plan your project with confidence, knowing exactly which parts you can handle and when it's time to call in a pro.

Frequently Asked Questions (FAQ)


What's the best type of insulation for a garage door?

For most DIY and custom projects, rigid foam board (like polystyrene) offers the best combination of R-value, low weight, and ease of cutting.

How much R-value do I really need?

An R-value between 8 and 12 is excellent for most garage doors and will make a significant difference in temperature regulation and comfort.

Will insulating my garage door really save me money?

Yes, especially if your garage is attached to your home. It reduces heat transfer, meaning your HVAC system doesn't have to work as hard to maintain the temperature in adjoining rooms. It also makes the garage a more usable space year-round.

My door is a custom size. Can I still insulate it?

Absolutely. As this guide shows, you just need to use custom-cut insulation materials like rigid foam board instead of a pre-sized kit. If you're considering a new door, there are many options for beautiful and efficient custom garage doors that come pre-insulated.

How much weight does insulation add to a garage door?

This varies by material, but a typical double-car garage door insulation project can add between 20 and 50 pounds. This is more than enough to require a professional spring adjustment for safe operation.

You may also like


blog photo

Space-Saving Insulation Solutions for Garage Doors in Compact

You’ve meticulously designed your compact, energy-efficient home. Every square foot is optimized, every window is triple-paned, and your walls have the perfect thermal envelope. But there’s a giant, uninsulated hole in your design that’s silently sabotaging your efforts: your garage door. In a smaller home—be it a modern townhouse, an ADU, or a tiny house—the garage isn't just a place for cars. It's often a workshop, a gym, or a storage area directly adjacent to your living space. An uninsulated door can make these areas unusable in extreme weather and bleed energy from your home. The problem? Most insulation advice you’ll find is for large, spacious garages where adding a two-inch thick foam panel is no big deal. For you, every inch of clearance matters, and every added pound puts strain on your system. This guide is different. It’s for those who need maximum thermal performance with minimal bulk.

blog photo

Comparing Insulated Garage Door Materials: Steel, Wood, and Aluminum

Ever walk into your garage on a freezing winter day or a blazing summer afternoon and feel an immediate, unpleasant blast of air? You might blame the weather, but the real culprit is likely the biggest moving part of your home: your garage door. It’s a massive, uninsulated wall that can be secretly draining your wallet through higher energy bills and making a potentially useful space completely uncomfortable. Many homeowners don't realize that the material their garage door is made of—and how it's insulated—is one of the most significant factors in their home's overall energy efficiency. Choosing the right combination isn't just about looks; it's a long-term investment in comfort and savings. This guide will walk you through everything you need to know, from deciphering technical jargon to comparing how materials like steel, wood, and aluminum perform when the heat is on (or when the cold sets in).