





How to Optimize Solar Garage Openers on North-Facing Roofs
Published: Jul 29, 2026
You’ve probably heard it a dozen times: “Putting solar panels on a north-facing roof is useless.” For a whole-home system designed to slash your electric bill, that advice is generally sound. But what if you’re not trying to power your whole house? What if you just want to power one small, specific thing—like your garage door opener?
That changes the entire equation.
Powering a garage door opener is a low-energy task that’s surprisingly well-suited for a small, cleverly optimized solar setup, even in the “worst” location. The secret isn’t about defying physics; it’s about understanding it. By focusing on the right details, you can turn a seemingly impossible project into a reliable, off-grid convenience.
The 3-Minute Physics Lesson: Why Tilt Beats Direction
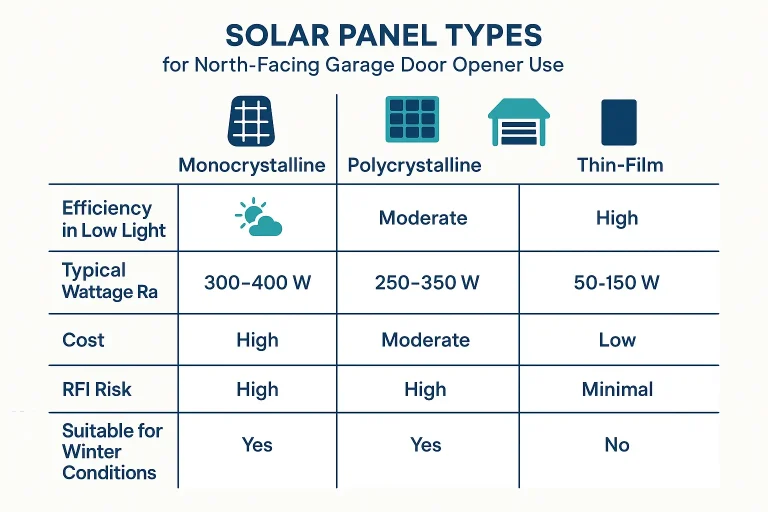
Let’s imagine you’re trying to catch rain in a bucket. If the rain is falling straight down, you’d keep the bucket flat. But if the rain is coming in sideways during a storm, you’d tilt the bucket to face the wind.
Solar panels work the same way. In the Northern Hemisphere, the sun travels in a lower arc across the southern sky, especially during the winter. A solar panel on a north-facing roof is like a flat bucket in a sideways storm—it misses most of the energy.
But what if you tilt it?
By mounting your panel on a steep angle, you change its perspective. It’s no longer looking straight up into the empty northern sky; it’s looking out toward the horizon, where it can “see” and capture the sun’s rays during sunrise and sunset. For a low-power device like a garage door opener, this captured energy is more than enough.
- Direction is for Power. For massive home arrays, facing south is critical to maximize peak energy production.
- Tilt is for Consistency. For a small, year-round system like this, a steep tilt angle is your key to capturing enough light every day, even in winter.
Modern monocrystalline panels also have a superpower: they are incredibly efficient at generating electricity from ambient and indirect light—the kind of light that fills the sky even on an overcast day. You’re not just relying on direct sunbeams; you’re harvesting the overall brightness of the day.
Sizing Your System: The Key to All-Weather Reliability
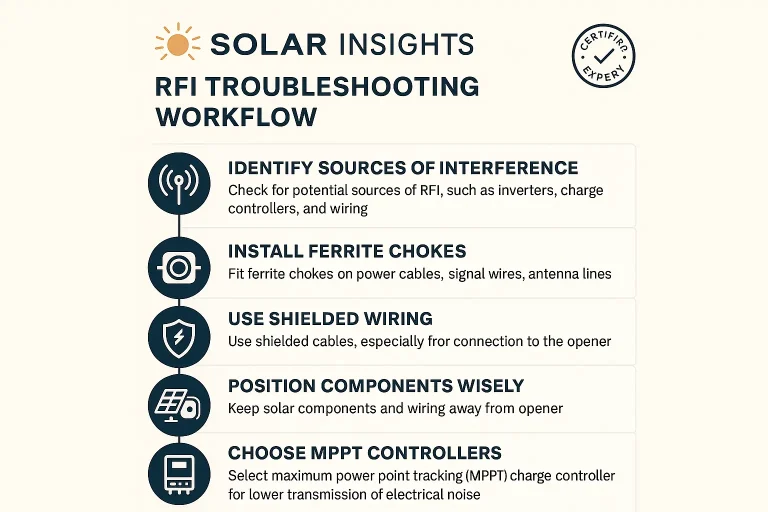
The single biggest reason solar projects fail isn’t a lack of sun; it’s a lack of planning. A dead battery on a cold, cloudy morning is almost always due to an undersized system. To get it right, you need to become an “energy auditor” for your garage door opener.
Your opener uses two kinds of power:
- Active Load: The energy it consumes for the ~15 seconds it’s actively opening or closing the door (e.g., 250-350 watts).
- Standby Load: The tiny trickle of power it uses 24/7 to listen for the signal from your remote (e.g., 2-6 watts).
While the active load is high, it’s brief. The real energy hog is the constant standby load. To size your system, you need to account for both, with enough buffer for a few cloudy days.
Choosing Your Components
Your off-grid system has three main parts: the panel, the battery, and the charge controller. For a north-facing setup, your choices matter immensely.
- Solar Panel: Opt for a monocrystalline panel. They have the best efficiency in low-light and overcast conditions, which is exactly what you need.
- Battery: An AGM or LiFePO4 battery is your best bet. Unlike car batteries, they are designed for deep, slow discharging and recharging cycles and perform better in the cold. Understanding how a robust battery system works is key, similar to having a reliable Chamberlain battery backup for a grid-tied opener.
- Charge Controller: This is the brain of the system, protecting the battery from overcharging. A MPPT (Maximum Power Point Tracking) controller is superior to a cheaper PWM controller for this project. It’s more efficient at converting low light into usable energy and—as we’ll see next—is less likely to cause a very frustrating problem.
Installation and The #1 Hidden Problem
Once you have your parts, the focus shifts to installation. You have a few options for mounting your panel:
- On the north-facing garage roof using angled brackets.
- On a south-facing wall of your house, running a wire to the garage.
- On a pole mount in the yard.
Whichever you choose, remember that the angle is critical. A good starting point for your tilt is your latitude plus 15-20 degrees to optimize for winter sun. While the specifics of running wires and mounting brackets vary, the general principles are similar to any standard garage door installation project — safety and security are paramount.
The Hidden Problem: Radio Frequency Interference (RFI)
You’ve installed everything perfectly. The sun is out, the battery is charging, and the door opens with the wall button. But when you try to use your remote… nothing happens.
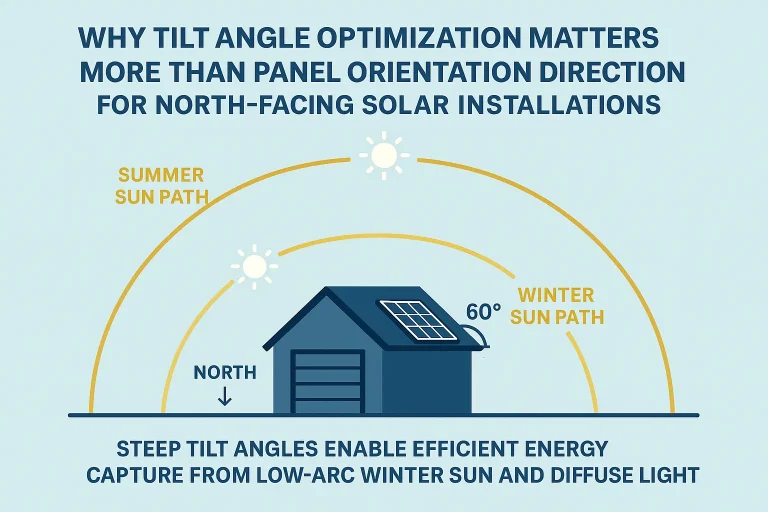
You’ve just discovered the most common and least-talked-about issue with DIY solar projects: Radio Frequency Interference (RFI). The electronics inside some solar charge controllers (especially cheaper PWM models) can generate “electrical noise” on the same frequency as your garage remote, effectively jamming the signal.
This is a notoriously tricky issue, and if you’re struggling with it, our general guide on how to reset a garage door remote can provide a foundational checklist. For solar-specific RFI, here’s how to solve it:
- Physical Separation: Move the charge controller and any wiring as far away from the garage door opener’s motor unit and antenna wire as possible.
- Use Ferrite Chokes: These are small magnetic clips that snap onto the power cables running from your controller to your opener. They are incredibly effective at filtering out RFI noise.
- Shielded Wiring: Use high-quality, shielded cables for all connections to contain any electrical noise.
- Choose an MPPT Controller: High-quality MPPT controllers are generally better designed and less likely to produce significant RFI in the first place.
Your Project Roadmap: A Simple Checklist
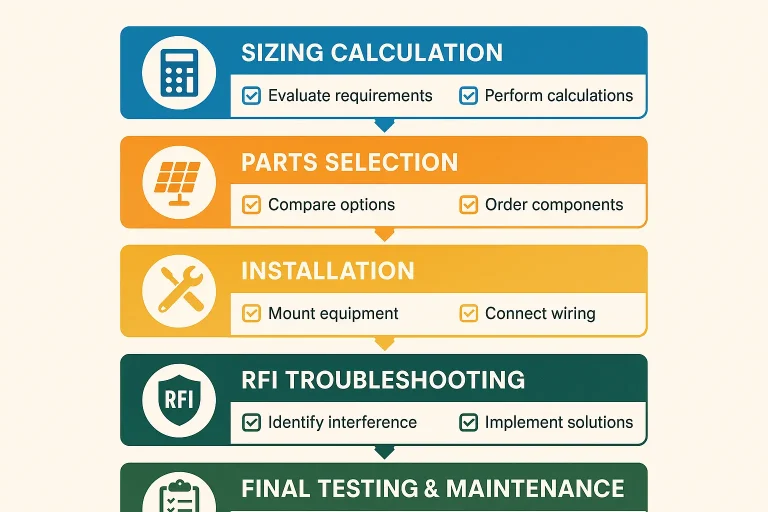
Feeling ready to get started? This project is more about careful planning than complex skills. Follow this roadmap to keep your project on track from idea to completion.
- Energy Audit: Determine the standby and active wattage of your garage door opener.
- Calculate Daily Needs: Figure out your total daily watt-hour consumption. Add a 25% buffer.
- Size Your Battery: Multiply your daily needs by the number of “backup” days you want (3 is a good number) to get your required battery capacity.
- Size Your Panel: Choose a panel with a wattage rating that can fully recharge your battery with about 4-5 hours of average sunlight. For north-facing, it’s wise to oversize the panel slightly.
- Select Components: Purchase a high-efficiency monocrystalline panel, a deep-cycle AGM or LiFePO4 battery, and a quality MPPT charge controller.
- Plan Your Installation: Decide on the best mounting location and angle for your panel.
- Install & Test: Mount your hardware, connect the system, and test its operation using the wall button.
- Troubleshoot RFI: Test your remotes. If they don’t work, apply the RFI fixes above until the issue is resolved.
Frequently Asked Questions (FAQ)
How many cloudy days can a solar opener handle?
This depends entirely on your battery size. A properly sized system should easily handle 3-5 consecutive days of low light without issue. When you calculate your needs, plan for the worst-case scenario.
Will this really work in northern states with harsh winters?
Absolutely. In fact, snow can sometimes help by reflecting more ambient light onto your panel. The key is the steep tilt angle, which not only helps the panel “see” the low winter sun but also helps snow slide off easily.
Can I power lights or tools with the same system?
It’s possible, but not recommended without careful planning. Every device you add increases the system’s complexity and power demand, requiring a larger panel and battery. It’s best to dedicate the system solely to the garage door opener to ensure its reliability.
Is a solar garage door opener worth the investment?
That depends on your goals. For pure cost savings, it will take a long time to break even. However, for convenience, energy independence, and ensuring your garage door works during a power outage, many homeowners find a solar garage door opener to be an invaluable upgrade.
Your Path to Energy Independence
Powering a garage door opener with solar on a north-facing garage isn’t just possible—it’s a practical and rewarding project when done right. By moving beyond conventional wisdom and focusing on the science of tilt angles, modern panel technology, and smart system design, you can create a reliable solution that works year-round.
This is your first step into a larger world of energy autonomy. By starting with a small, manageable project, you build the skills and confidence to tackle even bigger challenges down the road.
You May Also Like
Solar-Powered Garage Doors: Are They Worth the Investment?
If you’re a homeowner looking to cut energy bills and make your space more efficient, solar power may be a great option. While most people think of rooftop panels first, the garage is one area that often gets…
Published Date: May 22, 2025
Are Solar-Powered Garage Doors the Future? What Homeowners Need to Know
What if your garage door could save you money, lower your energy bills, and still operate during a power outage? While it sounds too good to be true, solar-powered garage doors make this possible. They combine cost…
Published Date: Feb 5, 2025
Energy-Efficient Garage Doors: Save on Utility Bills
Still wondering why are energy-efficient garage doors so popular with both businesses and homes? They save you money on your electricity bill and make your home look great. In this article, we’ll get into…
Published Date: Oct 29, 2024