





MPPT vs. PWM: Choosing the Right Solar Charge Controller for Your Garage Door
Published: Jul 30, 2026
Imagine this: a storm rolls through, the power goes out, and your neighborhood is dark. But you get home, press your remote, and your garage door opens flawlessly, powered by the sun it soaked up earlier. This isn’t science fiction; it’s the reality of a solar-powered garage door system. It offers security during outages and a step towards energy independence.
But to make this system work efficiently, you need one crucial component: the charge controller. It’s the brain of the operation, managing the flow of energy from your solar panel to your battery. Choosing the right one can feel overwhelming, especially with acronyms like PWM and MPPT floating around.
This guide will demystify these options. We’ll break down exactly what they are, how they differ, and most importantly, help you decide which one is the perfect fit for your garage door setup without overspending.
What a Charge Controller Actually Does
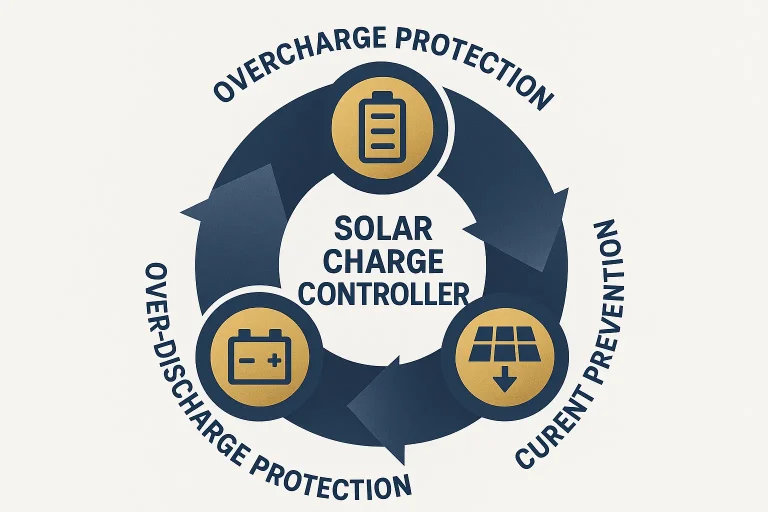
Before diving into PWM vs. MPPT, let’s clarify what a charge controller does. Think of it as a smart valve or a diligent security guard for your battery. Its primary job is to protect your battery, which is the most expensive and sensitive part of your small solar system.
It performs three critical safety functions:
- Prevents Overcharging: Just like you can overfill a glass of water, you can overcharge a battery. A charge controller senses when the battery is full and cuts off the power from the solar panel, preventing damage and extending the battery’s lifespan.
- Prevents Over-discharging: It also stops the garage door opener from draining the battery completely. A deep discharge can permanently harm a battery, so the controller disconnects the load if the battery voltage drops too low.
- Blocks Reverse Current: At night, without a controller, electricity could flow backward from the battery to the solar panel, slowly draining it. The controller acts as a one-way valve, ensuring power only flows in one direction.
Now that you know why you need one, let’s look at the two main “flavors” they come in.
Understanding these protections is a core part of exploring any battery backup garage door opener solution, whether it’s solar-powered or grid-tied.
The Core Choice, Simplified for Your Garage
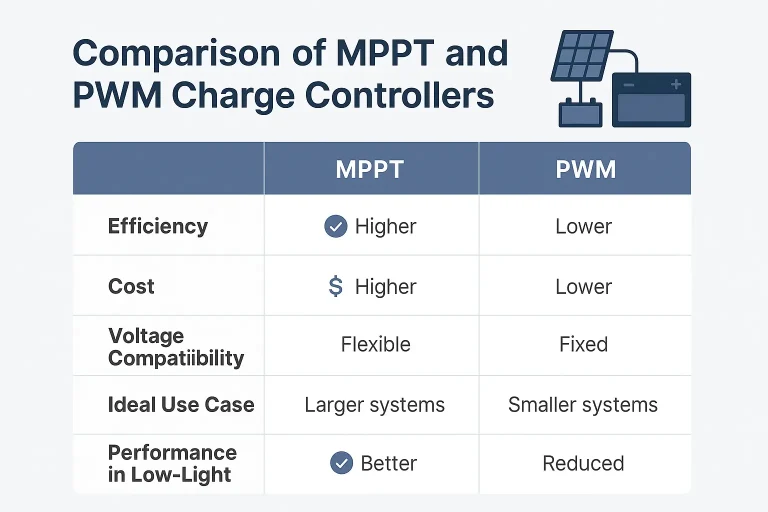
The fundamental difference between Pulse Width Modulation (PWM) and Maximum Power Point Tracking (MPPT) controllers lies in how they manage the voltage from the solar panel.
PWM (Pulse Width Modulation): The Simple Switch
A PWM controller is the older, simpler technology. It works like a basic switch, rapidly connecting and disconnecting the solar panel to the battery. When the battery is full, the switch “pulses” to keep it topped off. The key takeaway is that a PWM controller forces the solar panel to operate at the same voltage as the battery.
MPPT (Maximum Power Point Tracking): The Smart Power Converter
An MPPT controller is more advanced. It’s essentially a smart DC-to-DC converter. It can take a higher voltage from the solar panel and convert it down to the battery’s voltage. This is a huge advantage because solar panels produce their maximum power at a voltage much higher than what a 12V battery needs.
Here’s the “aha moment”: An MPPT controller doesn’t just find the panel’s “sweet spot” for power; it converts the excess voltage into charging current. Think of it like a car’s gearbox. Instead of revving the engine in first gear (wasting energy), it shifts up, converting high RPMs (voltage) into more speed (charging amps). This process can boost your energy harvest by up to 30%, especially in cold or cloudy weather.
PWM vs. MPPT for a Garage Door: What Matters?
When choosing between a Pulse Width Modulation (PWM) and Maximum Power Point Tracking (MPPT) solar controller for your garage door opener, you don’t always need the most expensive tech. Because garage doors operate on intermittent bursts of power rather than continuous loads, your decision comes down to three main factors:
System Size & Daily Power Demand: Most solar garage openers run on small setups—typically a single 12V battery paired with a 30W to 100W solar panel. For small, low-wattage systems, a basic PWM controller provides plenty of power without overcomplicating the setup.
Sunlight & Local Climate: MPPT controllers are roughly 15–20% more efficient than PWM, especially on cloudy days, in cold weather, or when the panels are partially shaded. If your garage roof gets limited direct sunlight, upgrading to an MPPT controller ensures your battery stays fully charged.
Cost vs. Value: A PWM controller costs $15–$50, making it a budget-friendly solution for simple DIY installs. MPPT units range from $60–$150+. Unless you are using high-voltage panels or experiencing heavy shade, paying extra for MPPT is usually unnecessary for standard residential garage doors.
Sizing Your Controller in 2 Minutes
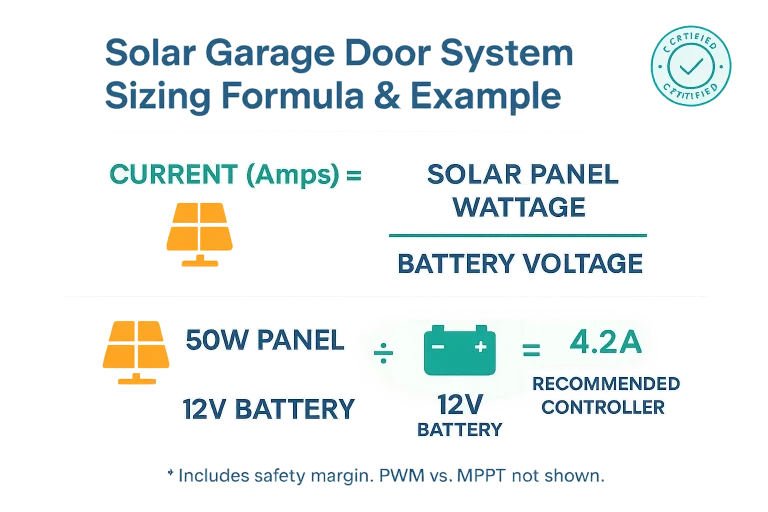
Choosing the right size controller is critical. A controller is sized by its amperage (A) rating. Sizing it is simpler than you think.
Here’s the formula:
Controller Amps (A) = Total Solar Panel Wattage (W) / Battery Voltage (V): Let’s run a real-world example for a typical garage door setup: • You have a 50-watt solar panel. • You are charging a 12-volt battery. Calculation: 50W / 12V = 4.17 Amps This means you need a charge controller with a rating of at least 4.17A.
Pro Tip: Always add a safety margin.
It’s wise to oversize your controller by about 25% to handle unexpected power surges from the sun (known as the “edge of cloud” effect) and to allow for future panel upgrades. In our example: 4.17A x 1.25 = 5.21 Amps So, a 10A controller would be a perfect, safe choice. It gives you plenty of headroom and ensures the component isn’t constantly running at its maximum limit.
The Complete Garage Door Solar Blueprint
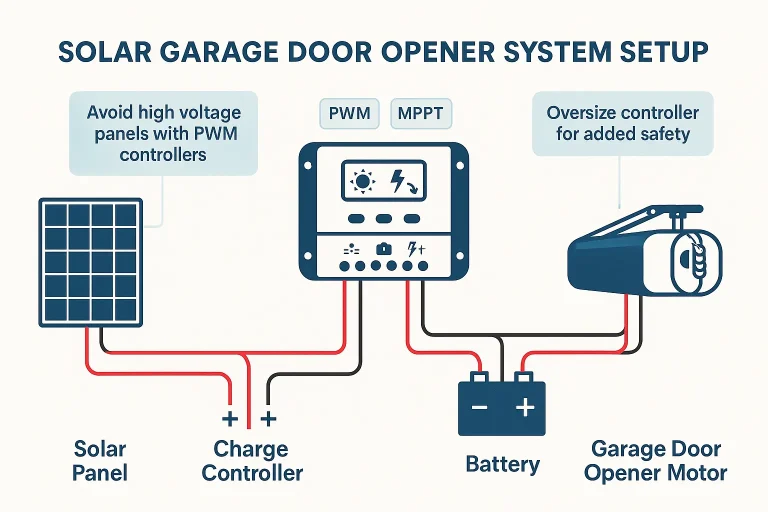
Connecting your system is straightforward. The charge controller is the central hub where everything connects. Always follow this order for installation to avoid damaging your equipment:
- Connect the Charge Controller to the Battery first. This allows the controller to detect the system voltage (e.g., 12V) and configure itself correctly.
- Connect the Garage Door Opener (the “Load”) to the Controller.
- Connect the Solar Panel to the Controller last.
To disconnect, you do the reverse: Panel > Load > Battery.
Here is a simple wiring diagram showing how the components fit together.
Of course, the heart of this system is the battery. Understanding do garage door openers have batteries for backup power is the first step in appreciating the value of a fully independent solar setup.
Frequently Asked Questions (FAQ)
Is an expensive MPPT controller overkill for a simple garage door opener?
For most people, yes. A garage door opener runs for maybe two minutes per day. A quality PWM controller paired with a standard 12V solar panel is perfectly capable of keeping the battery charged for this light, intermittent use. You’d only need an MPPT if your panel is partially shaded, you live in a very cold/cloudy climate, or you plan to add more devices to the system.
Can I use any solar panel with any controller?
No. This is a critical point. A PWM controller must be paired with a panel that has a similar voltage to your battery. For a 12V battery, you need a panel with a Vmp (Voltage at Maximum Power) of around 18V. These are typically sold as “12V panels.” Using a high-voltage “grid-tie” panel (with a Vmp of 30V+) with a PWM controller will waste most of its power. An MPPT controller, however, can efficiently convert that high voltage, giving you much more flexibility in panel choice.
What happens if my controller is too small?
An undersized controller can be damaged or destroyed by the current from your solar panel. It’s a fire risk and the number one mistake beginners make. Always use the sizing formula above and add a 25% safety margin.<
What kind of battery works best for a solar garage door setup?
A 12V deep-cycle battery is ideal. Unlike a car battery, which is designed for short, powerful starts, a deep-cycle battery (like those used in RVs or boats) is built to be discharged and recharged repeatedly. AGM or LiFePO4 are popular, low-maintenance choices. If you ever need guidance, our experts can walk you through a how to change battery in garage door opener process, whether it’s for a standard or solar system.
Your Next Step to Energy Independence
Choosing between MPPT and PWM isn’t about which is “better”—it’s about which is right for the job. For a dedicated garage door system, a simple, reliable PWM controller is often the smartest and most cost-effective choice. It provides all the protection your battery needs without the high cost of an MPPT’s advanced conversion technology, which is better suited for larger, more demanding off-grid systems.
By understanding these core concepts, you’re well on your way to building a resilient and reliable solar-powered garage door system. If you have questions about your specific opener or its power requirements, our team is always here to help.
You May Also Like
How to Optimize Solar Garage Openers on North-Facing Roofs
You’ve probably heard it a dozen times: "Putting solar panels on a north-facing roof is useless." For a whole-home system designed to slash your electric bill, that advice is generally sound. But what if you're not…
Published Date: Jul 29, 2026
Solar-Powered Garage Doors: Are They Worth the Investment?
If you’re a homeowner looking to cut energy bills and make your space more efficient, solar power may be a great option. While most people think of rooftop panels first, the garage is one area that often gets…
Published Date: May 22, 2025
Are Solar-Powered Garage Doors the Future? What Homeowners Need to Know
What if your garage door could save you money, lower your energy bills, and still operate during a power outage? While it sounds too good to be true, solar-powered garage doors make this possible. They combine cost…
Published Date: Feb 5, 2025