Repair, Reinforcement And Maintenance of Existing Garage Door Frames
Published: Aug 6, 2026
When homeowners notice soft, crumbling wood or peeling paint at the base of their garage opening, the initial reaction is often to look for a quick cosmetic fix. But a garage opening is not just an entry point—it is a heavy-duty, dynamic structural assembly under active mechanical load. Is that soft spot a harmless weekend touch-up, or a sign of a dangerous structural failure? Performing a thorough garage door frame damage assessment is the crucial first step in protecting your home from structural compromises and skyrocketing repair costs.
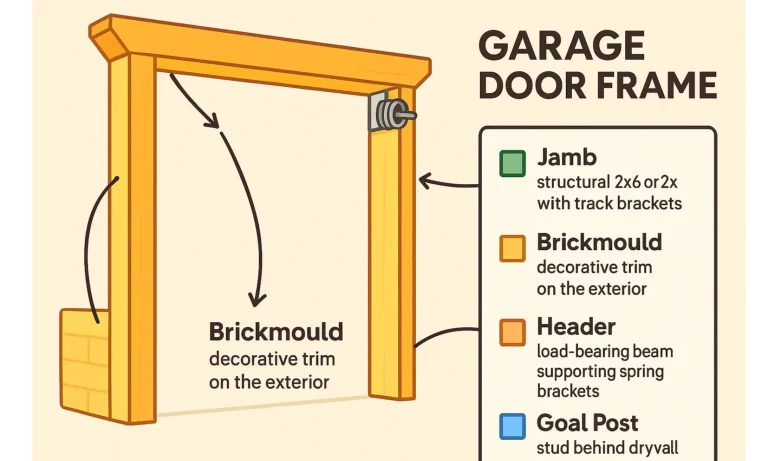
Anatomy of a Garage Door Frame (With Visual Glossary)
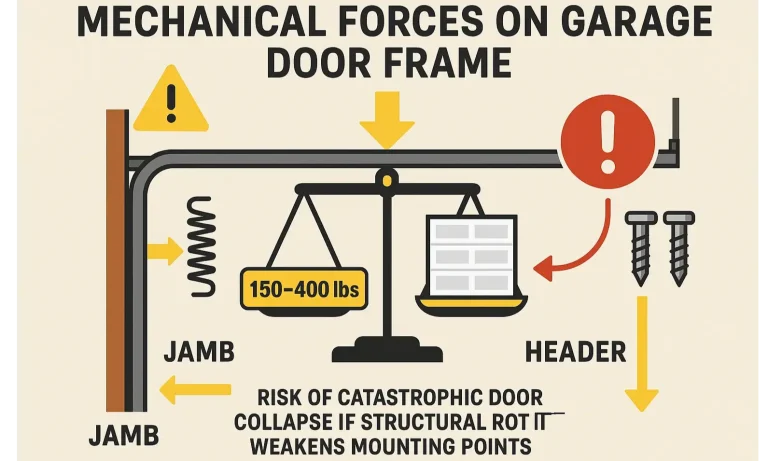
To understand how damage spreads, you must first understand the structural components that make up your door’s surround. Unlike standard interior openings, garage door framing has to support substantial vibrational forces and heavy-duty hardware.
- The Jamb (Structural 2×6 / 2×8): The vertical lumber on the inside of the opening where your steel tracks are directly anchored.
- The Brickmould: The decorative exterior wood or PVC trim that holds the weatherstripping.
- The Header: The massive load-bearing beam overhead where high-tension torsion spring brackets are anchored.
- The Goal Post (Internal Studs): The structural studs behind the drywall that tie the frame into your home’s main structural framing.
The 3-Step "Screwdriver Test"
To evaluate whether you are facing superficial mold, water damage wooden garage door issues, or severe pest damage, utilize this simple diagnostic sequence:
- Visual Inspection: Look for cracked paint, dark wood discoloration, bulging, or fine powder indicating termite or wood-boring beetle activity.
- Probe Depth: Gently press a flathead screwdriver into the suspect wood. If it sinks more than 1/4 inch with minimal resistance, the fibers are structurally compromised.
- Location Check: If the soft wood is within 3 inches of any metal track bracket, cease DIY testing immediately. The integrity of the fasteners mounting your tracks to the jamb is compromised.
The Danger Zone: Why Garage Door Frame Repairs are Unique
Standard exterior doors only support their own weight. In contrast, a garage door frame must handle dynamic loads of 150 to over 400 pounds moving multiple times a day. More importantly, your system’s high-tension springs are anchored directly to the frame or header.
Removing structural lag screws from a rotted jamb while the track is under active tension can cause a catastrophic spring release or door collapse, posing extreme physical danger. This is why a professional garage door framing service is essential for any repairs touching the track mounting zones.
Repair Methodology Matrix — Step-by-Step PVC Splice Guide
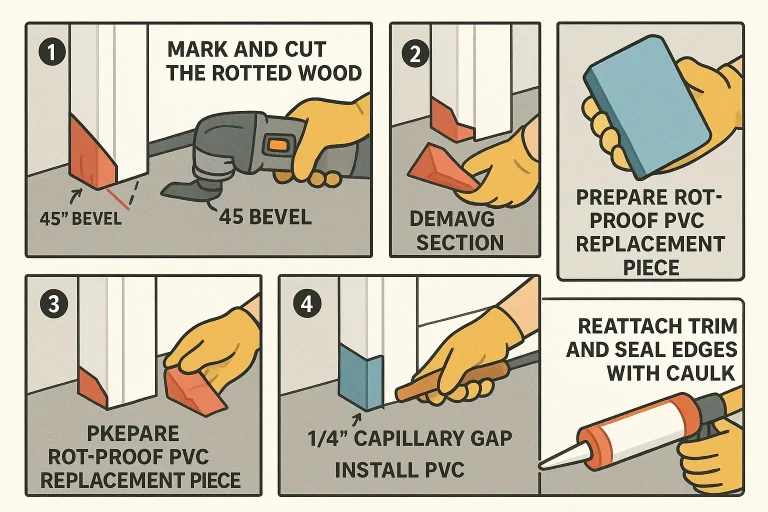
When planning to replace garage door frame elements or fix rotted sections, costs escalate dramatically the longer you wait. A simple trim replacement might cost $150 to $350, whereas ignoring the issue can allow water to migrate to structural headers, ballooning remediation costs up to $1,500 to $6,500+.
| Damage Level | Ideal Technique | Est. Cost (DIY) | Est. Cost (Pro) |
|---|---|---|---|
| Superficial (<1/4") | Epoxy/Bondo wood filler | $40–$60 | N/A |
| Bottom 6–12″ Rot | Cut & Splice (PVC Plinth) | $80–$120 | $300–$600 |
| Structural Rot (Tracks) | Full Jamb & Stud Replacement | Dangerous (Avoid) | $1,200–$3,000+ |