





Is Your Wooden Garage Door Rotting? A Homeowner’s Guide to Repair vs. Replacement
Published: Jul 27, 2026
You’ve noticed it, haven’t you? That small, dark stain at the bottom of your beautiful wooden garage door. Maybe it’s a few paint bubbles that weren’t there last season. It’s easy to dismiss, but that little spot could be the first sign of a much bigger problem: water damage and rot.
It’s a common concern for homeowners who love the timeless appeal of wood. You’re not just worried about curb appeal; you’re thinking about security, longevity, and the potential cost of a major repair. The good news? You’ve come to the right place.
This guide is your first step toward becoming a confident decision-maker. We’ll walk you through everything, from identifying the subtle signs of trouble to understanding when a simple repair will do and when it’s time to consider a replacement. Think of this as a friendly conversation, designed to turn your uncertainty into a clear plan of action.
Understanding the Enemy of Wood
Before you can diagnose the problem, it helps to understand what you’re up against. Wood and water have a complex relationship. While a well-sealed wooden door can stand up to the elements for decades, even the smallest breach in its armor can lead to trouble.
The Anatomy of a Wooden Garage Door Panel
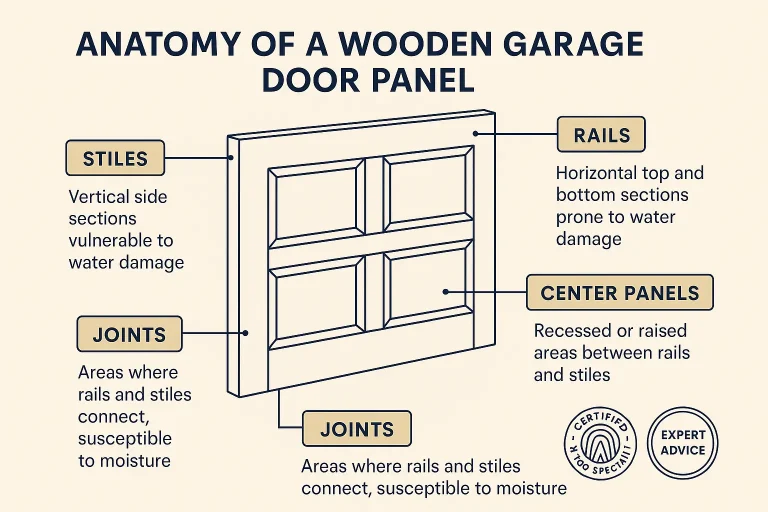
A garage door panel isn’t just a single slab of wood. It’s an assembly of different parts, and knowing them helps you pinpoint where the damage is starting. The most vulnerable area is almost always the bottom rail, as it’s closest to ground moisture, rain splash-back, and snow.
Damage to a central panel is often less critical than damage to a bottom rail, which provides structural support for the entire section.
- Stiles: The vertical boards on the sides of a panel.
- Rails: The horizontal boards at the top and bottom.
- Panels: The smaller, often decorative sections that fill the frame created by the stiles and rails.
Water Stains vs. Damage vs. Rot: What’s the Difference?
These terms are often used interchangeably, but they represent different stages of a worsening problem.
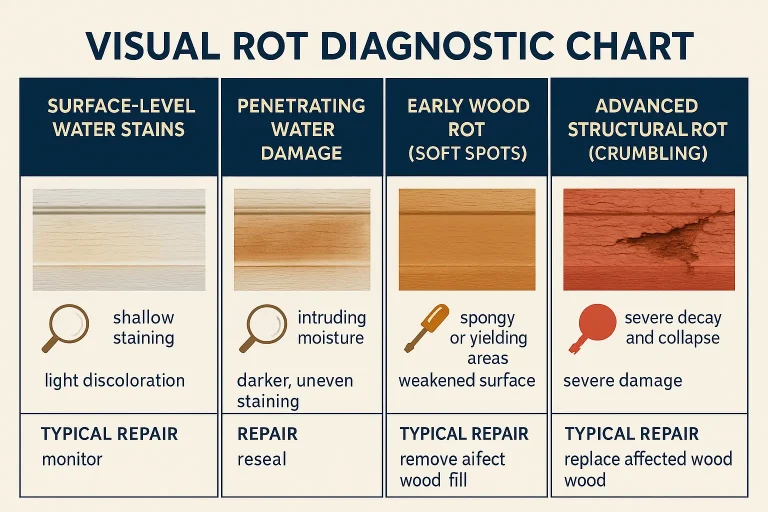
- Water Stains (Cosmetic): These are surface-level discolorations. The wood itself is still firm. The cause is often a one-time event, and the wood has since dried out. It’s an early warning sign that the door’s protective finish is failing.
- Water Damage (Penetrating): This is when water has soaked into the wood fibers, causing them to swell and break down. The paint may be peeling or bubbling, and the wood might feel slightly soft. This is the stage where intervention can prevent a much bigger issue.
- Wood Rot (Structural): This is the final stage. Water damage has invited fungi to the party, which actively consume the wood, turning it into a soft, crumbly, or spongy mess. Rot compromises the structural integrity of the door and can no longer be ignored.
The Diagnostic Process (A Step-by-Step Guide)
Ready to play detective? A few minutes of careful inspection can tell you everything you need to know about the health of your garage door.
Step 1: The Visual Inspection
Start with a slow walk-around. Look closely at the bottom of the door, the corners of the panels, and the area around the door frame. Keep an eye out for:
- Paint Irregularities: Bubbling, cracking, or peeling paint is a classic sign that moisture is trapped underneath.
- Discoloration: Dark streaks or black/gray stains often indicate prolonged moisture exposure.
- Visible Fungus or Mildew: Green or black fuzzy spots are a clear sign of fungal growth.
- Cracks and Splits: Wood expands and contracts as it absorbs and releases moisture, which can lead to cracks that let even more water in.
Water damage can also be a symptom of larger issues, like poor drainage around the garage. This is particularly true after heavy rain or storms, which is why understanding options for garage door storm damage repair is so important for protecting the entire system.
Step 2: The “Screwdriver Test”
This is a classic woodworker’s trick and the most reliable way to tell the difference between solid wood and hidden rot.
- Choose Your Tool: Grab a flathead screwdriver or an awl.
- Gently Probe: Press the tip of the screwdriver firmly against the suspect area.
- Analyze the Feel:
- Solid Wood: The screwdriver will meet significant resistance and will barely indent the surface.
- Water-Damaged Wood: The tip will sink in slightly, and the wood will feel soft or spongy.
- Rotted Wood: The screwdriver will sink in easily, with little to no resistance. The wood may crumble or flake away.
Test several spots, paying close attention to the bottom corners and the entire bottom rail of the lowest door panel.
Step 3: Assess the Severity with the Rot Diagnostic Chart
Once you’ve completed your visual and physical checks, you can classify the level of damage. This chart helps you visualize the spectrum from a minor cosmetic issue to a serious structural problem.
The "Repair vs. Replace" Decision Framework
Now for the big question: can this be fixed, or does it need to be replaced? Your diagnosis from the previous step will guide you. The decision isn’t just about cost; it’s about safety, longevity, and peace of mind.
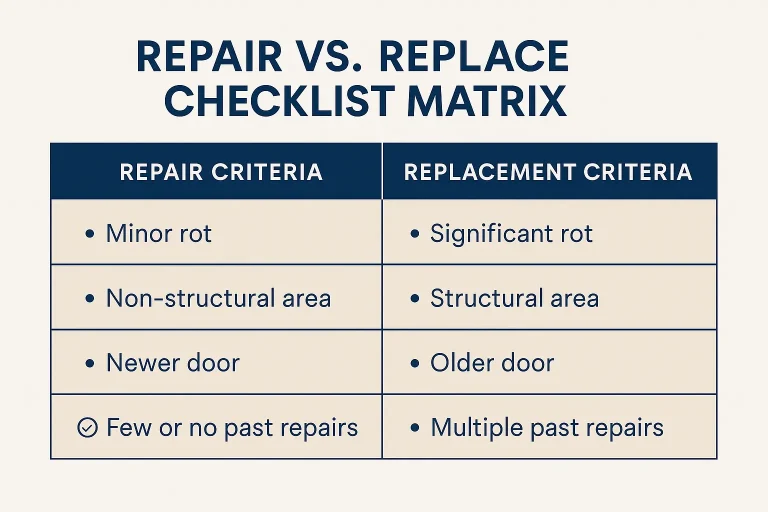
It can be tough to know if a damaged garage door can be repaired, but the following criteria will give you a clear framework for making the right call.
When to Repair a Wooden Garage Door Panel
A localized repair is a great option when the damage is contained. You should lean towards repair if:
- The Rot is Superficial: The damage is less than an inch deep and covers a small, manageable area (e.g., a few square inches).
- The Damage is Cosmetic: You’re dealing mostly with water stains and peeling paint on structurally sound wood.
- It’s Not on a Structural Joint: The rot is in the middle of a panel or rail, not where two pieces of wood join together.
- The Rest of the Door is Healthy: The door is otherwise in excellent condition, with no other signs of wear or damage.
When to Replace a Wooden Garage Door Panel
Sometimes, a repair is just a temporary fix for a problem that requires a more permanent solution. Full panel replacement is the safest and most effective choice when:
- The Rot is Widespread: The damage extends across more than a quarter of the panel’s width or affects multiple spots.
- The Damage is Structural: The rot has compromised a structural component, especially the bottom rail or the stiles where hinges attach. A rotted bottom rail can affect the door’s balance and safety.
- The Wood is Crumbly: The screwdriver test reveals deep, soft, and crumbling wood, indicating the rot is extensive.
- The Door is Old: If the door is over 15-20 years old and showing multiple signs of wear, investing in a new panel for an aging system may not be cost-effective.
This checklist provides a quick visual reference to help you weigh your options.
Your Practical Next Steps
Once you’ve made your decision, it’s time to take action.
If You’re Repairing…
A proper wood rot repair involves more than just slapping on some wood filler. The process generally includes:
- Excavating the Rot: Carefully scraping and digging out all the soft, rotted wood until you reach solid fibers.
- Applying Wood Hardener: Soaking the exposed, porous wood with a liquid hardener to stabilize it.
- Filling the Void: Using a high-quality, two-part epoxy wood filler to rebuild the damaged area.
- Sanding and Finishing: Sanding the repair smooth and then priming and painting it to match the rest of the door and protect it from future moisture.
If You’re Replacing…
If your diagnosis points to replacement, you have two main options: replacing a single panel or replacing the entire door. A full garage door panel replacement can be an effective way to solve the problem without the cost of a brand new door.
A Critical Safety Warning: Replacing a garage door panel, especially the bottom one, can be extremely dangerous. The panel is under tension from powerful springs. Attempting this without proper training and tools can lead to serious injury. We strongly recommend contacting a qualified professional for this job.
Prevention: The Best Strategy of All
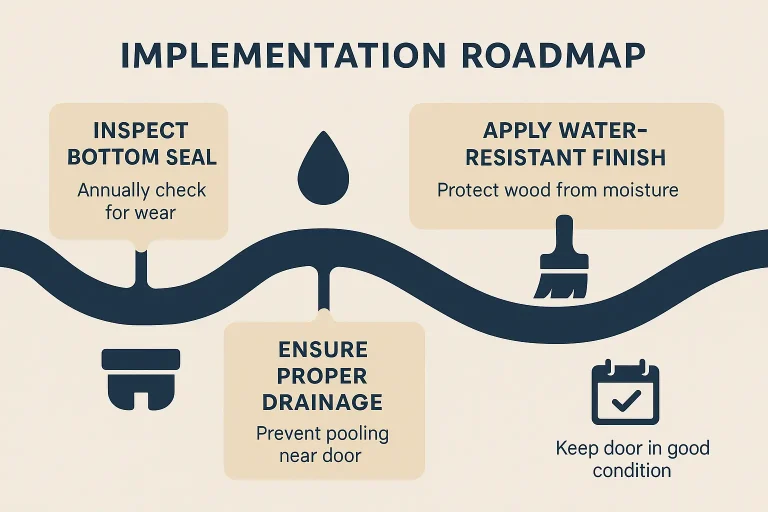
Whether you repair or replace, the final step is to ensure this doesn’t happen again. Protecting your investment is all about proactive maintenance.
- Maintain the Finish: Inspect your door’s paint or stain annually. If you see any cracks, chips, or faded areas, sand them lightly and apply a fresh coat.
- Check the Seals: The bottom seal is your door’s first line of defense. If it’s cracked, brittle, or flattened, water can seep underneath. Learning about replacing garage door bottom seal components is a key part of long-term care.
- Manage Drainage: Ensure gutters are clear and that the ground around your garage slopes away from the foundation. Installing proper garage door flashing can also prevent water from getting behind the frame.
- Schedule Regular Check-ups: A simple habit of annual garage door maintenance can catch small problems before they become costly disasters.
Frequently Asked Questions
What are the very first signs of water damage on a wood garage door?
The earliest signs are often subtle. Look for small paint bubbles or blisters, especially along the bottom edge. You might also notice faint, dark water stains or discoloration in the wood grain that looks different from the rest of the door.
Can you replace just the bottom panel of a garage door?
Yes, absolutely. In many cases, replacing only the damaged bottom section is a cost-effective solution, provided a matching panel is available from the manufacturer. However, due to the extreme tension of garage door springs, this is a job best left to professionals.
Is it worth repairing a 20-year-old wooden garage door?
It depends. If the rest of the door is in good shape and the rot is minor and localized, a repair can extend its life. However, if the door has multiple problem areas, failing hardware, or widespread rot, the cost of repairs might be better invested in a new, more efficient door. Sometimes, exploring options like modern faux wood garage doors can offer the same aesthetic with less maintenance.
How much does it cost to repair wood rot vs. replace a panel?
A DIY rot repair can cost between $50-$150 for materials like wood hardener, epoxy filler, and paint. Professional repair costs can range from $200-$500 depending on the extent of the damage. A single replacement panel can cost anywhere from $250 to $800+, not including labor for installation.
Can wood fully recover from water damage?
Once wood fibers have started to decay and rot, they cannot be restored to their original strength. A repair involves removing the rotted material and replacing it with a synthetic filler (like epoxy). The surrounding wood can dry out and be stabilized with a hardener, but the damaged portion is gone for good.
Your Path Forward
Dealing with water damage on a wooden garage door can feel daunting, but by following these steps, you’ve replaced confusion with clarity. You now know how to inspect your door, diagnose the severity of the problem, and apply a clear set of criteria to decide between repair and replacement.
Whether you’re grabbing your tools for a weekend repair or making a call to a trusted professional, you’re doing so from a position of knowledge. A well-maintained garage door is crucial for your home’s safety and value, and a thorough garage door inspection is always a wise next step. You’ve successfully taken the first—and most important—step in protecting your investment.
You May Also Like
When a Bent Garage Door Panel Needs Replacement vs. Repair
It happens in a split second. A moment of distraction while backing out, an icy patch on the driveway, or a misplaced sports ball—and now there’s a noticeable bend in your garage door. The first feeling is…
Published Date: Jun 17, 2026
Detecting Micro-Cracks and Fatigue in Garage Door Hinges and Panels
That faint creak your garage door makes? Most of us ignore it. The tiny, web-like line near a hinge? We dismiss it as a scratch. We often assume garage door problems are loud, sudden, and obvious—a snapped spring, a…
Published Date: Jan 19, 2026
How to Fix a Garage Door Panel: Repair Damaged Sections
A damaged garage door panel isn’t just cosmetic — it can affect how your entire door system operates. From small dents to cracks or warping, panel issues happen for many reasons. If you’re wondering how to fix a…
Published Date: Sep 29, 2025