




Rubber Isolation Between Opener Rail and Header Bracket: The Engineering Guide
Published: Nov 10, 2026
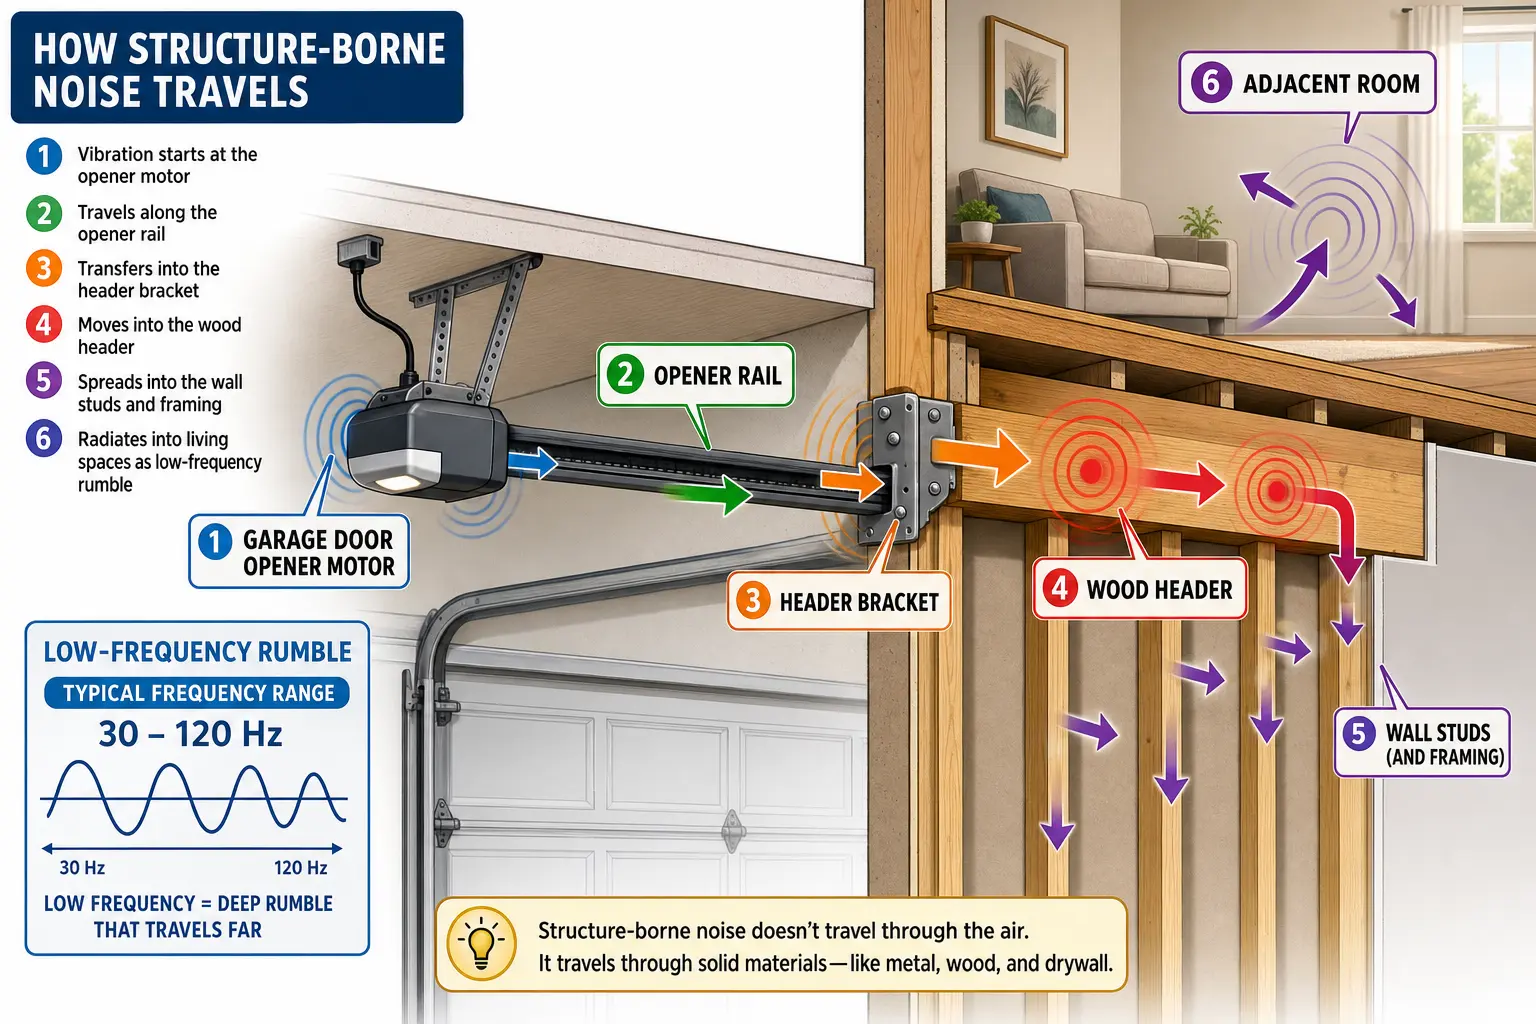
Low-frequency motor rumble between 30 Hz and 120 Hz from an operating garage door opener frequently radiates directly into living spaces above or adjacent to the garage. While many homeowners install ceiling hanger pads, they often overlook the front anchor point: the header bracket.
Anchoring a steel header bracket directly to a solid timber header creates an uninhibited bridge for structure-borne sound. Every motor stroke pulses dynamic force through the rail, turning structural framing studs into an acoustic soundboard. Proper elastomeric isolation at this connection attenuates structure-borne noise by 65% to 80% (an 8 to 14 dB reduction).
Whether performing a new garage door motor installation or optimizing an existing system, decoupling the header joint is one of the most effective refinements available for home quietness.
Mechanical Safety and Structural Integrity
A primary concern among installers is whether placing rubber between the rail and header bracket compromises structural rigidity or causes trolley binding. Soft, low-grade elastomers allow horizontal rail deflection, which leads to clevis pin binding under peak pulling loads. Furthermore, excessive rail flex can delay the opener’s UL 325 auto-reverse mechanism when hitting an obstruction, presenting a safety hazard.
To preserve safety and mechanical alignment, isolation materials must absorb micro-vibrations without sacrificing shear rigidity. High-performance isolators utilize compounds engineered to support continuous dynamic tensile and shear loads of 30 to 75 lbs per point, maintaining strict travel limits while breaking acoustic transmission pathways.
Material & Hardware Comparison Matrix (MOFU Decision Engine)
Selecting the right hardware compound determines both long-term sound dampening and operational reliability. Field analysis reveals that 42% of DIY rubber installations fail within 12 to 18 months due to choosing low-durometer natural rubber prone to ozone degradation or over-tightening fasteners until the rubber crushes completely.
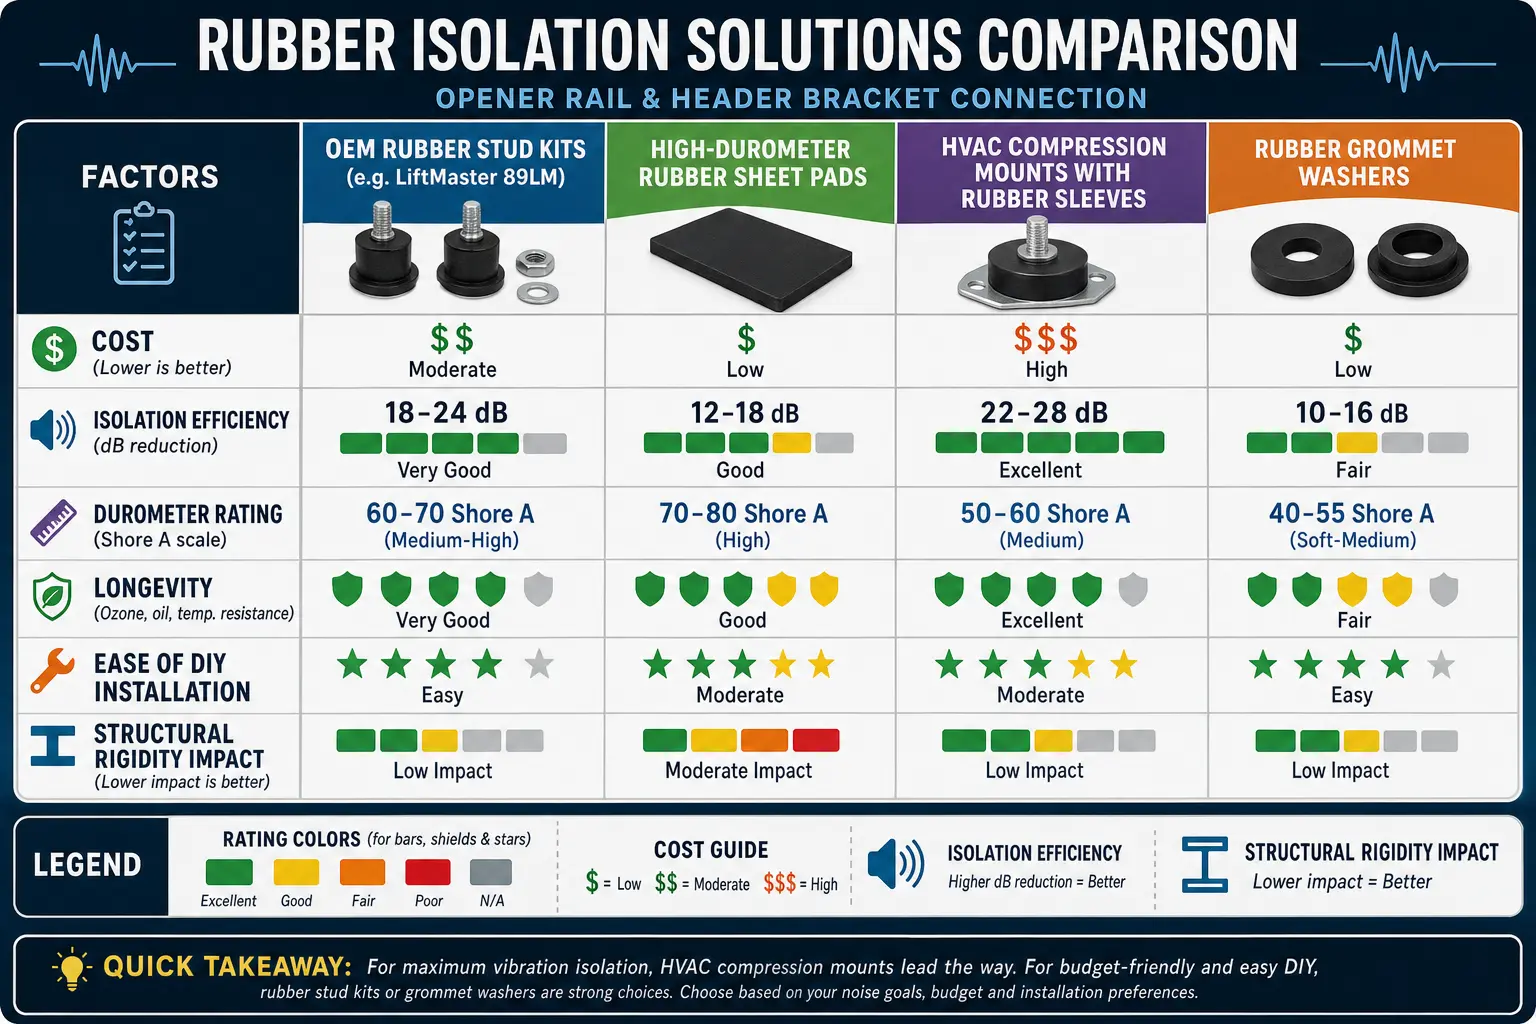
| Hardware Option | Durometer / Material | Noise Reduction | Structural Rigidity | Expected Longevity |
|---|---|---|---|---|
| OEM Stud Kits (e.g., LiftMaster 89LM with 5/16″-18 UNC threads) | 60A EPDM Rubber | High (10–14 dB) | Excellent (Captive Studs) | 10+ Years |
| Neoprene Sheet Gaskets (1/4″ to 3/8″ thickness) | 60A–70A Neoprene | Moderate (8–10 dB) | Good (Requires Sleeves) | 7–10 Years |
| HVAC Compression Mounts | 50A–60A Natural Rubber | High (12–14 dB) | Moderate (Potential Flex) | 3–5 Years |
| Standard Rubber Washers | Soft Vulcanized Rubber | Low (2–4 dB) | Poor (Crushes easily) | 1–2 Years |
For specialty hardware setups, such as a low headroom garage door track installation, rigid alignment is critical. OEM stud kits or 60A–70A Shore A durometer EPDM sheets supply the precise balance of vibration dampening and track stability.
Step-by-Step Installation: How to Isolate the Header Bracket Correctly
Executing header isolation requires completely eliminating metal-to-timber contact and preventing lag bolt “acoustic shorting”—a common mistake where un-isolated screws transmit motor hum past the rubber sheet directly into the wood framing.
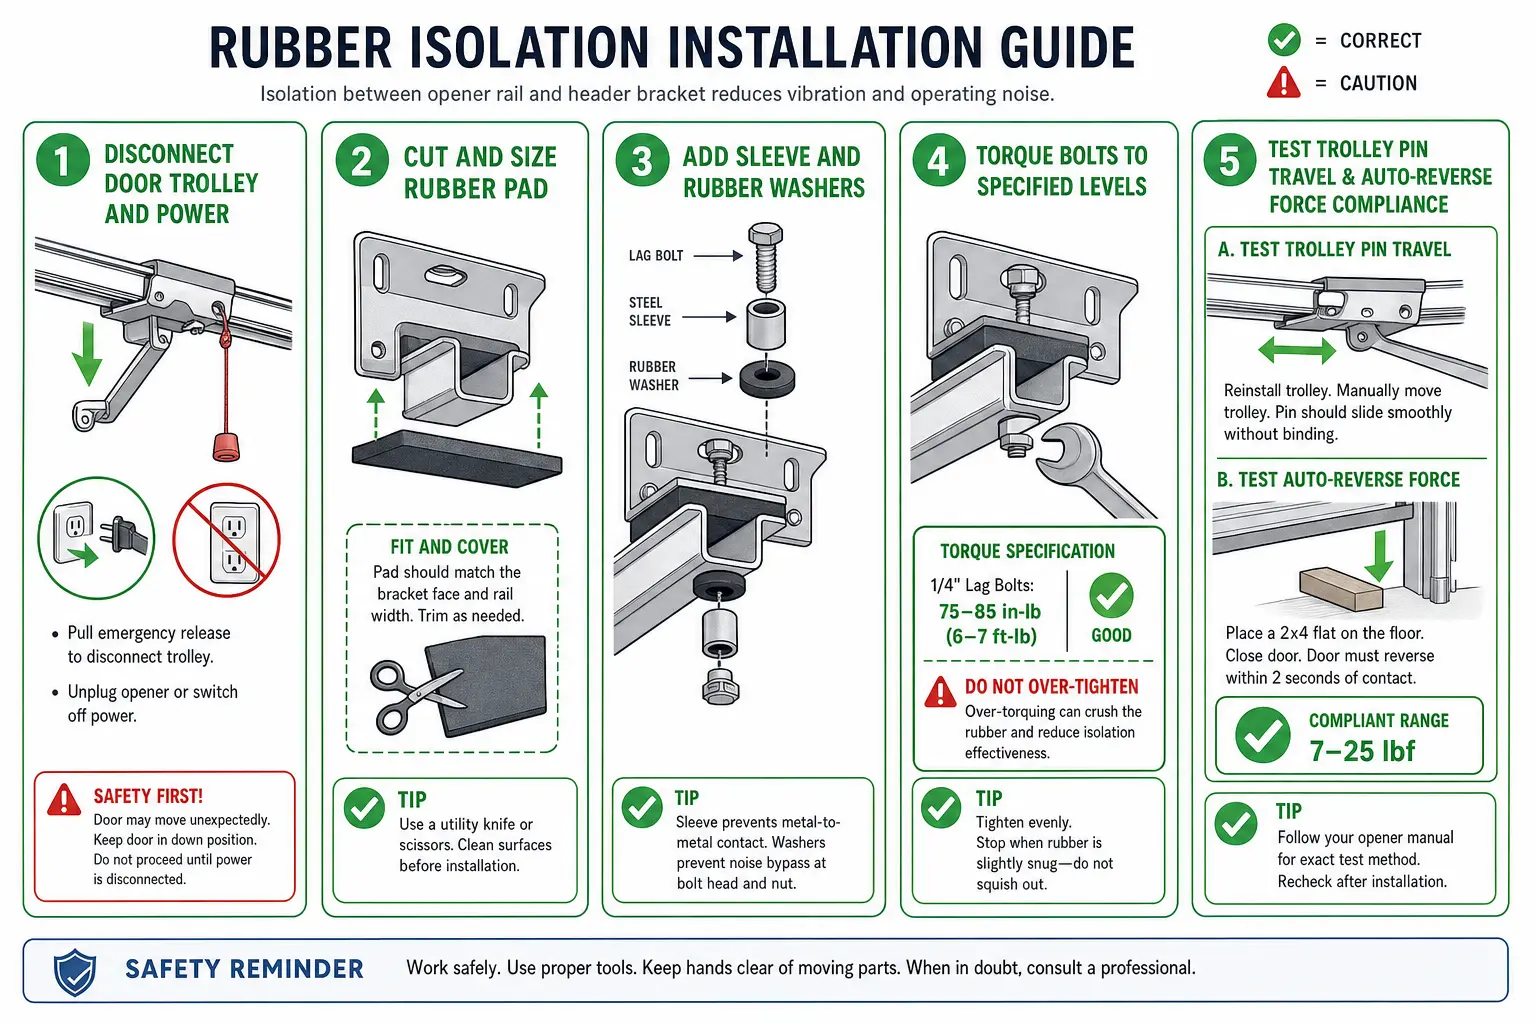
- Unload System Tension: Disconnect the trolley arm and disconnect electrical power. Review technical advice on how to open a garage door opener safely before relieving structural rail connections.
- Fabricate the Isolation Pad: Cut a 60A–70A EPDM rubber sheet so it extends roughly 1/4″ beyond the header bracket footprint, eliminating direct steel contact with the timber.
- Isolate the Fasteners: Insert neoprene shoulder washers or rubber grommet sleeves into the bracket holes. Fastener shanks must not contact the steel bracket walls.
- Torque to Specification: Tighten 5/16″ lag bolts until the elastomer compresses by approximately 15% to 20%. Over-tightening crushes the material and restores hard vibration pathways.
- Calibrate and Test: Reattach the rail clevis pin. Test trolley travel manually to verify smooth movement, then test the UL 325 auto-reverse force limits.
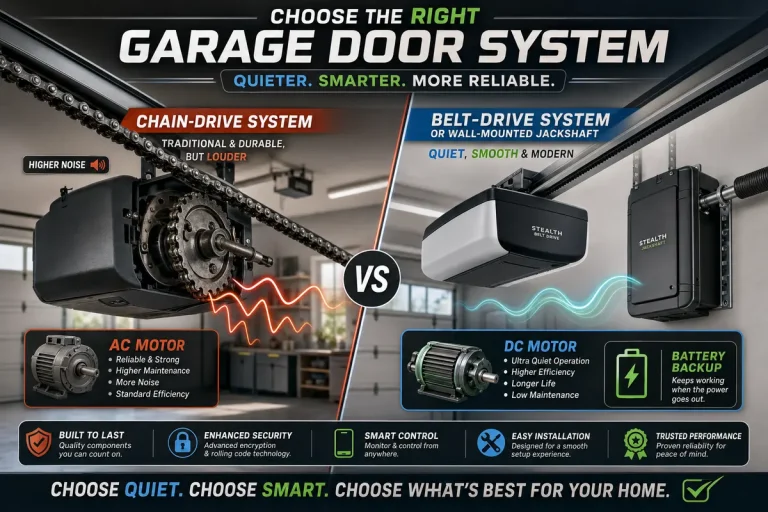
If an older opener continues to generate severe mechanical vibration despite isolated mounting points, a complete garage door motor replacement using modern belt-drive technology offers the most effective long-term sound mitigation.
Frequently Asked Questions
Will adding rubber isolation cause the rail to bind or flex excessively?
No, provided you use the proper material hardness. Selecting a 60A–70A Shore A durometer EPDM or Neoprene isolator provides sufficient shear resistance to prevent rail deflection during operation while attenuating micro-vibrations. Avoid soft materials under 50A durometer, which allow trolley sway and cause clevis pin binding.
Why shouldn’t I run standard lag bolts straight through a rubber pad into the header?
Running metal lag bolts directly through an isolated bracket creates an acoustic bridge. Vibrations travel through the steel bracket, into the bolt shank, and directly into the home framing timber. To break this pathway, you must use rubber shoulder bushings or dedicated male-female vibration isolator studs.
What is the optimal rubber durometer for garage opener rail isolation?
The optimal hardness rating is 60A to 70A Shore A durometer. This range handles continuous dynamic tensile loads of 30 to 75 lbs without crushing over time, providing optimal acoustic attenuation across garage temperature swings.
You May Also Like