Measuring a Torsion Spring: Wire Size, Length, and Inside Diameter
Published: Oct 8, 2026
When facing a broken garage door spring, obtaining precise dimensions is the difference between a smooth-running system and a dangerous engineering failure. An incorrect measurement can result in an unbalanced garage door, causing the opener to burn out, cables to slip, or the door to fall unexpectedly.
Because torsion springs hold immense kinetic energy, safety is the primary priority. Never attempt to adjust, loosen, or measure a wound spring without releasing its tension first using solid steel winding bars. Standard screwdrivers or rebar must never be used, as they lack the structural integrity required to control this force safely. Having the right garage door tools for technicians makes all the difference in executing these measurements accurately.
Measuring Torsion Spring Wire Size: The 10/20-Coil Compressive Method
Many DIYers mistakenly reach for a digital caliper to measure the thickness of a single coil. However, rust, paint, and environmental corrosion can add up to 0.010 inches of thickness to the wire. This minor skew is enough to misidentify a wire gauge, resulting in a 10% torque deficit that ruins your door balance.
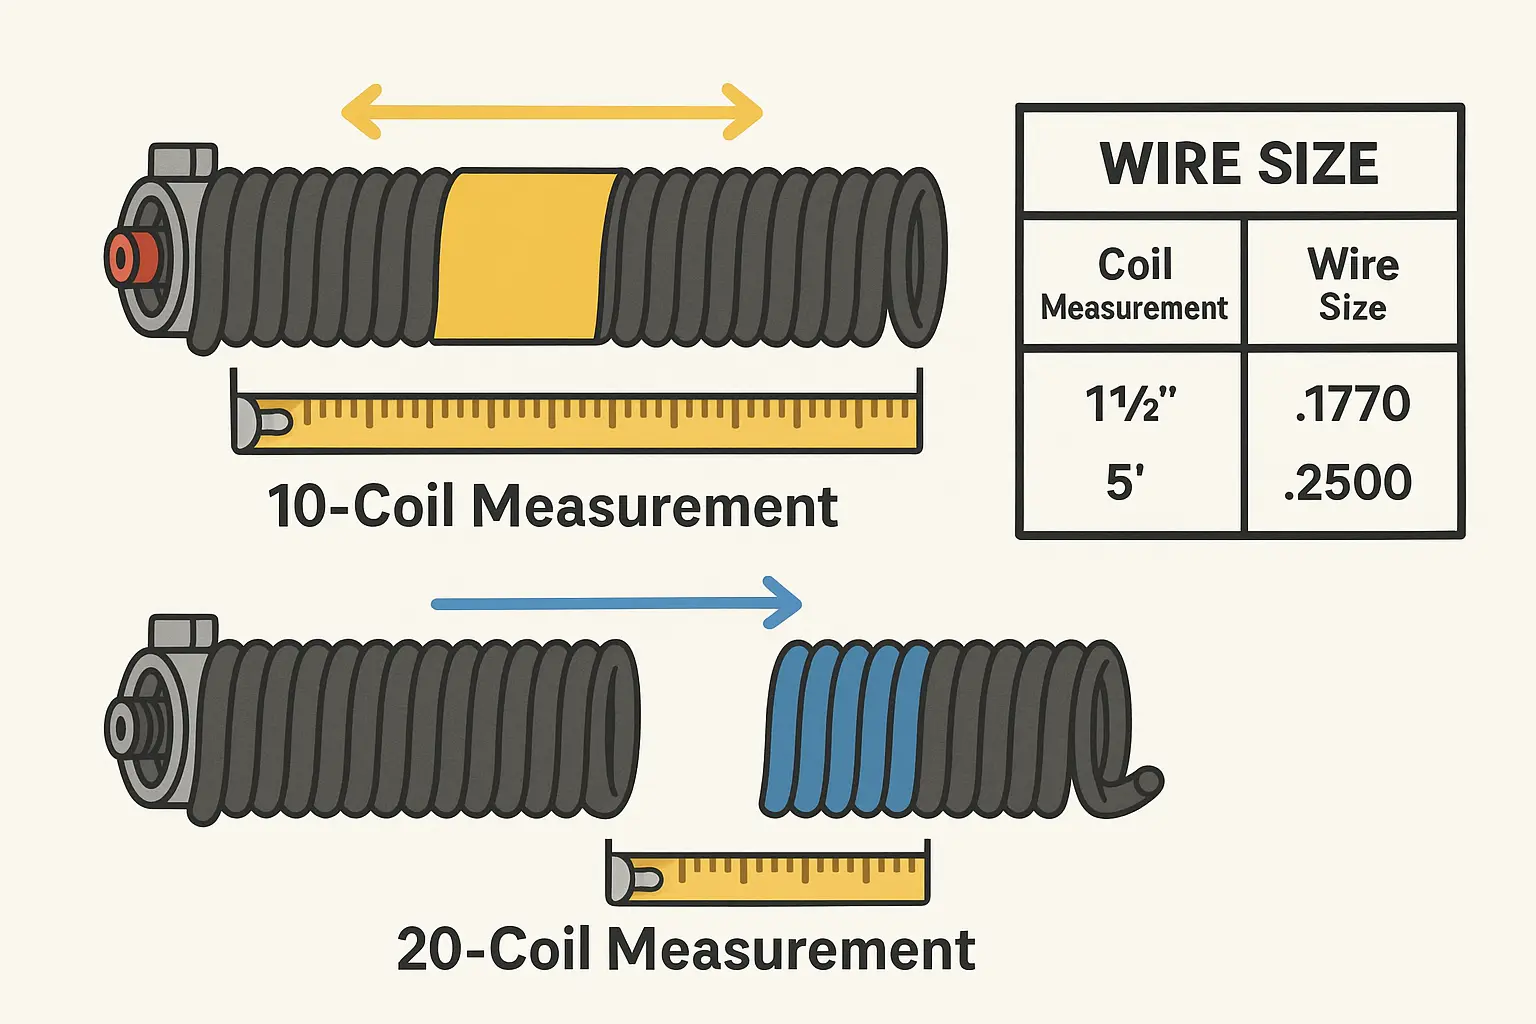
To bypass this error, professionals use the DASMA-approved 10/20-coil compressive method. This technique requires measuring the length of 10 and 20 consecutive compressed coils.
- Locate an oily, clean section of the spring.
- Insert a piece of paper or a small scrap into the gap between two coils to mark your starting point.
- Count exactly 10 coils, insert another marker, and measure the distance between them using a tape measure.
- Repeat the process for 20 coils to cross-reference and confirm your calculation.
Additionally, always apply the 30% Mixed-Wire Rule: historical service data indicates that roughly 30% of multi-spring garage doors utilize mismatched wire sizes (such as a .243 wire on the left and a .250 wire on the right) because installers optimized for warehouse inventory. You must measure both springs independently.
| 10-Coil Measurement | 20-Coil Measurement | Resulting Wire Size (Inches) | DASMA Color Code |
|---|---|---|---|
| 1-3/4″ | 3-1/2″ | .177 | Yellow |
| 1-7/8″ | 3-3/4″ | .187 | White |
| 2-1/16″ | 4-1/8″ | .207 | Yellow |
| 2-3/16″ | 4-3/8″ | .218 | White |
| 2-1/4″ | 4-1/5″ | .225 | Red |
| 2-7/16″ | 4-7/8″ | .243 | Green |
| 2-1/2″ | 5″ | .250 | Gold |
| 2-5/8″ | 5-1/4″ | .262 | Blue |
| 2-3/4″ | 5-1/2″ | .273 | Orange |
Measuring the Inside Diameter
The inside diameter (ID) determines how the spring sits on the torsion shaft. Most residential garage doors use an inside diameter of 1-3/4 inches or 2 inches.
To find this measurement:
- Check the cast aluminum winding cones or stationary center cones at the ends of your spring. Manufacturers stamp the inside diameter directly into the casting (e.g., “175” or “P175″ for 1-3/4”, and “200” or “P200″ for 2”).
- If the markings are worn or rusted away, measure across the inside opening of the spring coil with a caliper or tape measure. Do not include the wire thickness in this measurement.
Keep in mind that certain OEM brands feature non-standard IDs. For instance, older Raynor systems often feature a 2-1/4 inch ID, while Crawford systems may utilize a 1-19/32 inch ID. Knowing these specifications helps clarify how does a garage door spring work to lift your specific door.
Measuring Overall Length: Broken vs. Wound Springs
To calculate the physical length of the spring, you must measure it in its relaxed state.
For Broken Springs
Do not attempt to measure the gap where the break occurred. Instead, loosen the set screws on the winding cone, slide the two broken halves together along the shaft until the broken coils touch, and measure the overall length from the first active coil to the last. Do not include the cast-iron cones in this measurement—measure only the steel wire coils.
For Intact Wound Springs
A spring under tension expands due to helical growth. Torsion springs grow by exactly one wire diameter for every full turn of tension applied. For a standard 7-foot door requiring 7.5 winding turns, the spring will be 1.5 to 2 inches longer when wound than when relaxed. You must subtract this growth from your measurement to determine the true purchase length. If you suspect deterioration, check for signs your garage door spring is broken before taking measurements.
Identifying Wind Direction: Left Hand vs. Right Hand Wound
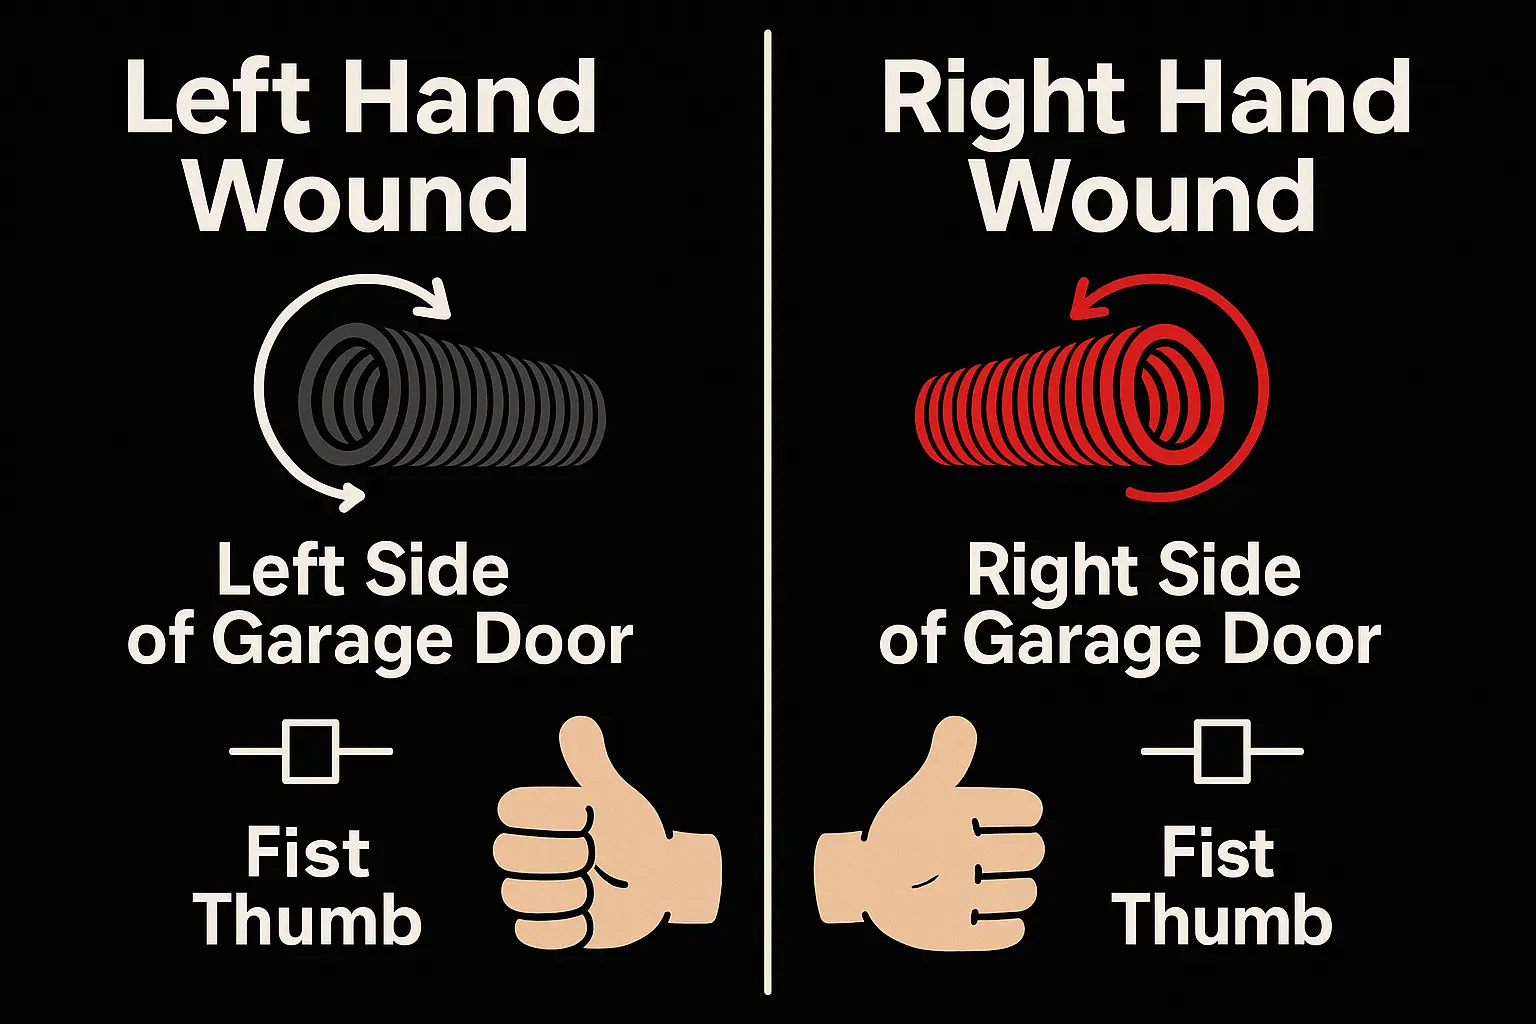
Determining wind direction is one of the most common points of confusion during a garage door spring replacement. Torsion springs are wound in opposite directions to balance the lateral forces on the shaft.
DASMA standard TDS-171 color codes the winding and stationary cones to simplify this process:
- Red Cones/Drums denote Right-Hand Wound (RHW) springs. These are typically installed on the Left Side of the center anchor bracket (looking from inside the garage out).
- Black Cones/Drums denote Left-Hand Wound (LHW) springs. These are typically installed on the Right Side of the center anchor bracket.
If you cannot see the color indicator, look at the end of the wire coil:
- The Fist Thumb Rule: Make a fist with either hand, pointing your thumb straight out along the torsion shaft toward the center bracket. If the coils curl in the direction of your fingers on your left hand, it is Left Hand Wound. If they curl in the direction of your right hand fingers, it is Right Hand Wound.
Sizing Upgrades: How to Convert to High-Cycle Springs
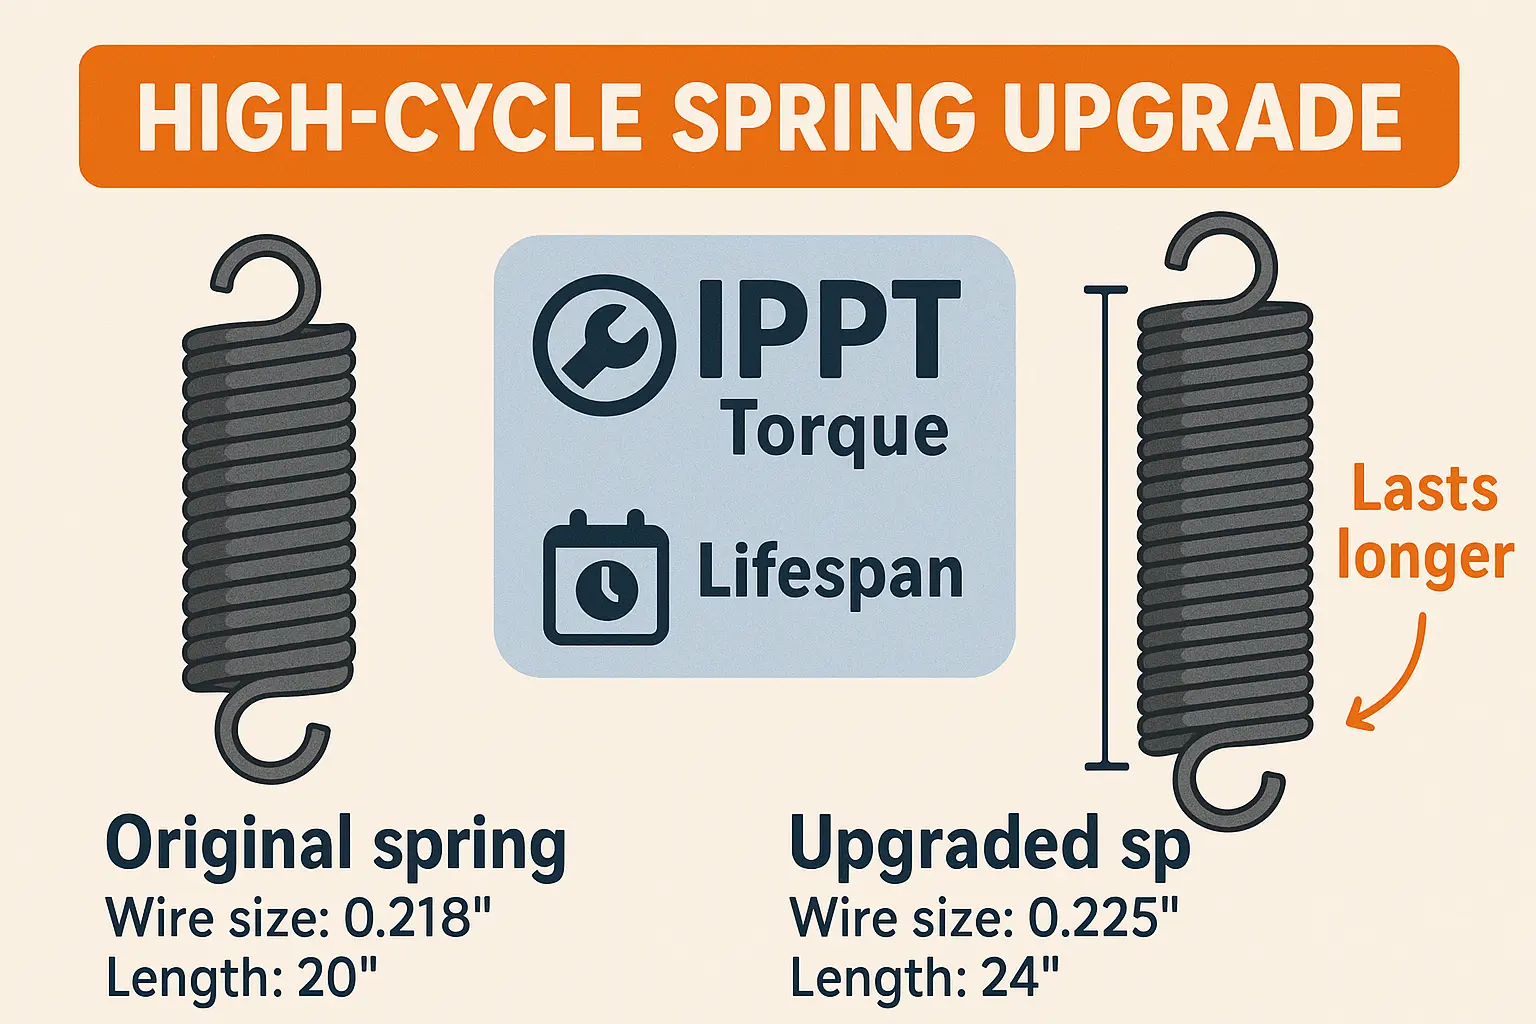
Standard residential springs are engineered for a standard garage door lifespan of 10,000 operational cycles. However, you can significantly increase this lifespan by upgrading to a “high-cycle” spring system.
To double or triple your spring’s lifespan (e.g., from 10,000 to 30,000 cycles), you must maintain the exact same Inch-Pounds Per Turn (IPPT) while increasing both the wire diameter and the overall spring length. For example, a standard 0.218″ x 2″ x 20″ spring can be converted into a longer-lasting 0.225″ x 2″ x 24″ spring. This thicker wire combined with a longer body distributes the torsional fatigue over more steel, drastically delaying material wear. Ongoing garage door spring maintenance like lubrication will ensure your new high-cycle springs achieve their full longevity.
The Clopay EZ-Set Exception
If you own a proprietary Clopay EZ-Set system, the coils have factory-engineered gaps between them. This spacing makes the standard 10/20-coil measurement method impossible because the tape measure will include those gaps. To measure an EZ-Set spring correctly, you must use a locking clamp to gently compress a section of 10 coils so they touch, and then measure that compressed segment.
Frequently Asked Questions
Can I convert my garage door from extension springs to torsion springs?
Yes, you can convert extension spring to torsion setups. Torsion springs provide a smoother, more reliable operation and distribute the door’s weight more evenly, reducing wear on other components like cables. If you notice a frayed garage door cable, it is highly recommended to perform a complete system overhaul.
What happens if I install a torsion spring on the wrong side?
Reversing the left-hand and right-hand wound springs will cause the spring to unwind rather than tension when the door opens. This can lead to the door free-falling, damaging your opener, or causing severe structural damage and injury.
How do I know when it is time for a garage door spring replacement?
Typical warning signs include a visibly broken spring gap, a squealing or straining opener, a heavy-feeling door, or the door lifting unevenly. Most standard torsion springs last between 7 to 10 years, or roughly 10,000 cycles, before metal fatigue causes them to snap.
You May Also Like