





How to Install Garage Door Floor Bolts in Concrete
Published: Aug 26, 2026
You close your garage door with the satisfying click of the automatic opener. It’s locked, right? For most of us, that’s the end of the thought. But what many homeowners don’t realize is that most automatic openers can be bypassed by determined intruders in a matter of seconds. They offer convenience, but not true, physical security.
This is where a simple, time-tested piece of hardware comes in: the garage door floor bolt. It’s a purely mechanical lock that physically anchors your door to the concrete foundation of your garage, creating a formidable barrier. Installing one isn’t just an upgrade; it’s a fundamental shift in how you protect your home.
But there’s a catch: drilling into concrete is a different game than working with wood. It requires specific tools and techniques to get right. This guide is built on one core idea: Concrete is Different. We’ll walk you through every step, demystifying the process and giving you the confidence to add a crucial layer of security to your home.
Understanding the Mechanics of a Floor Bolt
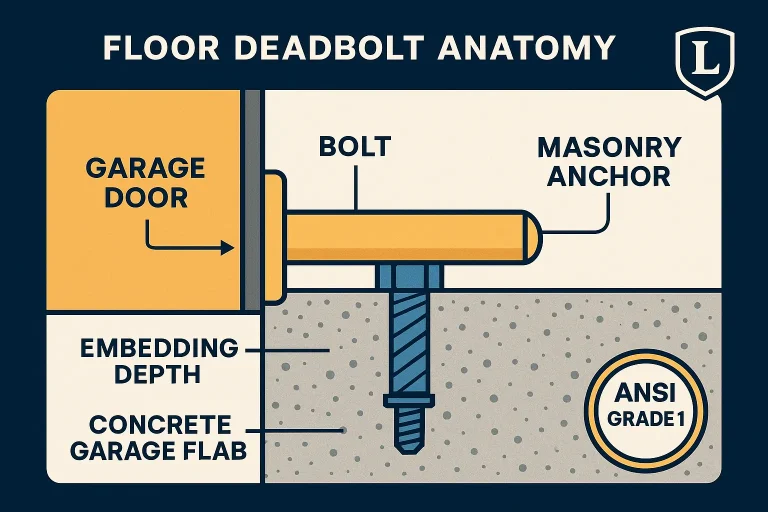
Before we get our hands dirty, let’s clarify what we’re working with. A garage door floor bolt, or deadbolt, is a lock mounted on the interior of your garage door. When engaged, a thick metal bolt extends down from the door and into a hole drilled in your concrete floor, preventing the door from being lifted or pried open.
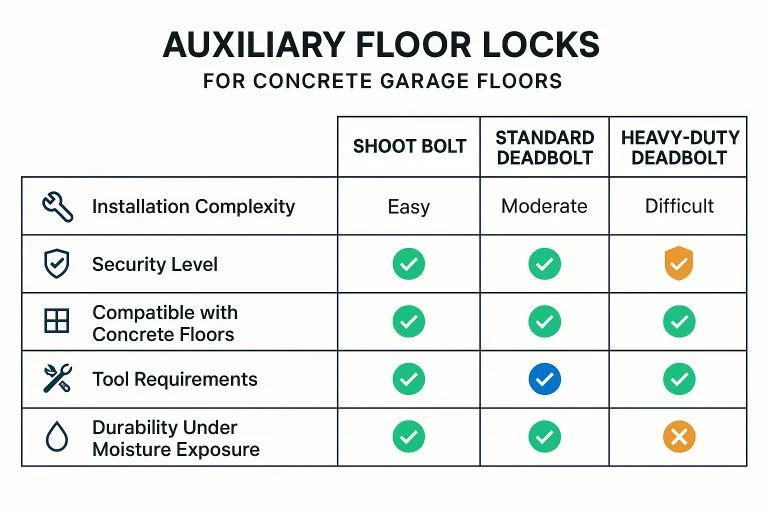
Unlike the digital convenience of smart garage door security features, which can be vulnerable to hacking, a floor bolt offers brute-force resistance. There are a few common types, each with its own merits:
- Slide Bolts (Shoot Bolts): These are the most common. They feature a handle that you manually slide to drive a bolt into the floor. They are simple, reliable, and effective.
- Keyed Deadbolts: These function more like a traditional door lock, requiring a key to throw the bolt. They offer added security if you’re concerned about someone engaging the lock from inside.
- Spring-Loaded Bolts: These often have a step-on or pull-cord mechanism to retract the bolt, making them easier to operate without bending over.
Choosing the right one often comes down to balancing ease of use with your specific security needs.
The Complete Tool & Materials Checklist
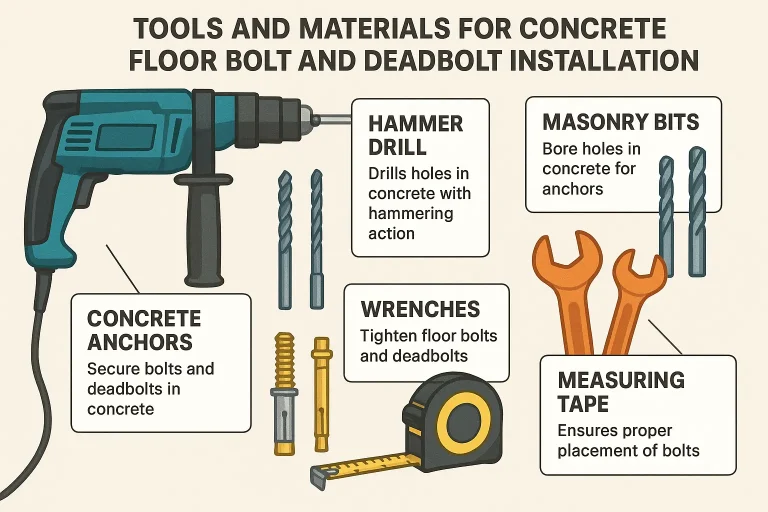
Successful installation hinges on having the right tools. Because we’re working with concrete, a standard power drill just won’t cut it. Here’s exactly what you need and, more importantly, why you need it.
Essential Tools:
- Hammer Drill: This is the star of the show. Unlike a regular drill that only spins, a hammer drill spins and punches forward and backward in rapid succession. This hammering action pulverizes the concrete, allowing the bit to bore a clean hole. Using a regular drill will, at best, be frustratingly slow and, at worst, burn out your drill’s motor.
- Masonry Drill Bits: These bits are designed for concrete, with a hardened carbide tip that can withstand the abrasive material. Ensure you have the correct sizes—one for the anchor pilot hole in the concrete and potentially a different one for mounting screws on the door.
- Shop-Vac or Canned Air: For blowing concrete dust out of the drilled hole. A clean hole is essential for a secure anchor.
- Wrench or Socket Set:: To tighten the anchor and mounting bolts.
- Pencil or Marker: For marking your drill spots.
- Safety Gear: Always wear safety glasses and a dust mask. Drilling concrete kicks up fine silica dust, which is harmful to inhale.
- Garage Door Floor Bolt Kit: This should include the lock mechanism, bolts, and sometimes the floor strike plate or sleeve.
- Concrete Anchors (e.g., Sleeve Anchors): This is the critical piece connecting your lock to the floor. The lock kit may not include these. A sleeve anchor is a metal tube that expands inside the concrete as you tighten the bolt, creating an incredibly strong friction hold.
Essential Materials:
The Step-by-Step Installation Guide
While watching a video of the process is invaluable, having a detailed textual guide to reference is just as important. Follow these steps methodically for a secure, professional-grade installation.
Step 1: Position and Mark the Lock
First, decide where to place your lock. Most people install one on each side of the garage door, about 6-12 inches from the edge.
- Close the Garage Door: Ensure the door is fully closed and sealed against the floor.
- Position the Lock: Hold the lock assembly against the inside of the door at your desired height. Make sure the bolt mechanism is low enough to clear the floor when retracted but has plenty of travel to engage fully.
- Mark the Door: With the lock in place, use your pencil to mark the mounting holes on the garage door.
- Mark the Floor: Extend the bolt so it touches the concrete floor. Mark the exact center of where the bolt makes contact. This spot is your target for the anchor hole.
Pro Tip: Double-check that your floor marking doesn’t interfere with the door’s weather stripping or the path of the rollers. Proper alignment with the vertical tracks is key, similar to a new garage door track installation.
Step 2: Drill the Door and Mount the Lock
- Drill Pilot Holes: Using a standard drill bit appropriate for your door’s material (metal or wood), drill pilot holes on the marks you made on the door.
- Mount the Lock: Secure the lock assembly to the door using the provided screws or bolts. Don’t overtighten just yet.
Step 3: Drill the Concrete (The Right Way)
This is the most critical step.
- Select Your Bit: Choose a masonry bit that matches the diameter of your concrete anchor sleeve.
- Set Your Depth: The hole needs to be slightly deeper than the length of the anchor. A good rule of thumb is to wrap a piece of painter’s tape around the drill bit to mark the required depth.
- Drill the Hole: Place the tip of your masonry bit on the mark you made on the floor. Start the hammer drill slowly to create a small divot, which will prevent the bit from “walking.” Once the hole is started, increase the speed and apply firm, steady pressure. Let the tool do the work.
4. Clean the Hole: This is non-negotiable. Use a shop-vac or canned air to completely clear all dust and debris from the hole. Any remaining dust will prevent the anchor from expanding properly and compromise its strength.
Step 4: Install the Concrete Anchor and Plate
- Insert the Anchor: Tap the sleeve anchor into the cleaned hole until it is flush with the concrete surface.
- Position the Plate: Place the floor strike plate (the metal piece the bolt goes into) over the anchor hole.
- Secure the Plate: Insert the anchor bolt through the plate and into the sleeve. Tighten it with your wrench. As you tighten, you’ll feel the anchor expand and grip the concrete. It should be rock solid.
Step 5: Test and Final Adjustments
Engage the bolt. It should slide smoothly and securely into the floor plate. If it binds or is misaligned, loosen the mounting bolts on the door slightly, adjust the lock’s position, and retighten. Once you’re satisfied, fully tighten all bolts on the door and floor.
Troubleshooting and Maintenance
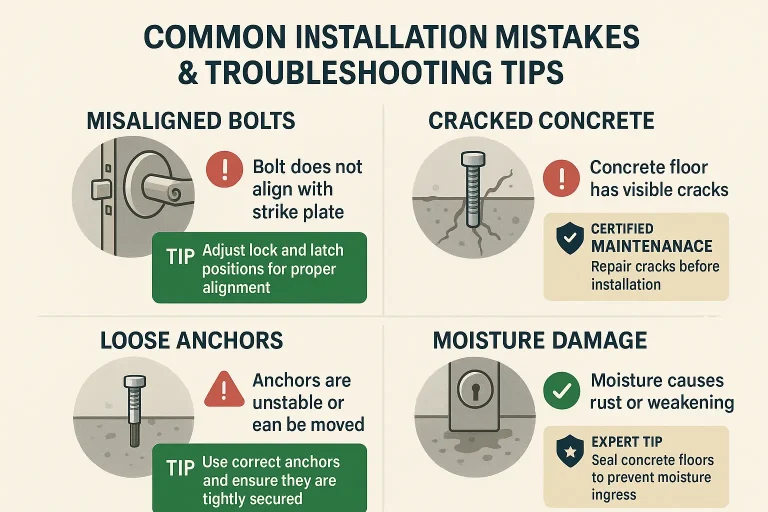
Even with careful planning, you can run into issues. Here are some common problems and how to solve them.
- Problem: The bolt is misaligned with the floor plate.
- Solution: Your initial markings were slightly off. Loosen the lock on the door, re-align it with the floor plate, and mark new holes on the door if necessary before re-tightening.
- Problem: The concrete cracked or chipped around the hole.
- Solution: This usually happens when you apply too much pressure too quickly or drill too close to an edge or expansion joint. For minor chipping, you can often proceed. For a significant crack, you may need to patch the concrete and re-drill in a more stable location.
- Problem: The floor anchor feels loose.
- Solution: The most likely culprit is dust in the hole. Remove the anchor, thoroughly clean the hole with a shop-vac, and re-insert it. If it’s still loose, the hole may be too large for the anchor. You may need to use a slightly larger anchor.
- Maintenance Tip: Once a year, clean out the floor hole and lightly lubricate the bolt mechanism to ensure smooth operation, especially in areas with high moisture.
Frequently Asked Questions (FAQ)
What is the best way to lock a garage door from the inside?
A floor-mounted deadbolt is the most secure method because it anchors the door to the immovable foundation of your home. Understanding the basics of how to lock a garage door properly involves both the opener and manual locks for maximum protection.
Can I do this myself, or should I hire a professional?
For a handy homeowner with the right tools (specifically a hammer drill), this is a very manageable DIY project. The process is similar in difficulty to other DIY tasks, and you may wonder, “can I install a garage door keypad on uneven surfaces?“. However, if you’re uncomfortable working with power tools or drilling into concrete, a professional can ensure the job is done quickly and correctly.
What do I do if my automatic opener stops working after installing the bolt?
This is a critical safety point: Always disengage the floor bolt before operating your automatic opener. Trying to open the door while it’s bolted to the floor can cause severe damage to the door panels, tracks, and opener motor. If this happens, you may need to perform some garage door opener troubleshooting or call a technician. By taking the time to install a robust floor bolt, you’re not just adding a lock; you’re investing in peace of mind. You’re creating a simple, powerful deterrent that hardens your home’s most vulnerable entry point.
You May Also Like
Best Garage Door Bottom Seal for Uneven Concrete Floors
That stubborn gap under your garage door is more than just an eyesore. It’s an open invitation for rainwater, chilly drafts, dust, and unwelcome pests. If your garage floor is sloped, cracked, or uneven, you know the…
Published Date: Jun 26, 2026
Why Your Garage Door Stops Opening When it Hits the Floor
It’s one of those uniquely frustrating moments. You hit the button, your garage door starts its familiar rumble, but instead of gliding all the way up, it stops short—maybe a few inches, maybe a few feet from the…
Published Date: May 1, 2026
How to Square and Level Garage Door Tracks on Uneven Garage Floors
That wedge-shaped gap under your garage door isn't just an eyesore—it's a puzzle. You’ve probably tried everything, nudging the tracks left and right, hoping to close it. But the more you adjust, the worse the door…
Published Date: Apr 30, 2026