





Smart Upgrades for Heavy And Multi-Door Openers: DIY vs Pro
Published: Jul 27, 2026
You’ve seen the ads and read the articles. A smart garage door opener seems like the perfect weekend project—a simple upgrade for modern convenience. You envision opening your garage from your phone, getting delivery notifications, and never again wondering if you left the door open.
But what those simple “how-to” guides often leave out is a critical detail: they’re written for the standard, single, lightweight garage door.
If your home features a beautiful, heavy wooden door, an oversized custom door, or a multi-door setup, that “simple” DIY project enters a different league of complexity and risk. Attempting to apply a one-size-fits-all smart solution to a non-standard system can lead to a straining motor, a failed upgrade, or even a dangerous malfunction. Before you add that smart opener to your online cart, let’s talk about the physics and safety that most guides ignore.
The Opener Doesn't Lift, It Guides
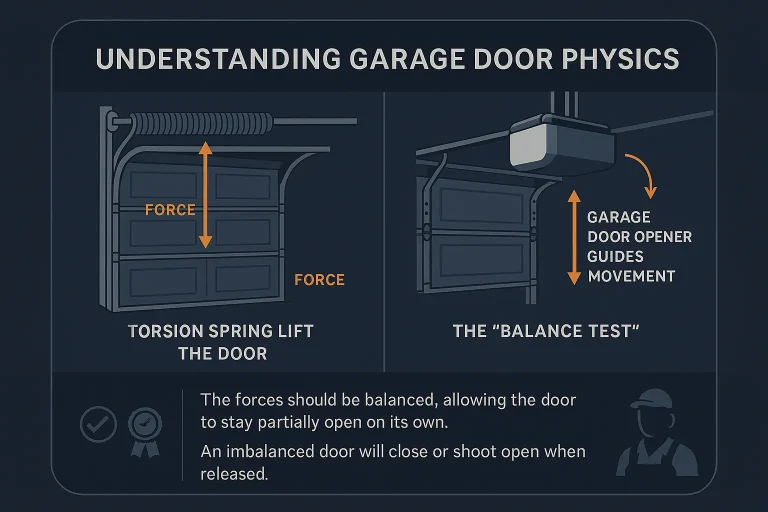
Here’s the single most important “aha moment” in understanding your garage door: the opener does not do the heavy lifting. That monumental task belongs to a set of tightly wound torsion or extension springs. These springs are calibrated to perfectly counterbalance the weight of your door.
When everything is balanced, your door is essentially weightless. The opener only needs to provide a little push and pull to guide it along the tracks.
This is why the very first step in any opener project—smart or otherwise—isn’t about wiring or Wi-Fi. It’s about safety and mechanics.
It’s the Critical Balance Test.
How to Safely Test Your Garage Door’s Balance:
1. Close the Garage Door: Make sure the door is fully shut.
2. Disconnect the Opener: Pull the red emergency release cord. This disengages the motor, allowing you to operate the door manually.
3. Lift the Door Manually: Raise the door by hand to about waist height. It should feel manageable, not incredibly heavy.
4. Let Go Carefully: A perfectly balanced door will stay in place. It might drift down slightly, but it shouldn’t slam shut or fly open. If it does either, the springs are not properly calibrated, and you have a serious safety issue that a new opener will only make worse.
A door that fails this test puts immense strain on an opener motor, leading to stripped gears and burnout—symptoms many people mistake for garage motor problems when the real culprit is poor balance. An overworked opener on a heavy, unbalanced door isn’t just an inconvenience; it’s a dangerous failure waiting to happen.
Sizing Up Your Situation: Standard vs. Heavy-Duty vs. Multi-Door
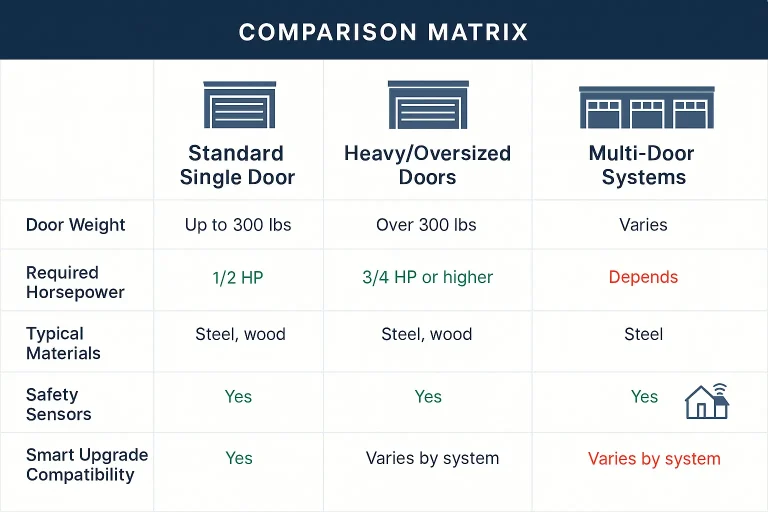
Once you’ve confirmed your door is balanced, the next step is to understand the unique demands of your specific setup. Not all garage doors are created equal, and the right approach to a smart upgrade depends entirely on your situation.
Heavy & Oversized Doors: More Than Just Horsepower
A solid wood, carriage house, or full-view glass garage door can easily weigh over 400 pounds, compared to the 150 pounds of a standard steel door. This extra weight puts exponential stress on every component.
- Torque, Not Just Horsepower: Manufacturers often advertise high horsepower (HP), but for heavy doors, the critical factor is torque—the rotational force needed to get the door moving. A standard residential opener may have the HP but lack the industrial-grade gears and chassis to handle the sustained torque required, leading to premature failure.
- Commercial-Grade Components: Heavy-duty systems often require a different class of opener altogether. It’s crucial to understand what is a duty cycle and whether your door’s weight and usage patterns necessitate a commercial-grade unit, even in a residential setting. These openers are built with solid steel rails and powerful DC motors designed for this exact purpose.
- Safety Sensor Calibration: Heavier doors carry more momentum. The safety sensors and auto-reverse mechanisms must be precisely calibrated to account for this, a nuance often missed in a standard DIY installation.
The Two-Door Challenge: Syncing and Safety
Managing a multi-door garage adds a layer of technical complexity. While it might seem like you can just install two separate smart openers, you can run into issues with:
- Wi-Fi Interference: Two smart devices operating close together can sometimes interfere with each other or struggle to maintain a stable connection to your home’s router, leading to unreliable performance.
- Power and Wiring: Ensuring both units are properly wired and powered without overloading a circuit requires careful planning.
- User Experience: Juggling two different apps or trying to sync them with a smart home system can be clunky. A seamless experience often requires a more integrated solution and proper garage door keypad programming to control everything from one place.
The DIY vs. Professional Decision Framework
So, how do you decide? While many wonder, “are garage door openers easy to install,” the better question is, “Is it safe and appropriate for my specific door?” Use this framework to make an informed decision.
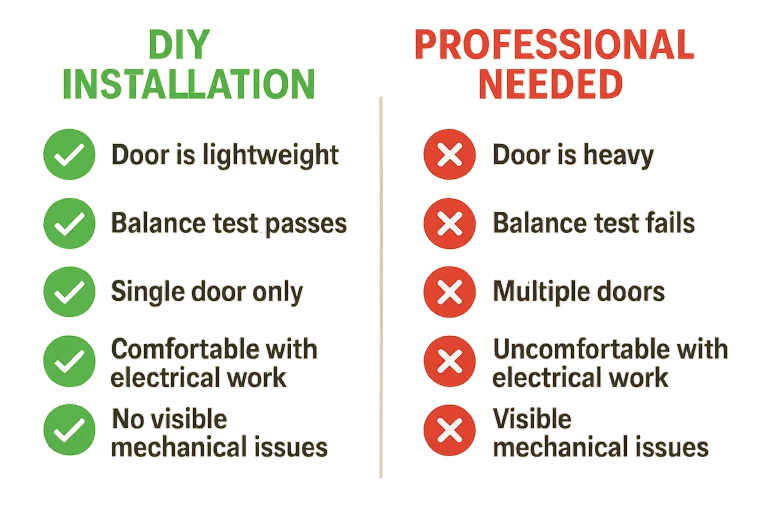
Green Flags for DIY:
- Your Door is Standard: You have a single, sectional steel door that is 10-12 feet wide or less.
- Your Door Passed the Balance Test: It hangs suspended at waist height without assistance.
- You’re Comfortable with the Basics: You have experience with basic mechanical and electrical projects and have all the necessary tools.
- You’re Following a Guide: You plan to follow a detailed smart garage door opener installation guide specific to your model.
Red Flags – Call a Pro Immediately:
- Your Door FAILED the Balance Test: This is a non-negotiable stop sign. The spring system requires professional adjustment or repair before any opener work can begin.
- Your Door is Heavy or Oversized: Any solid wood, custom, glass-paneled, or exceptionally wide door needs a professional assessment to ensure the opener is correctly matched and installed.
- You Have a Multi-Door System: A professional can recommend an integrated system, ensure a stable network connection, and configure everything to work seamlessly and safely.
- You See Visible Damage: Frayed cables, rusted or broken springs, or bent tracks are all signs that your system needs professional attention from trusted garage door repair services.
- You Have Low Headroom or an Unusual Track Configuration: These situations often require specialized installation kits and expertise.
Your Path Forward
Your smart garage journey should end with convenience and peace of mind, not frustration and risk. Based on your assessment, here are your next steps.
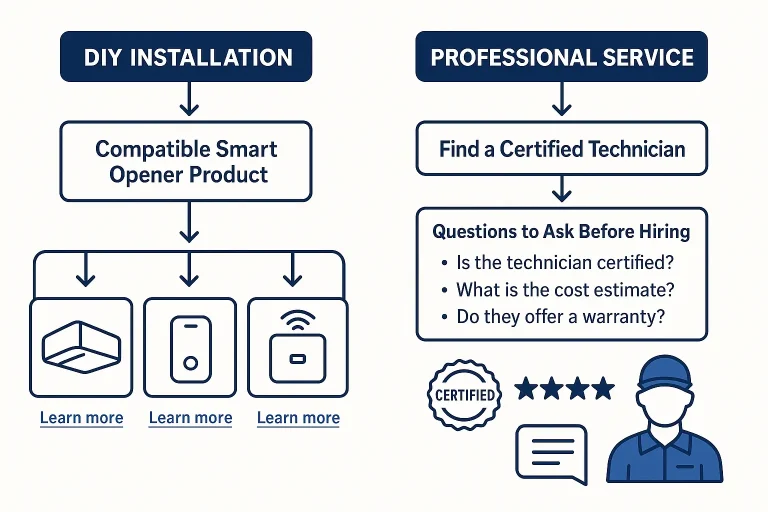
The DIY Route (For Standard, Balanced Doors)
If you’ve hit all the green flags, your project is likely feasible. Your focus should be on careful execution. Start by exploring a reliable garage motor installation guide and double-checking that the smart opener or adapter you choose is compatible with your existing unit. Always follow the manufacturer’s instructions to the letter.
The Professional Route (The Safest Choice for Complex Setups)
If you encountered any red flags, the smart choice is to call a certified technician. They won’t just install a device; they will perform a complete system evaluation. They will ensure your door is balanced, the springs are safe, and the selected smart opener has the right power and features for your heavy-duty or multi-door needs. A professional installation ensures safety, reliability, and protects the investment you’ve made in your home’s curb appeal.
Frequently Asked Questions (FAQ)
Can a garage door be too heavy for a garage door opener?
Absolutely. This is the core issue. When a door is too heavy for the spring system, it forces the opener to do the lifting, causing it to wear out rapidly. The solution isn’t a stronger opener; it’s rebalancing or replacing the springs to properly counteract the door’s weight.
Do heavy doors require different safety sensors?
While the sensors themselves may be the same, their placement and force-setting calibration are far more critical. A professional will test the auto-reverse function to ensure it can safely stop and reverse a door with high momentum. These systems are part of a group of essential overhead door safety devices that must function correctly.
What are the three main types of garage door openers?
The three primary types are Chain Drive (durable and budget-friendly but noisy), Belt Drive (quiet and smooth, ideal for attached garages), and Screw Drive (low maintenance with fast operation). For heavy doors, heavy-duty belt or chain drives with DC motors are often recommended for their superior torque.
Can I just add a smart adapter to my powerful, heavy-duty opener?
Sometimes, but compatibility is key. Some smart adapters are only designed for standard residential openers. It’s critical to verify that the adapter is rated to work with your opener’s motor and that it won’t interfere with any of its built-in safety features. A professional can best advise on compatible and safe pairings.
You May Also Like
Specifier’s Guide: Types of Commercial And Industrial Garage Door Systems
For any warehouse, logistics hub, or retail facility, the garage door is the single largest structural opening in the building envelope. This entry point directly influences energy expenses, logistical workflow, and…
Published Date: Jul 14, 2026
High-Cycle Commercial Doors for Distribution Centers and Warehouses
That sound you hear isn’t just a truck backing up to the dock. It’s the rhythm of your entire operation. Every time a loading dock door groans open and slowly closes, it’s a beat in that rhythm. But what if that beat…
Published Date: Jun 8, 2026
Shelter Integration with Overhead Loading Dock Doors
That gap between the truck and your loading dock wall? It might look small, but it’s a massive drain on your resources. Every day, it’s leaking heated or cooled air, inviting in rain and pests, and creating potential…
Published Date: Jun 4, 2026